 Adobe Community
- Home
- Lightroom Classic
- Discussions
- Re: How does Lightroom build previews when process...
- Re: How does Lightroom build previews when process...

Copy link to clipboard
Copied
Using LR Classic CC to try and sort out a problem my camera (Panasonic Lumix G80) has with the colour orange.It handles every other colour perfectly with the exception of shiny red which is almost right (just a slight purple tint on bright highlights).But oranges of a particular shade (I'm not sure which ones in particular,it seems a bit random) come out scarlet,vermilion or even almost red in some cases.I can of course correct this using the HSL sliders in Lightroom and have made a series of presets I just have to click on to correct it.
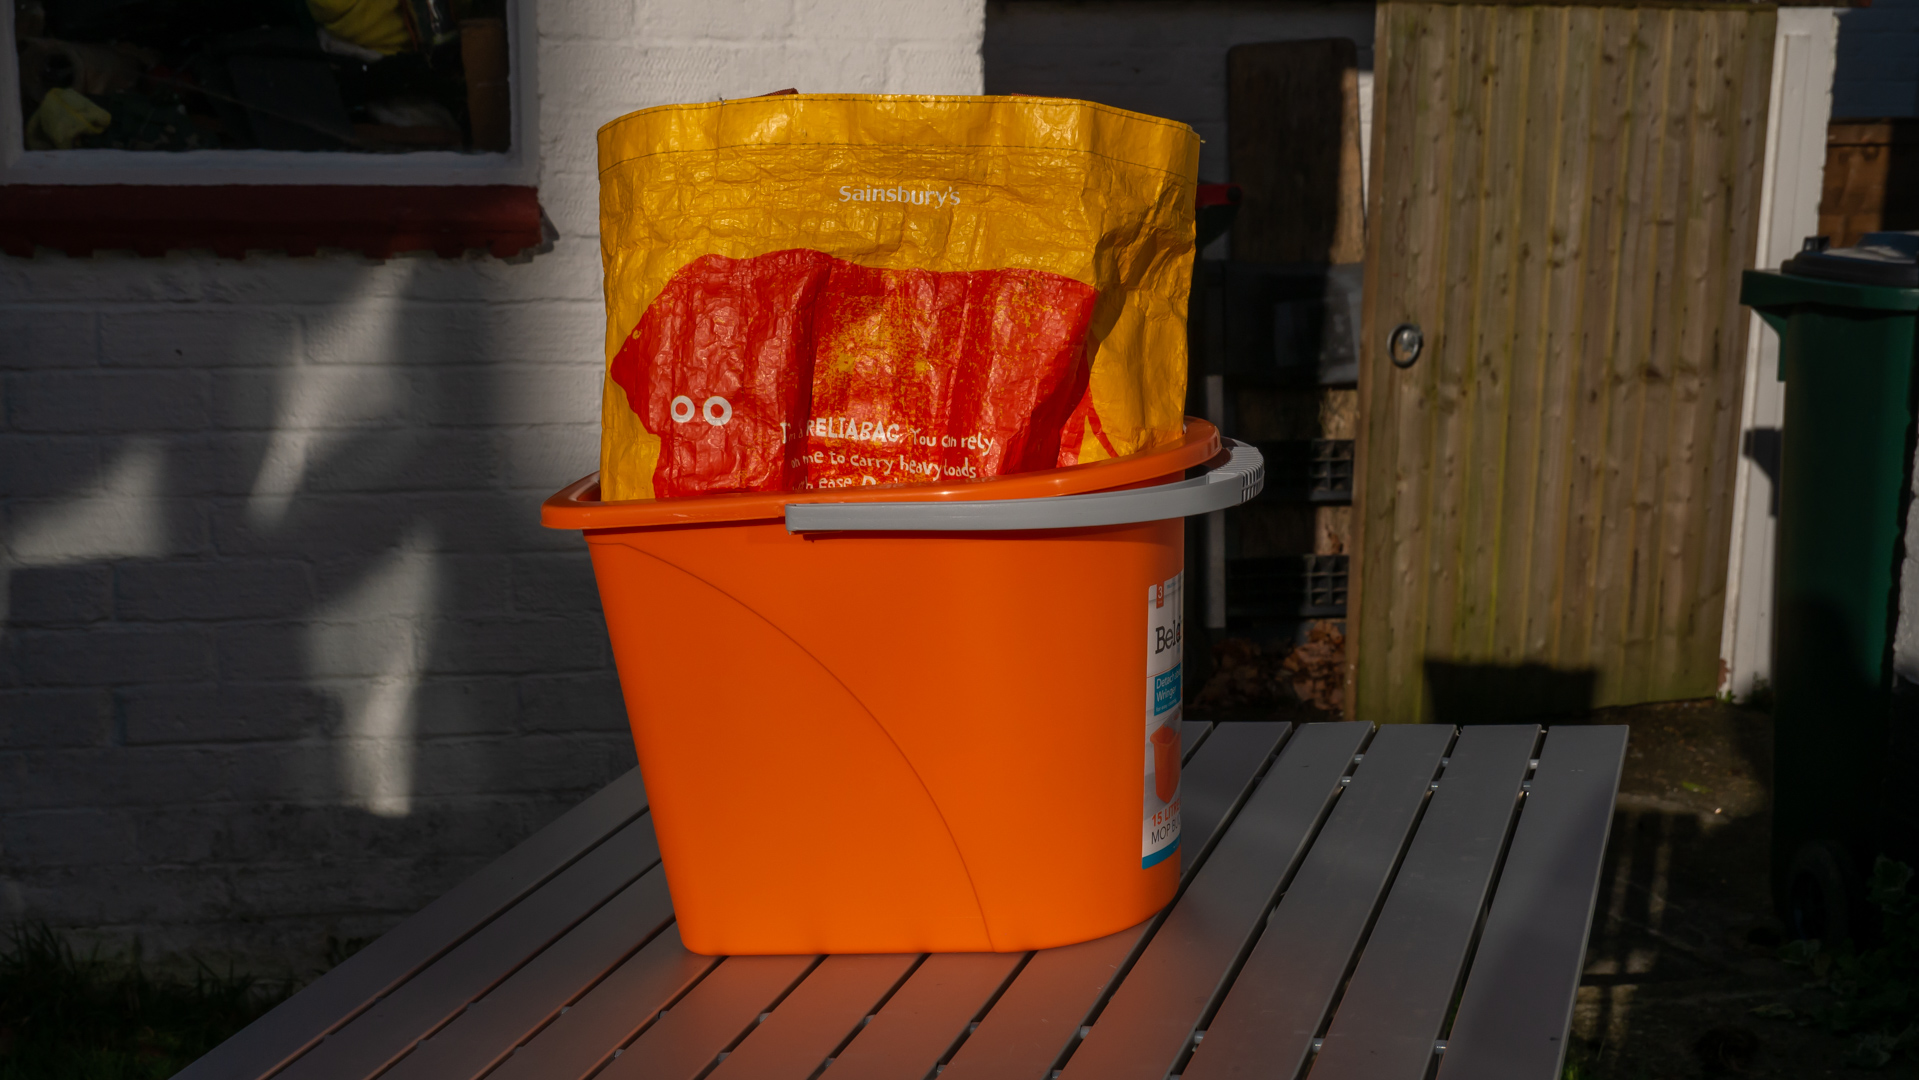
I'm trying to make a preset I can apply on import,so decided to take some test photos of an orange bucket I'd bought just for this task.
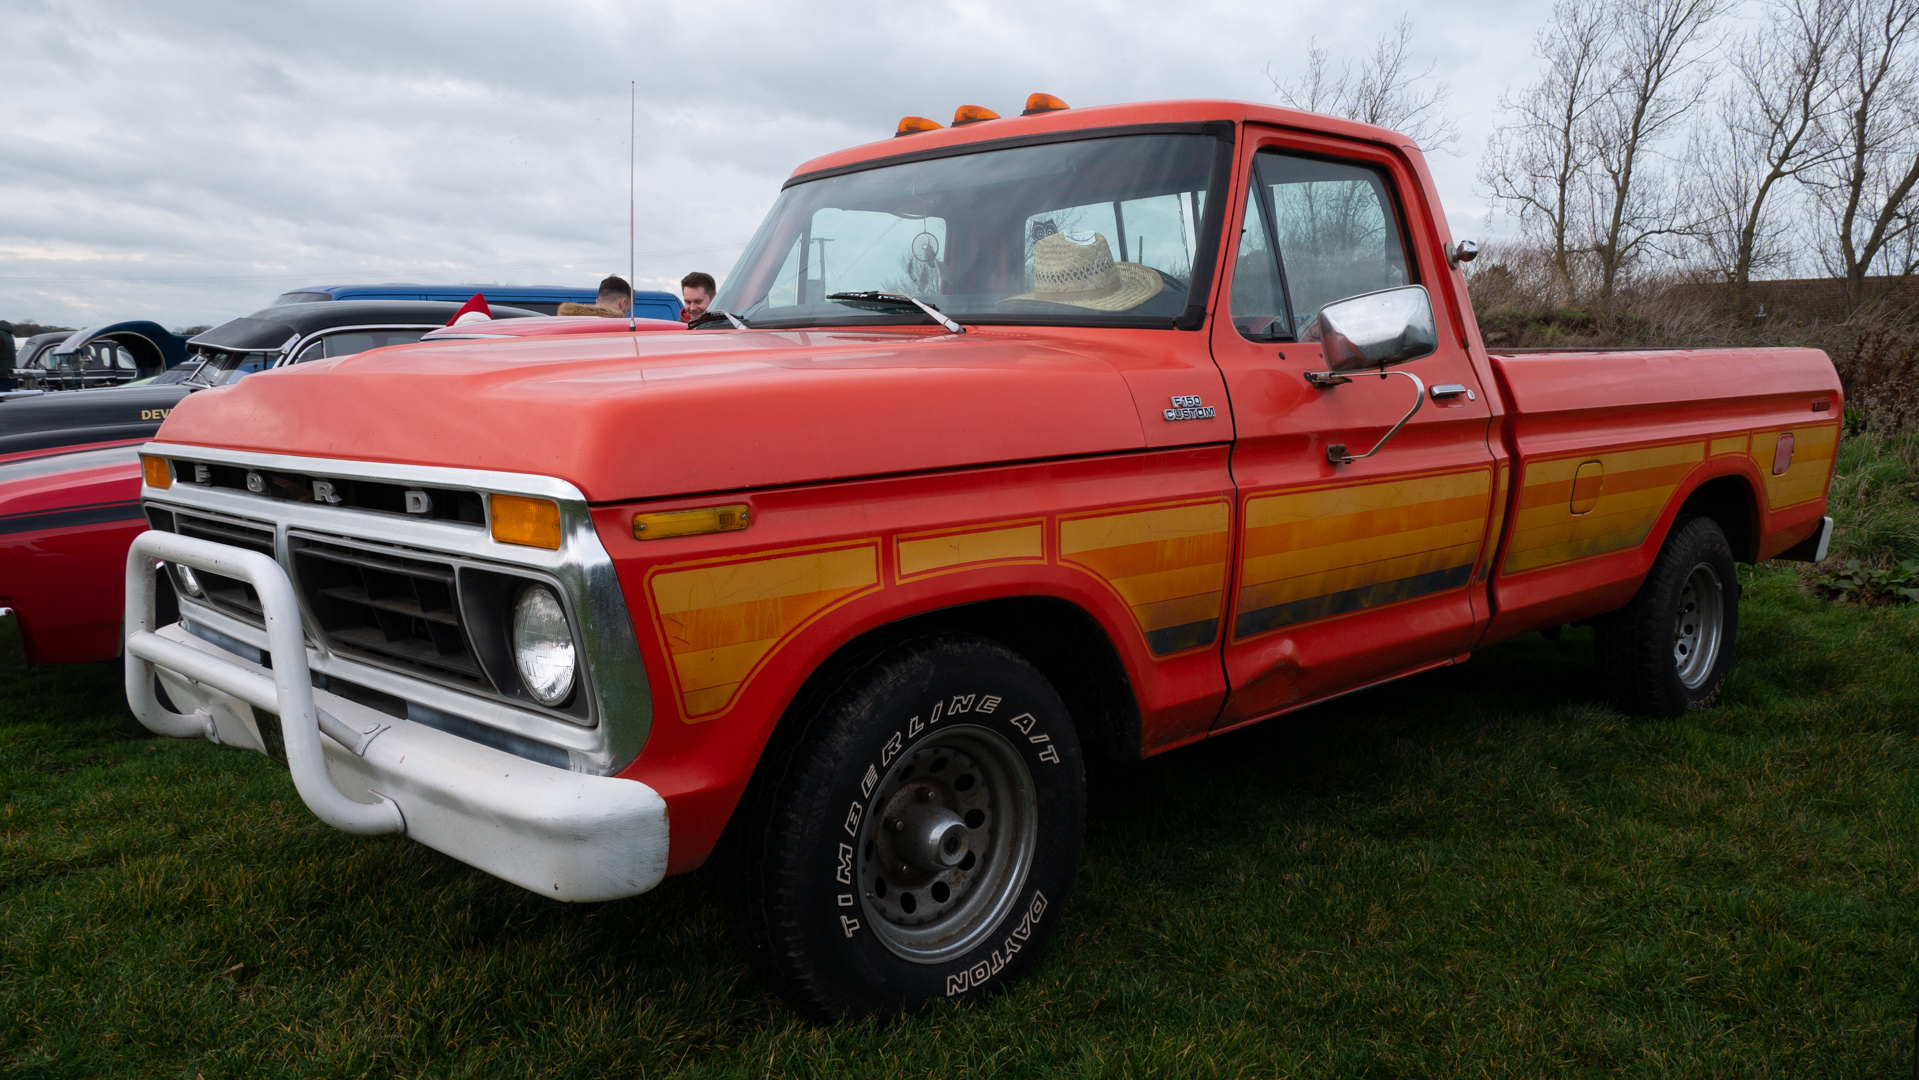
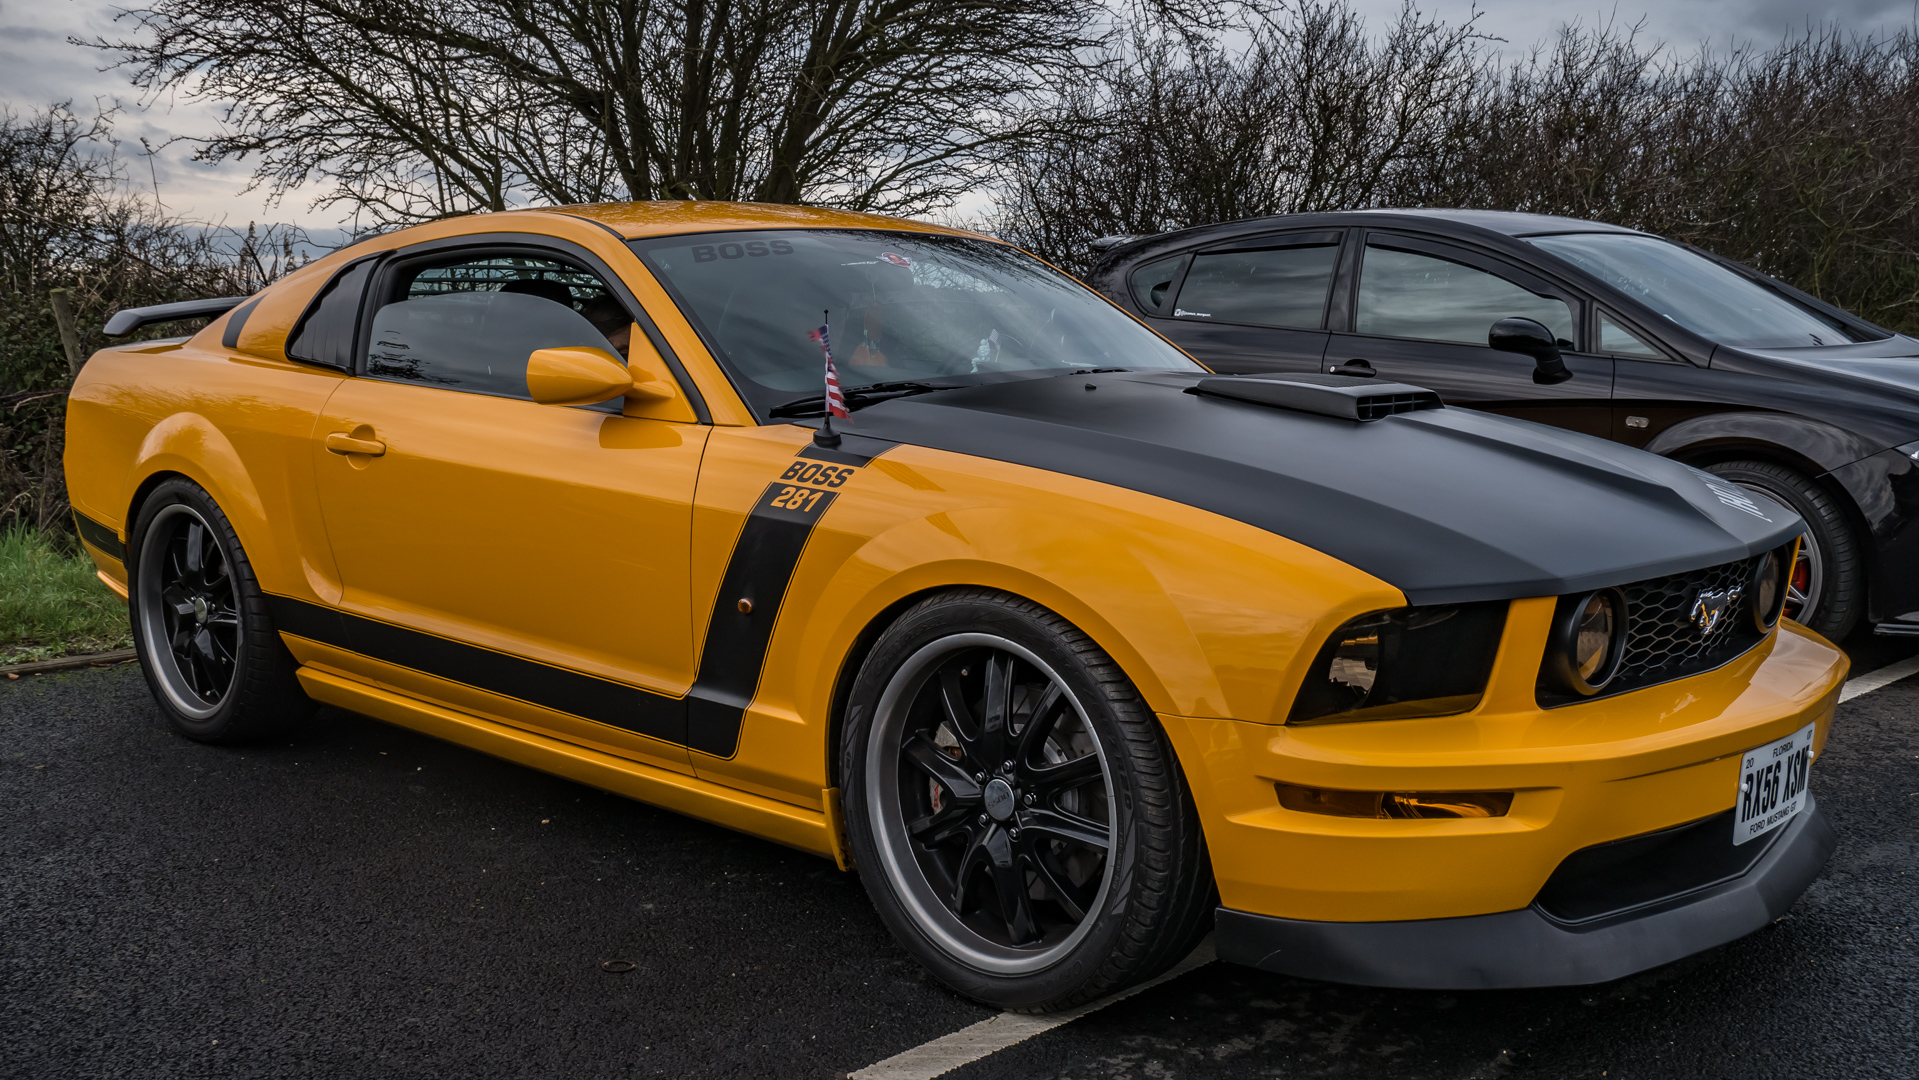
This pickup should be near as damn it the same colour as the bucket,no processing other than what was applied on import.....
This (the bucket) is the sort of colour it normally has trouble with.I took a series of photos using every photo style my camera has,all saved as cropped RAW images.The above image is as it came out of the camera with no colour correction and is 100% perfect,i.e. the bucket and bag really are exactly that colour.Now as I understand the process when you import into LR using RAW images it converts them to DNG based on the embedded profile from the photo style that was set when the photo was taken.Every image I see after import and moving to the develop module looks exactly the same,including the two that were monochrome on import are now the exact same as all the others in full colour.The only processing it applies to all the images is cropping down to 16:9,colour temperature to 5000K (I guess based on the camera's white balance setting) and sharpening.How is it applying just these and not the selected photo styles,or am I just not understanding how this is supposed to work,i.e. does it get this embedded profile from somewhere else and not from the photo styles?


 1 Correct answer

Imagewerx wrote
They were taken in 'proper' stills mode,but cropped in camera to 4K/16:9 as this is how I view them on a 4K TV set.I have to do it this way as I won't always be able to tell how to frame them otherwise.
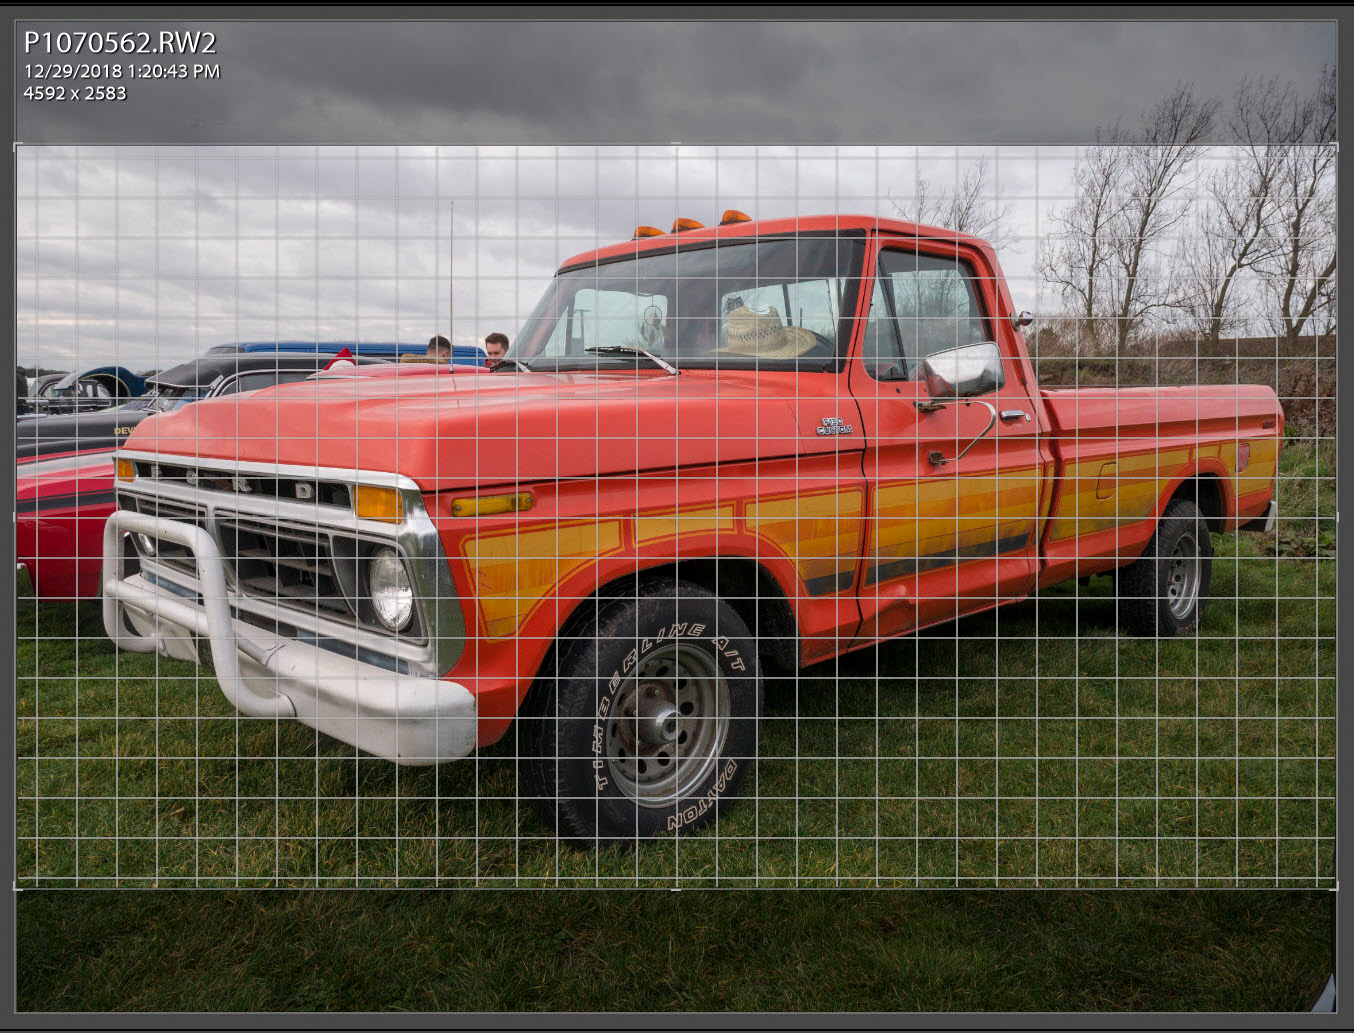
Gottcha. The in-camera crop is just raw file metadata that LR reads and applies. For other purposes (prints) you can remove the 16:9 crop and reveal the full image area using the LR Develop module Crop Overly tool.
 45
Replies
45
45
Replies
45
Copy link to clipboard
Copied
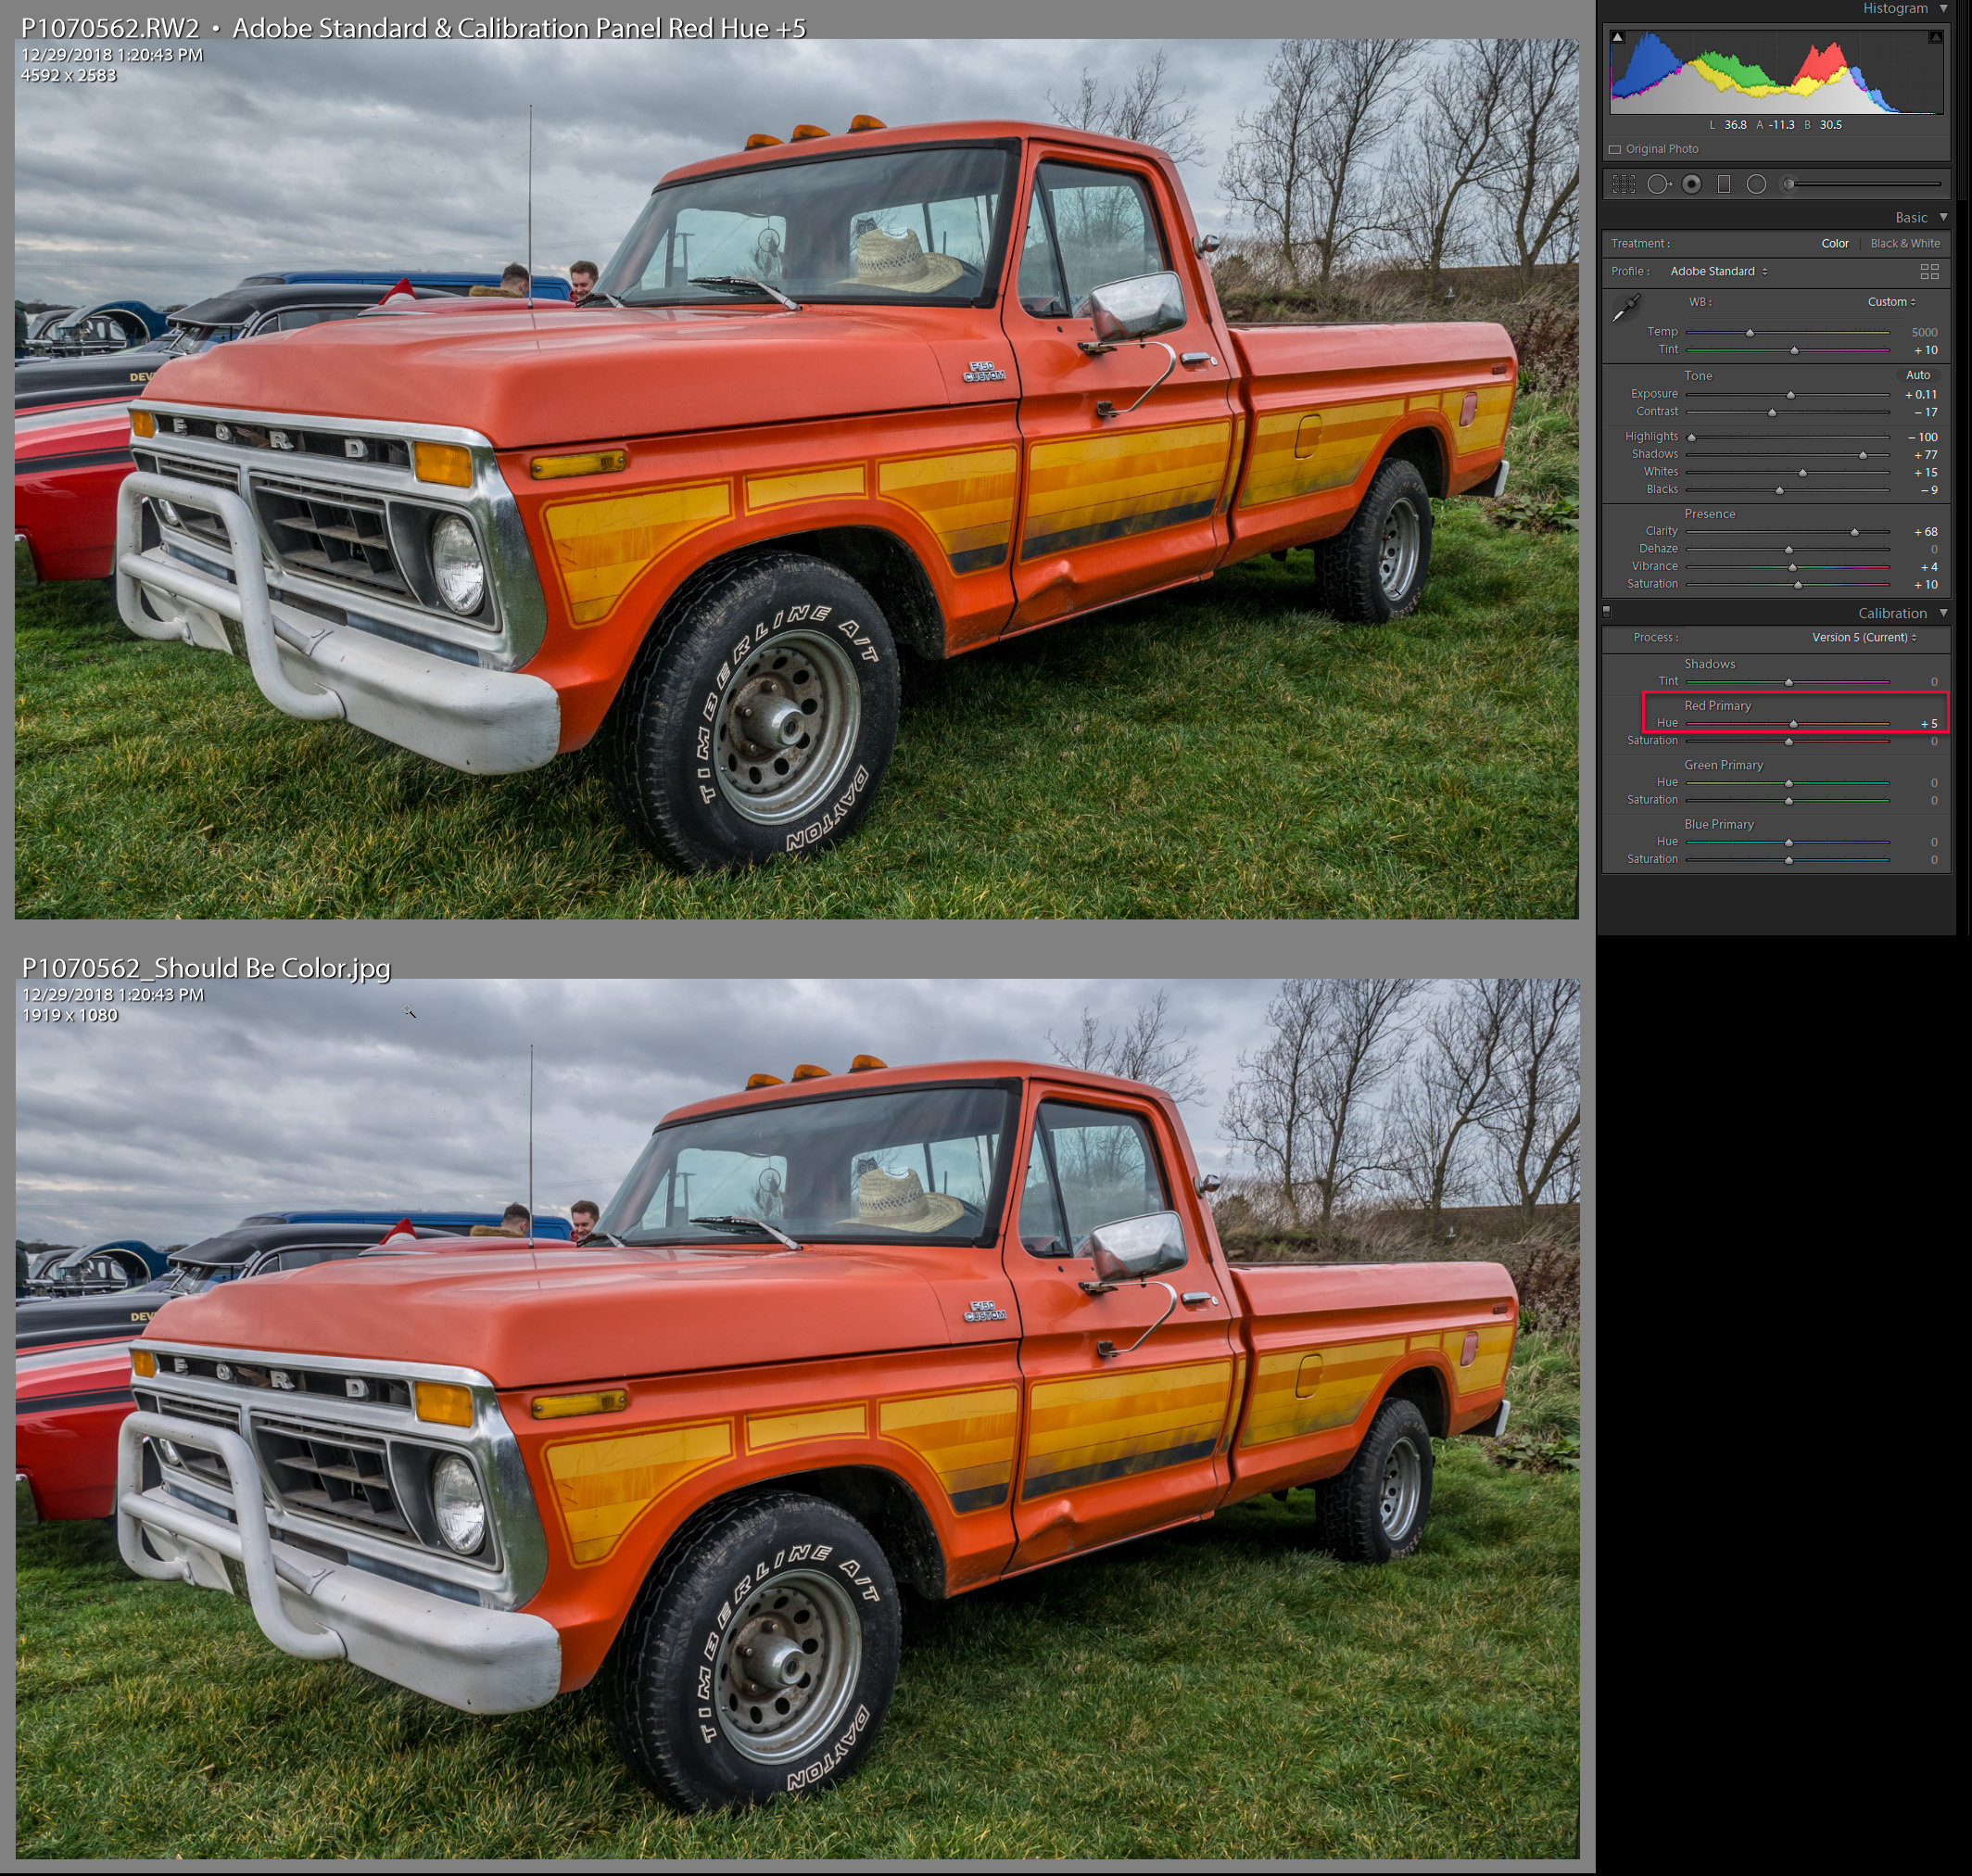
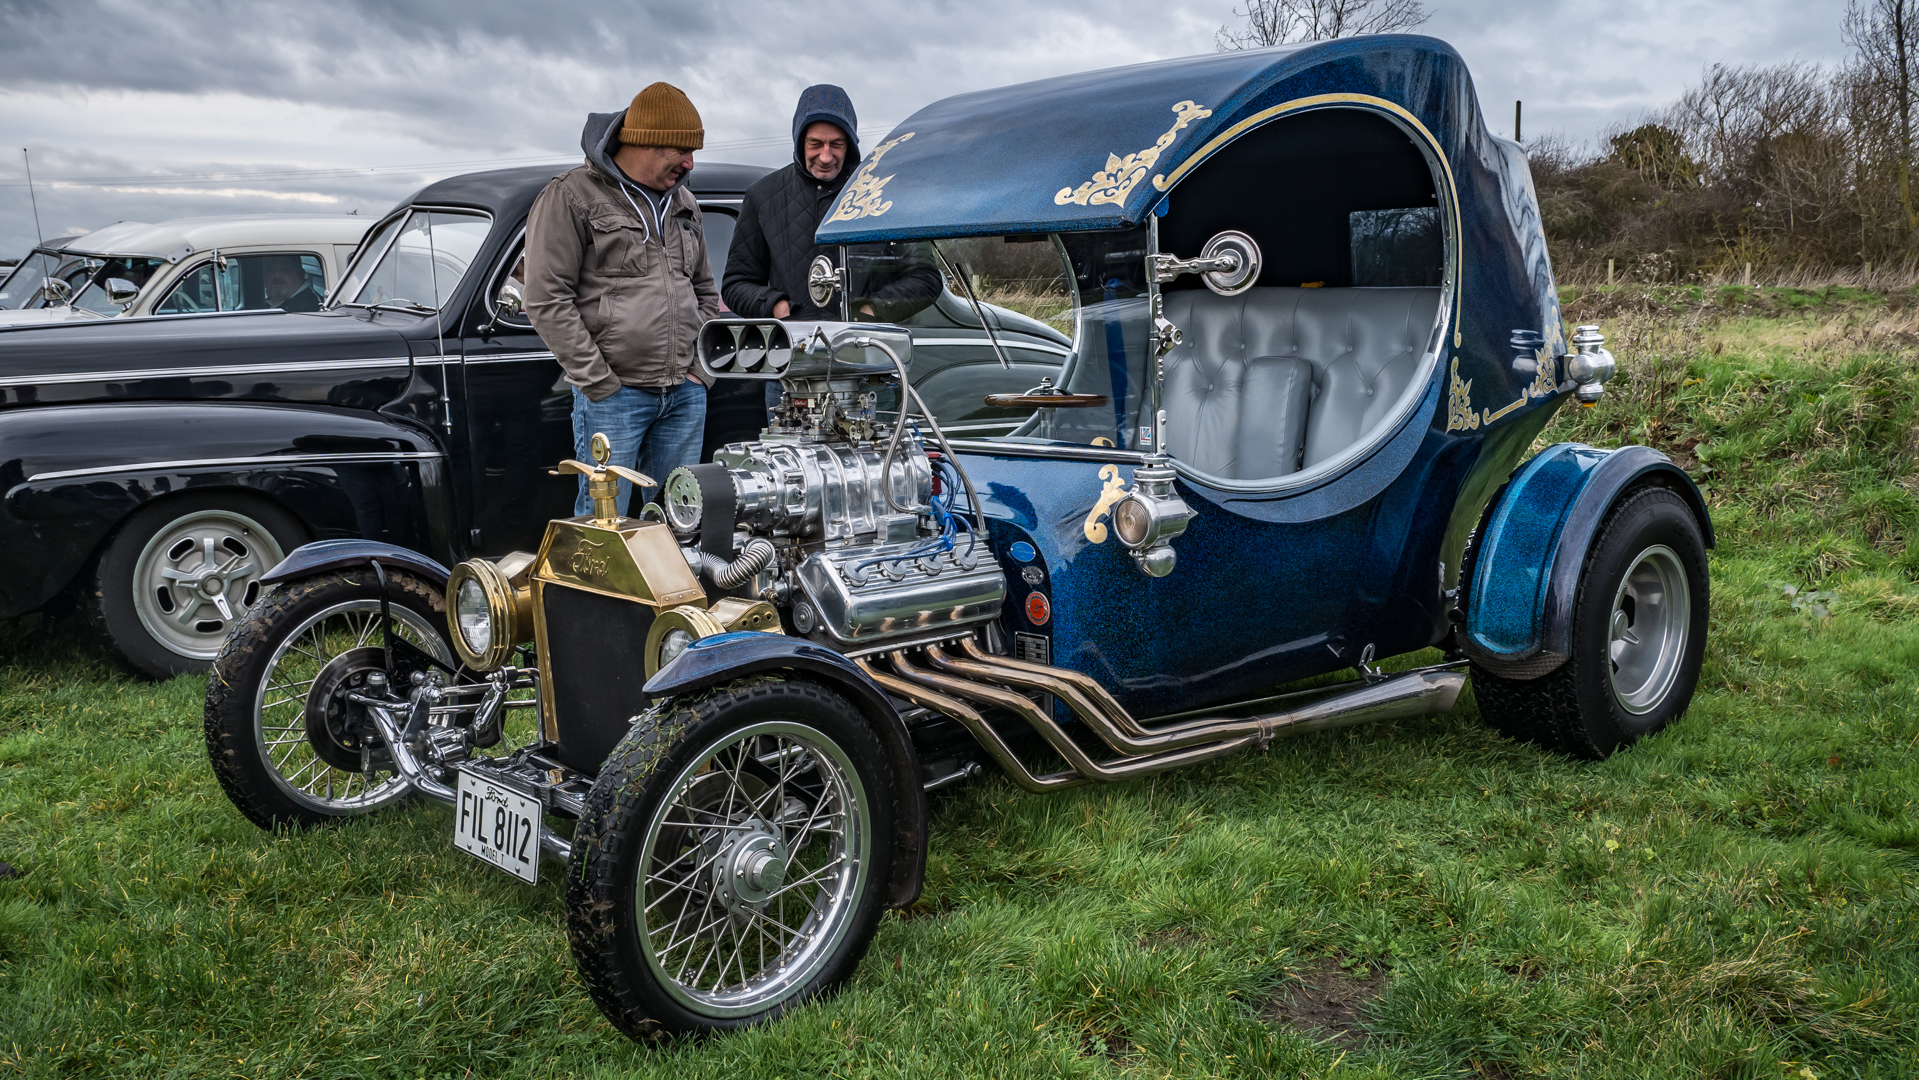
Ok thanks so far guys,I'll go through everything properly later on.From memory this is the colour the truck should be.....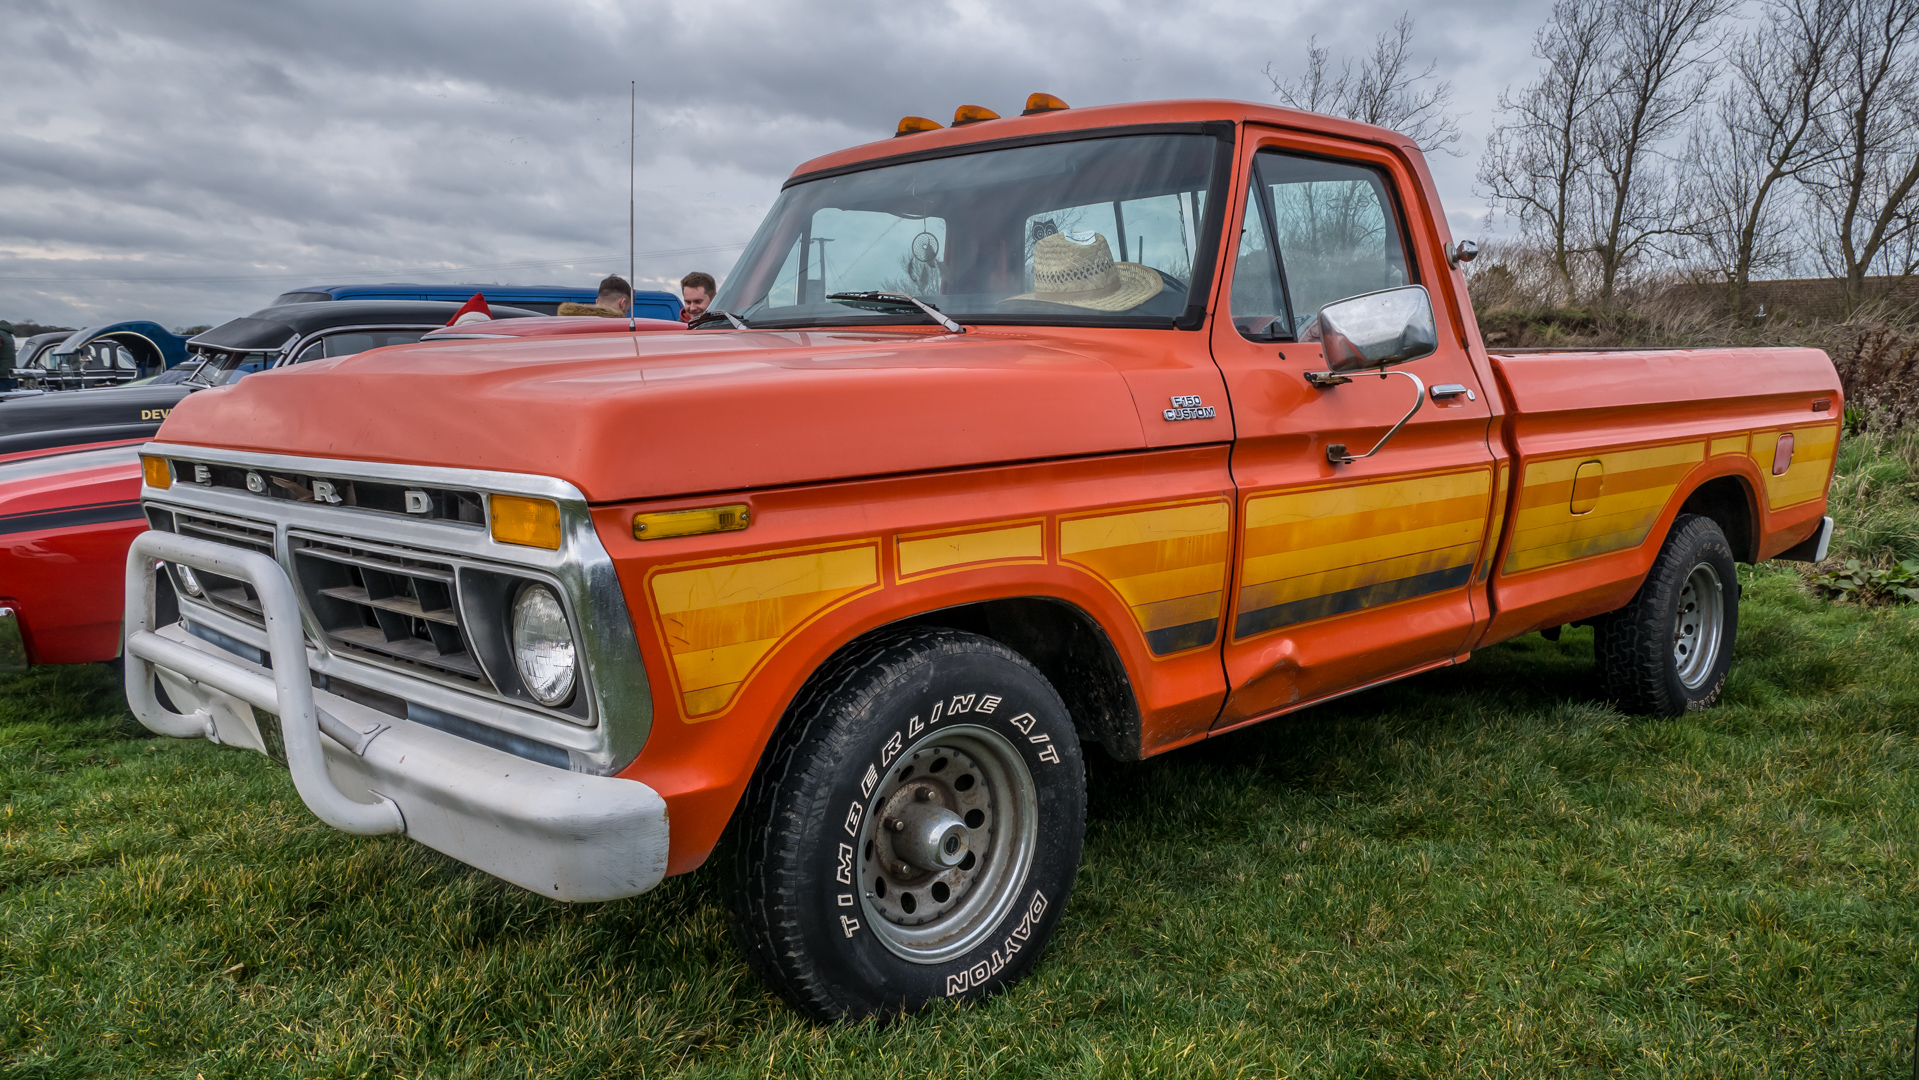
Copy link to clipboard
Copied
Imagewerx wrote
Ok thanks so far guys,I'll go through everything properly later on.From memory this is the colour the truck should be.....
I downloaded your screenshot and applied only your LR Basic panel settings embedded in the file to the original raw file with Adobe Standard Profile. To match your rendering I changed the Calibration panel Red Hue to +5. As mentioned earlier you can save these two settings (Treatment & Profile, Calibration) as a Develop preset or change your 'Default Develop Settings to include the Calibration panel setting change. I have no idea if this is a "proper" correction that will work with all images under all lighting conditions. The best way to do that is create a custom camera profile using a ColorChecker PassPort. The required correction is pretty small so it's not likely anything is wrong with the camera.
Copy link to clipboard
Copied
https://forums.adobe.com/people/Todd+Shaner wrote
Imagewerx wrote
Ok thanks so far guys,I'll go through everything properly later on.From memory this is the colour the truck should be.....
I downloaded your screenshot and applied only your LR Basic panel settings embedded in the file to the original raw file with Adobe Standard Profile. To match your rendering I changed the Calibration panel Red Hue to +5. As mentioned earlier you can save these two settings (Treatment & Profile, Calibration) as a Develop preset or change your 'Default Develop Settings to include the Calibration panel setting change. I have no idea if this is a "proper" correction that will work with all images under all lighting conditions. The best way to do that is create a custom camera profile using a ColorChecker PassPort. The required correction is pretty small so it's not likely anything is wrong with the camera.

Thanks guys,think I've got it sussed now.I had to go to +9 to get it looking right to my eyes on this and others.
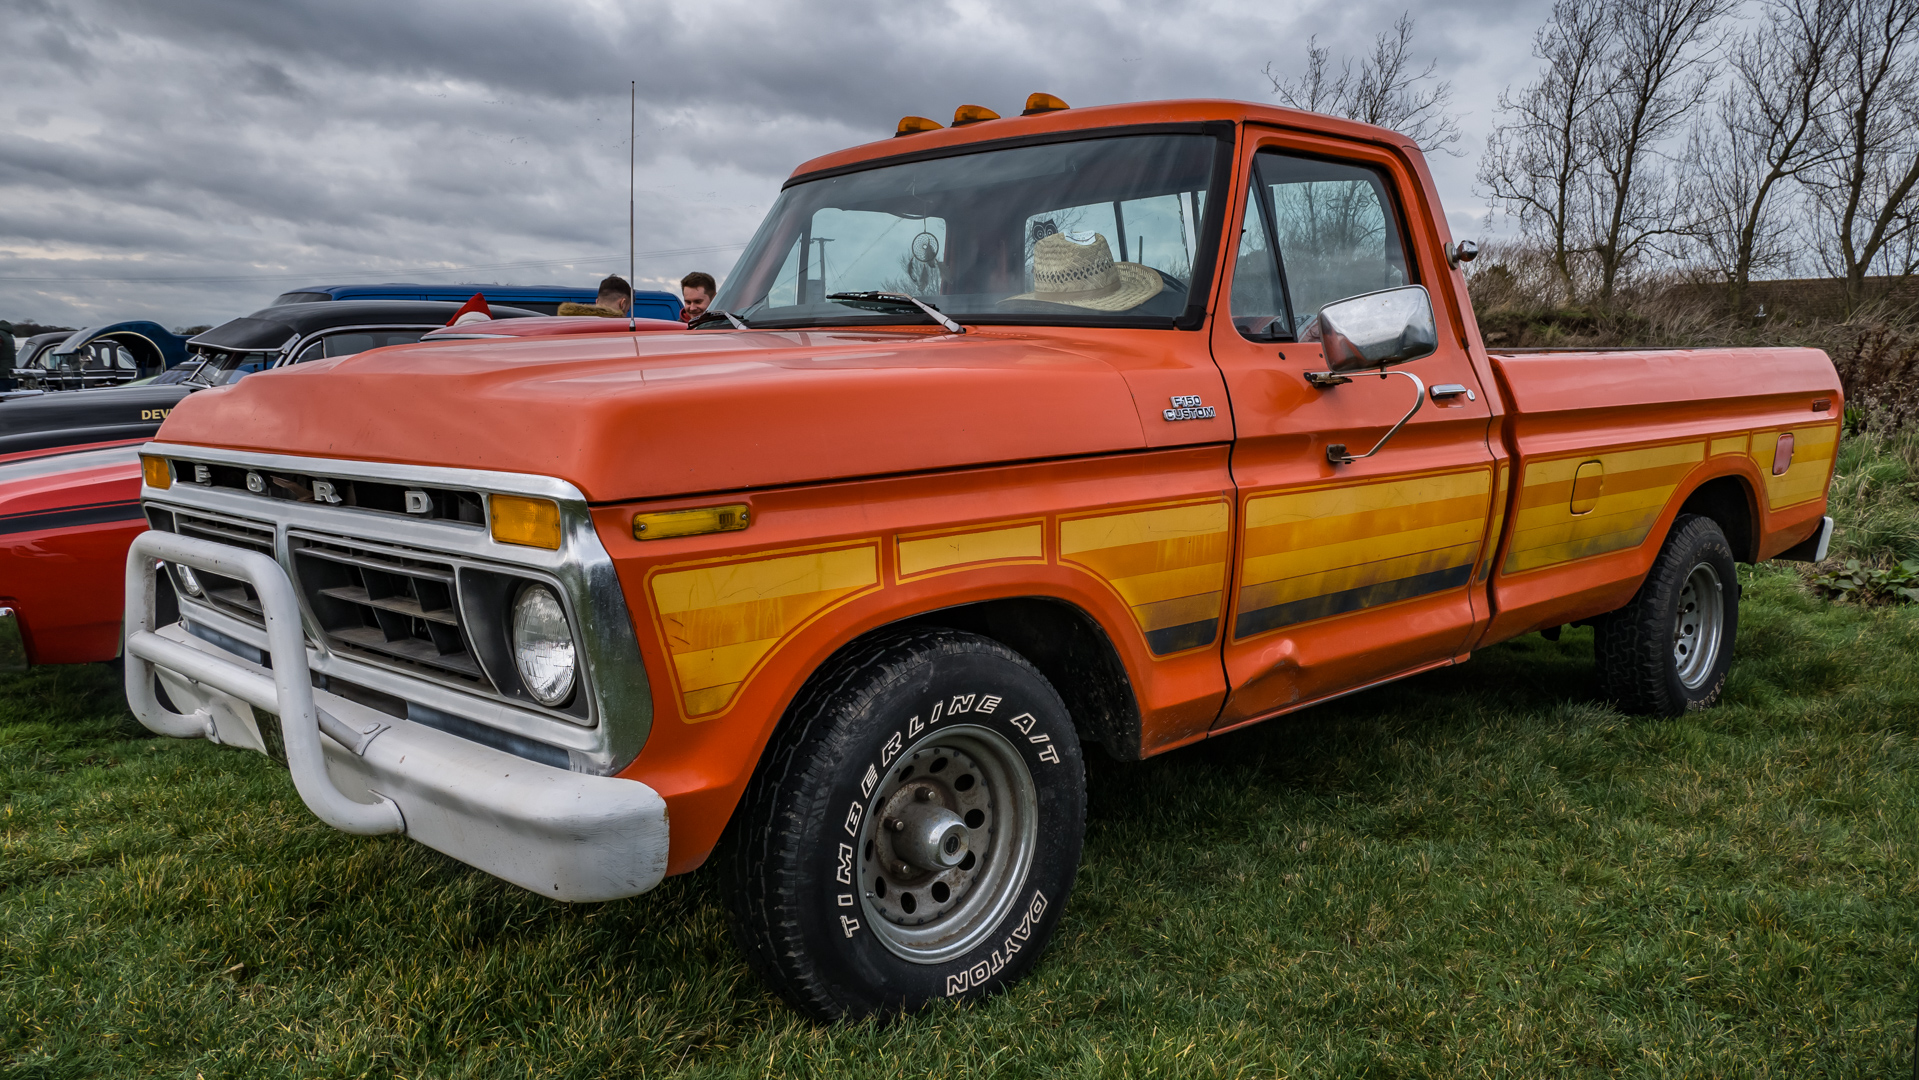
This is about right and was quite a subdued shade of orange.......
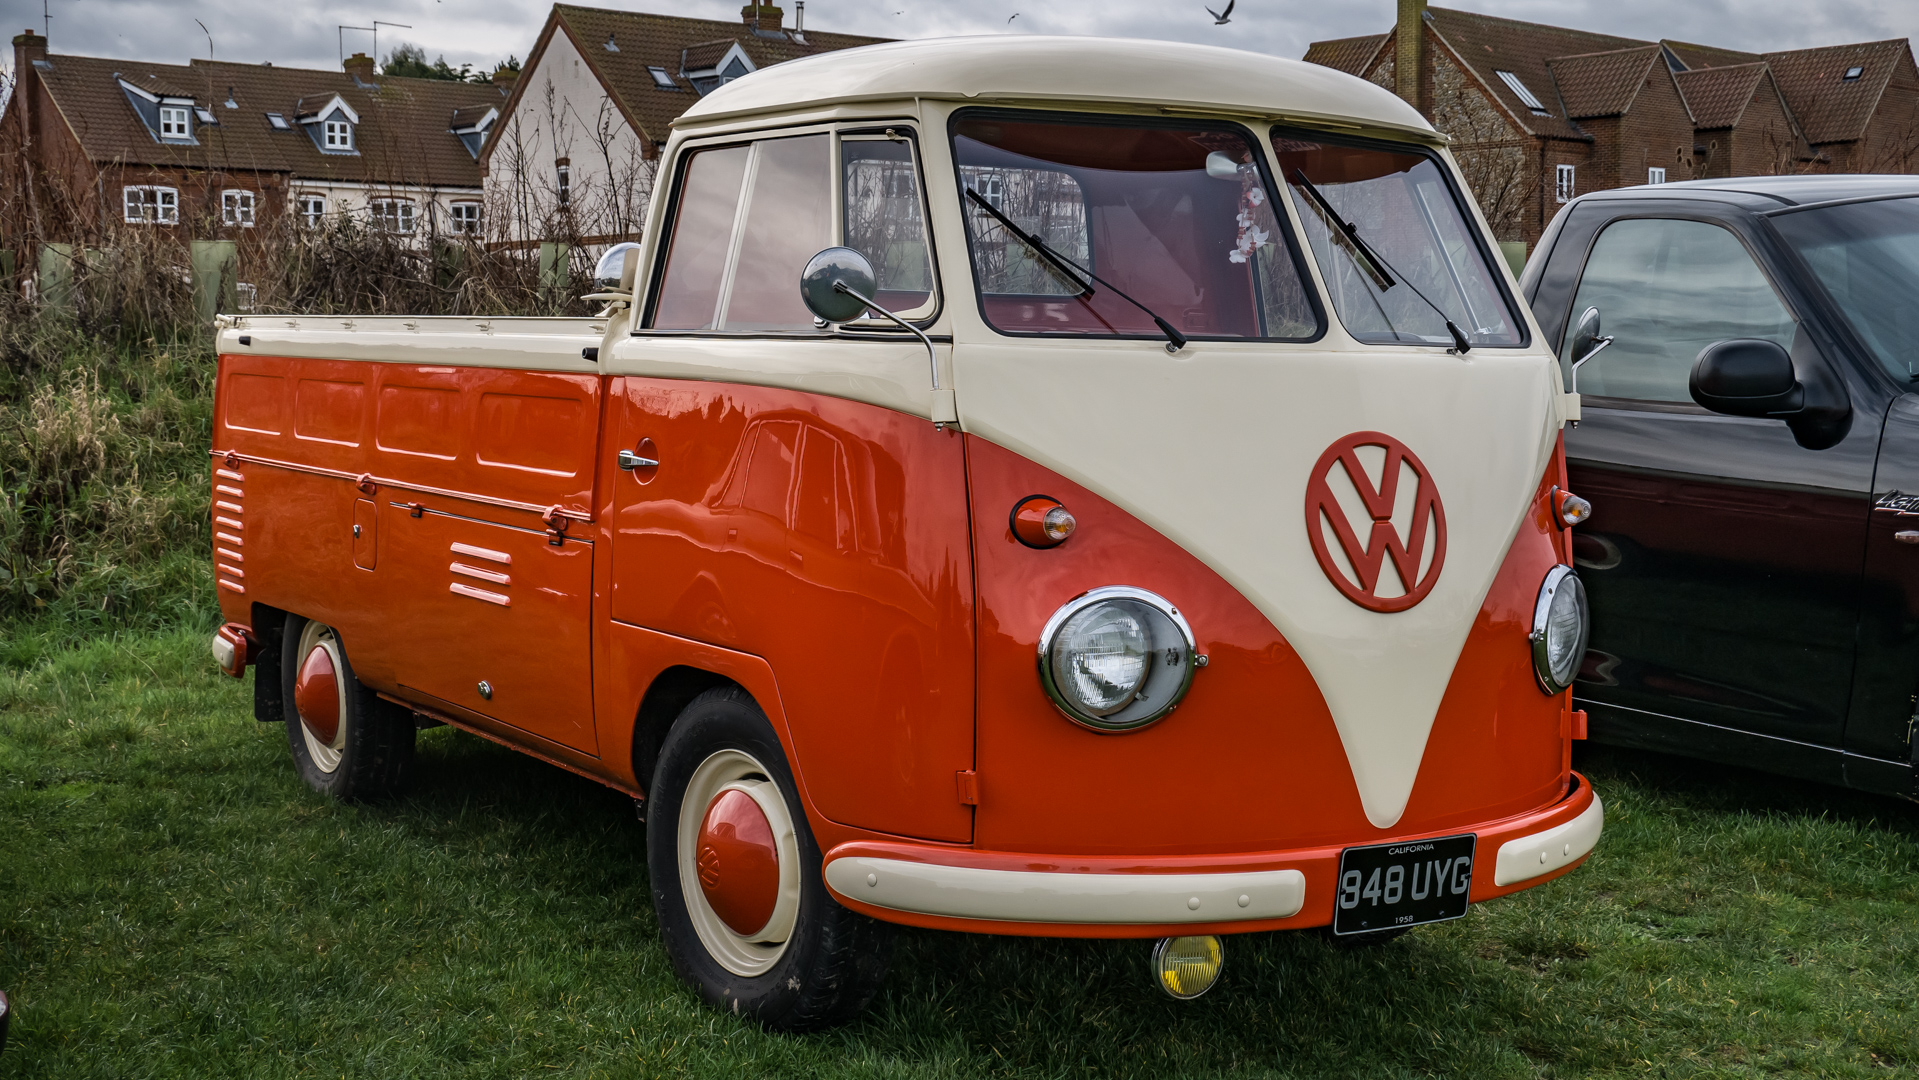
This was quite a bright and vibrant version of orange......
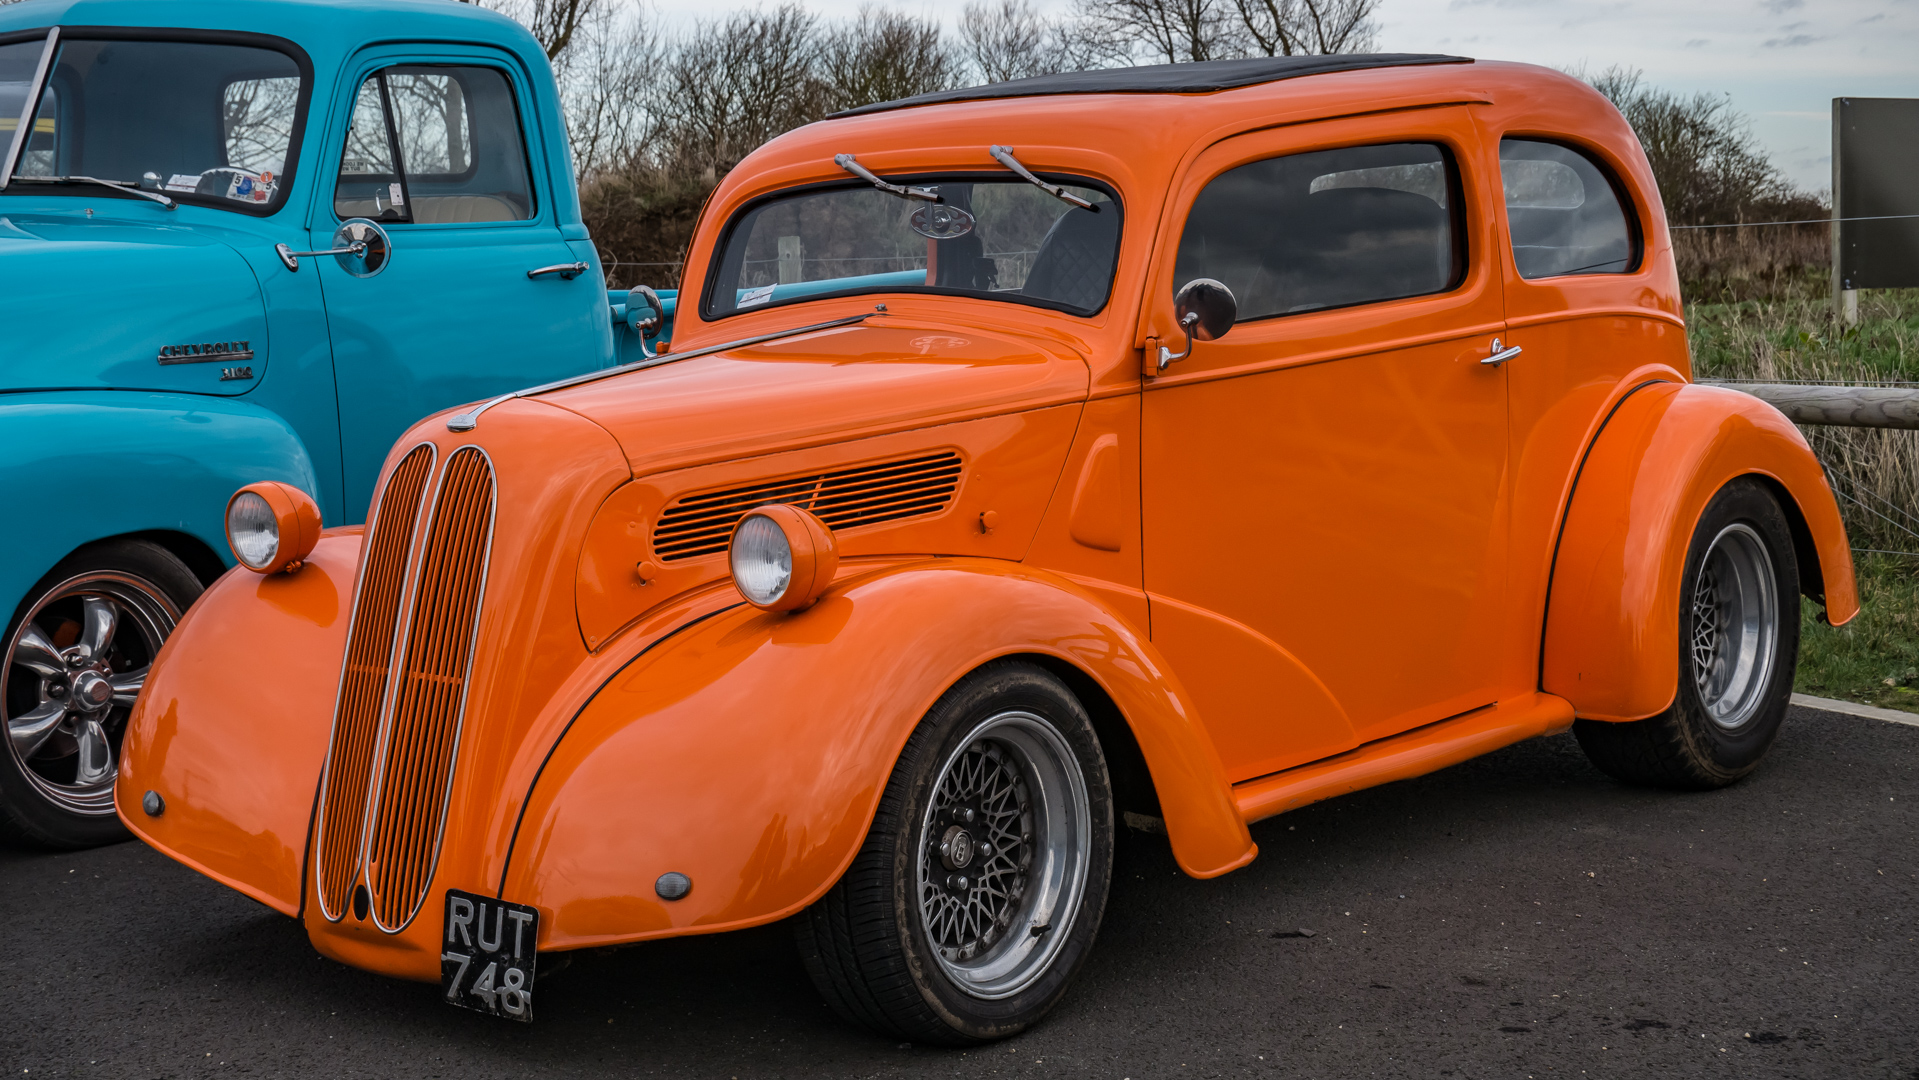
And this was a bit of a difficult colour to get right and to remember the exact colour of as these photos were taken about three weeks ago.But it is (I think!!!!) half way between orange and yellow.

Copy link to clipboard
Copied
An obvious thing that causes the truck to be less orange than the bucket is the WB computed by the camera. The bucket was shot in sunlight, while the truck was shot on a cloudy day, yet the As Shot WB is 5000K as if sunlight, but eyedroppering on the clouds or even using Auto WB changes to something closer to 6000K and the truck is a little more orange, although perhaps not enough, requiring the RGB channel adjustments as well.

Copy link to clipboard
Copied
There are way too many adjustments on this camera compared to my much simpler Canon EOS 80D.I'm still not certain that it's not because I've adjusted something buried deep in some bizarre menu somewhere.I may try a full reset to default settings to see if it looks any different.
Even allowing for slight differences in how the camera adjusts itself for white balance,I still don't think it would make this big a difference that sticks out like a sore thumb.
But as I understand how RAW works,white balance adjustment is only applied to JPEGs?
Copy link to clipboard
Copied
Imagewerx wrote
I'm still not certain that it's not because I've adjusted something buried deep in some bizarre menu somewhere.I may try a full reset to default settings to see if it looks any different.
The only in-camera settings applied to the raw image inside LR that can NOT be undone are the 'Built-in Lens Profile' (Lens Corrections panel) and actual in-camera exposure compensation settings. There's no in-camera setting I'm aware of that can change the raw file color data. As already mentioned both the in-camera Crop and WB settings are metadata that LR reads and applies to the image. Both can be changed to what ever settings you want to use.
Imagewerx wrote
There are way too many adjustments on this camera compared to my much simpler Canon EOS 80D.
Even allowing for slight differences in how the camera adjusts itself for white balance,I still don't think it would make this big a difference that sticks out like a sore thumb.
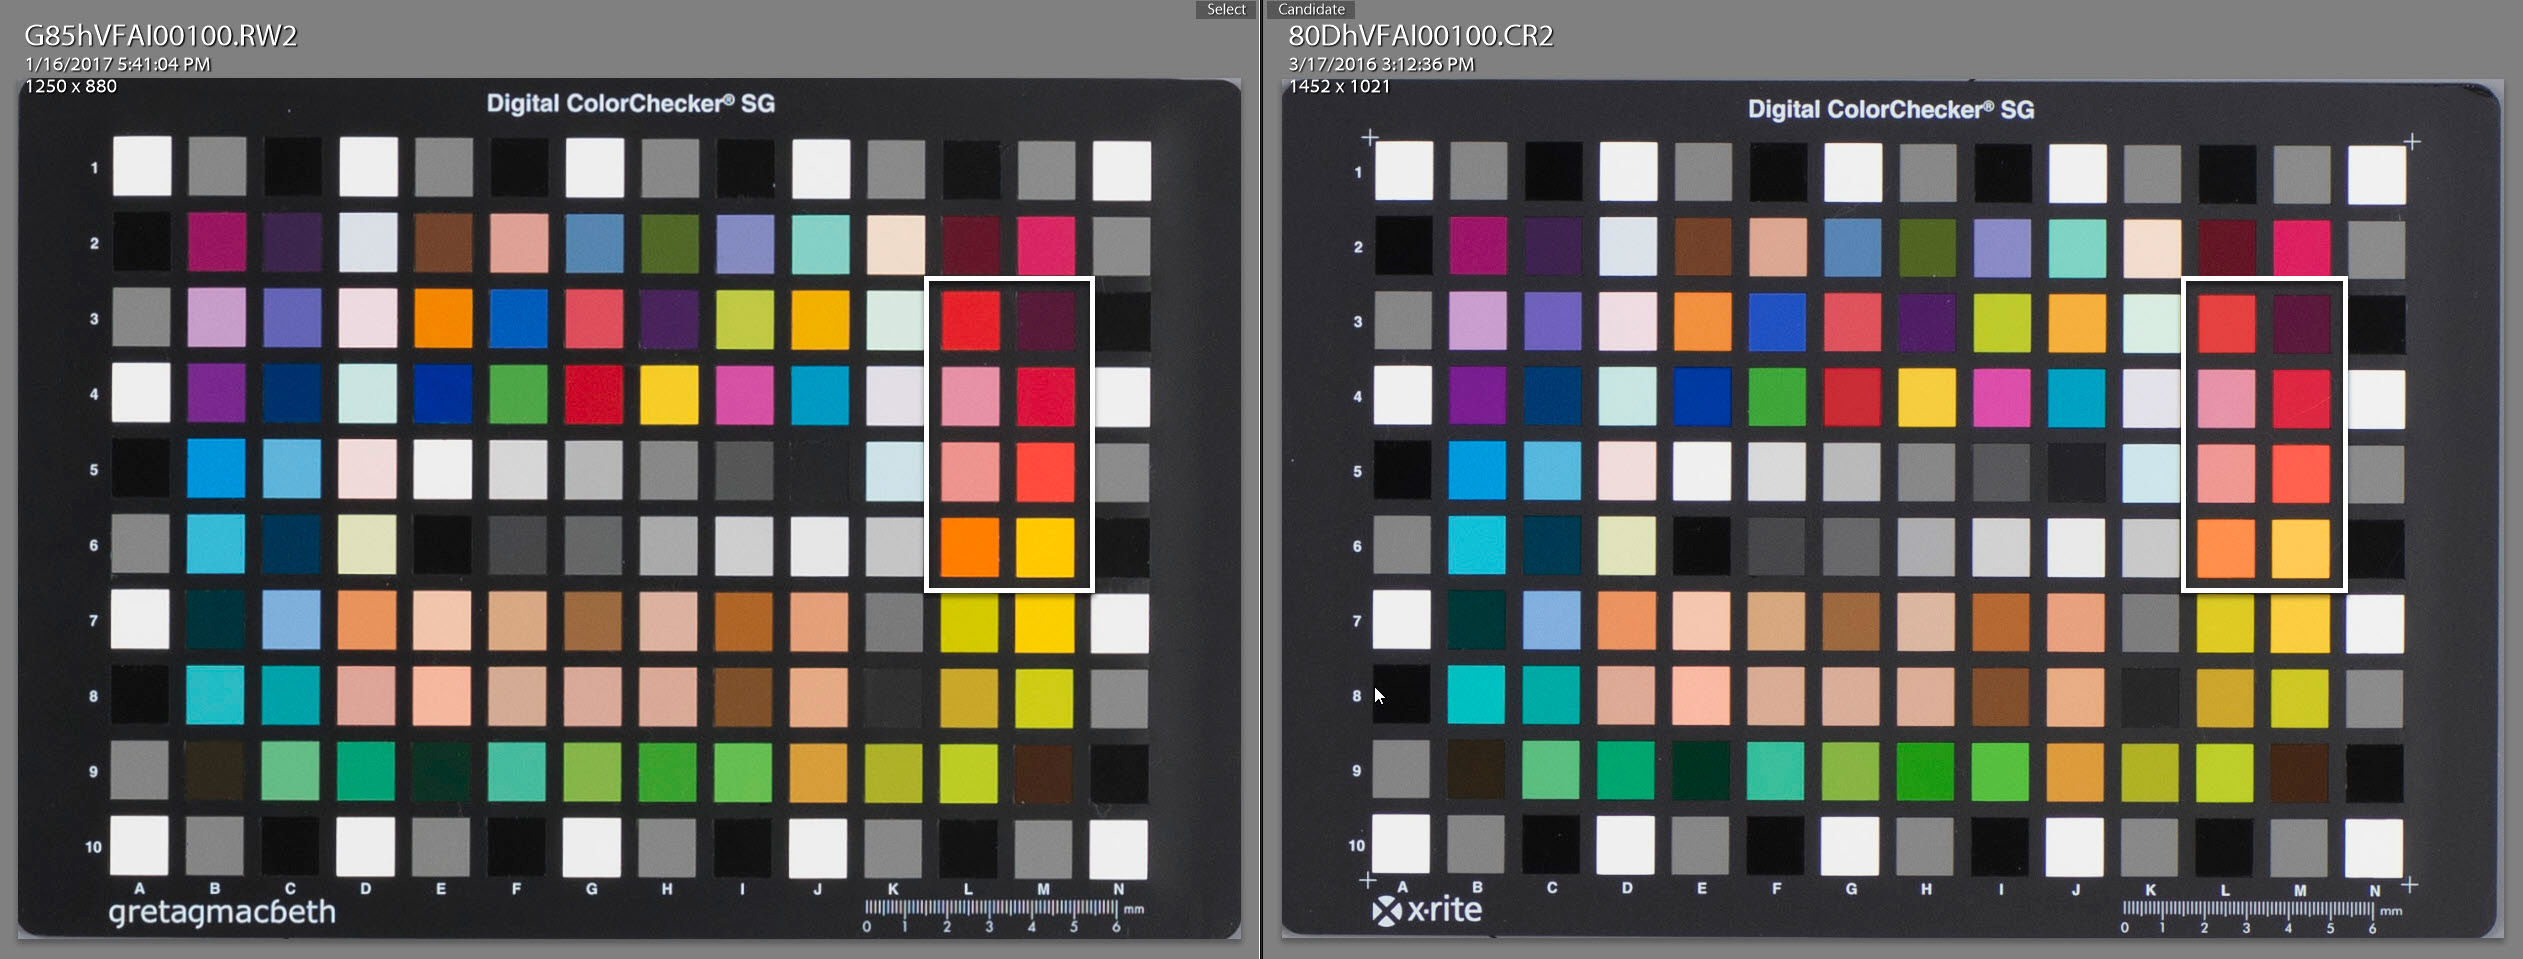
That may in fact be the cause of what you're seeing. It appears the Canon 80D has less red saturation in orange color objects. That coupled with an incorrect WB (Temp setting too low) setting is probably the cause of the orange color shift when compared to the Canon 80D image rendering. A third contributing factor may be your display(s). As you mentioned, I"'m using just a cheap Acer and Samsung 55inch HDTV to do my editing on". HDTV displays have a myriad of color adjustments and presets most of which produce very inaccurate color and tonal rendering. "Cheap" computer monitors will also produce inaccurate color if not properly adjusted (i.e. calibrated) since they have numerous screen controls as well. This usually becomes apparent when you try to make prints using your LR adjusted image files. A good video on the subject by thedigitaldog with solutions here: Why are my prints too dark? - YouTube
You can download the chart at Imaging Resources for the G80 (G85 US model #) and Canon 80D here:
https://www.imaging-resource.com/PRODS/panasonic-g85/G85hVFAI00100.RW2.HTM
https://www.imaging-resource.com/PRODS/canon-80d/80DhVFAI00100.CR2.HTM
(Adobe Standard with WB & Exposure matched)
Copy link to clipboard
Copied
I fully understand the reasons for proper monitor calibration,really I do. I don't do prints,and as long as the image on my HDTV looks right to my eyes,that's what I want.
Canon are justifiably proud of their famous colour science,and I never had reason to doubt if the colours I got from it were accurate.The very slight colour inaccuracy of the Panasonic camera easily outweighs the few advantages the Canon had over it.
The problem I have now is that skin tones aren't quite right,but I can't seem to fix this using the recommended method of the HSL sampling tool if that's the right name for it.
Copy link to clipboard
Copied
Imagewerx wrote
Canon are justifiably proud of their famous colour science,and I never had reason to doubt if the colours I got from it were accurate.
We've been over this, you're not and never produced accurate color, only pleasing color. Measure the car, give us Lab values from a Spectrophotometer, then we can attempt to produce accurate color which again because it's not output referred, will likely not be pleasing when viewed. JUST like the example in the URL provided of the family photo!
Copy link to clipboard
Copied
thedigitaldog wrote
We've been over this, you're not and never produced accurate color, only pleasing color. Measure the car, give us Lab values from a Spectrophotometer, then we can attempt to produce accurate color which again because it's not output referred, will likely not be pleasing when viewed. JUST like the example in the URL provided of the family photo!
I don't have access to the car,or any of the many,many cars I take photos of.As I already said I don't need what others judge to be 'accurate colour'.If I ever need to make prints from my photos,then I'll use what ever methods are needed to get colours that are judged by other people to be accurate.Up until then the colours I see on my chosen viewing medium are what I see as 'accurate'.
Copy link to clipboard
Copied
Imagewerx wrote
The problem I have now is that skin tones aren't quite right,but I can't seem to fix this using the recommended method of the HSL sampling tool if that's the right name for it.
So you're saying with the Red Hue +9 Calibration correction flesh tones are now off? Remember what I said about that correction, "I have no idea if this is a "proper" correction that will work with all images under all lighting conditions."
The blue truck picture was also shot on an overcast day and the WB adjustment is not correct. Even a small 500K Temp difference (5000K vs 5500K) can cause the small color shift you're seeing. I suggest taking a look at people pictures shot with cloud-free sunlight (5500-6500K) or flash and see what the flesh tones look like with and without the Red Calibration setting. You may need to change the LR Calibration panel settings to achieve "more pleasing" colors as the thedigitaldog mentions. I also suggest using the Adobe Standard camera profile, which provides more "accurate" color rendering. You can always dial-in some LR Basic panel Vibrance and Saturation as required based on subject content to make it "more pleasing."
Copy link to clipboard
Copied
https://forums.adobe.com/people/Todd+Shaner wrote
Imagewerx wrote
The problem I have now is that skin tones aren't quite right,but I can't seem to fix this using the recommended method of the HSL sampling tool if that's the right name for it.
So you're saying with the Red Hue +9 Calibration correction flesh tones are now off? Remember what I said about that correction, "I have no idea if this is a "proper" correction that will work with all images under all lighting conditions."
The blue truck picture was also shot on an overcast day and the WB adjustment is not correct. Even a small 500K Temp difference (5000K vs 5500K) can cause the small color shift you're seeing. I suggest taking a look at people pictures shot with cloud-free sunlight (5500-6500K) or flash and see what the flesh tones look like with and without the Red Calibration setting. You may need to change the LR Calibration panel settings to achieve "more pleasing" colors as the thedigitaldog mentions. I also suggest using the Adobe Standard camera profile, which provides more "accurate" color rendering. You can always dial-in some LR Basic panel Vibrance and Saturation as required based on subject content to make it "more pleasing."
It doesn't make any difference I can see if it's on +9 or back at zero and this was done using the Standard camera profile.I'll wait until the next car show on a sunny day and will go from there.
Copy link to clipboard
Copied
Imagewerx wrote
I don't have access to the car,or any of the many,many cars I take photos of.As I already said I don't need what others judge to be 'accurate colour'.If I ever need to make prints from my photos,then I'll use what ever methods are needed to get colours that are judged by other people to be accurate.Up until then the colours I see on my chosen viewing medium are what I see as 'accurate'.
We're talking past each other so I'm not sure how I can possibly help you further. Again, until you measure a color, you can't state a captured color is accurate. And no, your memory of the scene is pretty worthless in this regard, a topic known a colorimetry, where measured and resulting colors CAN be judged for color accuracy without a lick of subjectivity. This will likely fall on deaf ears but I'll post it anyway for lurkers who may be interested in the subject of actual, accurate color and how one correctly judges it's accuracy:
Delta-E and color accuracy
In this 7 minute video I'll cover: What is Delta-E and how we use it to evaluate color differences. Color Accuracy: what it really means, how we measure it using ColorThink Pro and BableColor CT&A. This is an edited subset of a video covering RGB working spaces from raw data (sRGB urban legend Part 1).
Low Rez: https://www.youtube.com/watch?v=Jy0BD5aRV9s&feature=youtu.be
High Rez: http://digitaldog.net/files/Delta-E%20and%20Color%20Accuracy%20Video.mp4
Copy link to clipboard
Copied
Thank for all your help anyway.I'm sorry but I can be a bit awkward at times,but I will watch those videos sometime soon.
Not meaning to argue,but a genuine question here.If I have an object of known colour in front of me,and what I see on my screen when I look at a photograph of that same object is exactly the same colour as the test object,could this not be considered to be accurate colour?
Copy link to clipboard
Copied
Imagewerx wrote
Thank for all your help anyway.I'm sorry but I can be a bit awkward at times,but I will watch those videos sometime soon.
Not meaning to argue,but a genuine question here.If I have an object of known colour in front of me,and what I see on my screen when I look at a photograph of that same object is exactly the same colour as the test object,could this not be considered to be accurate colour?
I often say that when you can measure what you are speaking about, and express it in numbers, you know something about it;
but when you cannot measure it, when you cannot express it in numbers, your knowledge is of a meagre and unsatisfactory kind.
Lord Kelvin
As for a $5 white object, you need spectrally neutral white and not all whites are white!
http://digitaldog.net/files/22Thecolorofwhite.pdf
And for another solution:
https://photographylife.com/diy-reliable-and-cheap-universal-white-balance-reference-device
Copy link to clipboard
Copied
thedigitaldog wrote
I often say that when you can measure what you are speaking about, and express it in numbers, you know something about it;
but when you cannot measure it, when you cannot express it in numbers, your knowledge is of a meagre and unsatisfactory kind.
Lord Kelvin
That's an incredibly blinkered (and arrogant) view of the world to say that if you don't know or can't explain the science behind something,you're no good at it.
I've seen fantastic photos taken by people with very cheap point-and-shoot cameras who don't have a clue about expressing their photography in numbers.I've also seen really crappy photos taken by all-the-gear-and-no-idea photographers with £10K worth of camera and lens who claim they know EVERYTHING about taking photos.
It's easy to lose sight of why we take photos and just bury it in techno babble.Wouldn't it be nice to get back to a simpler time when all we wanted to do was just go out and take photos?
Copy link to clipboard
Copied
"That's an incredibly blinkered (and arrogant) view of the world to say that if you don't know or can't explain the science"
I did explain it, in a video (and articles) you apparently didn't view!
Copy link to clipboard
Copied
I did view them and must congratulate you on a very well made and easy to understand explanation about the science behind photography.
But as per the title of this thread 'How does Lightroom build previews when processing RAW images',this has nothing to do with what I need to know.Knowing any of this won't help to improve my photographs,that is to get an image with colours that look right to ME.
I'll quote myself here if that's alright.......
'It's easy to lose sight of why we take photos and just bury it in techno babble.Wouldn't it be nice to get back to a simpler time when all we wanted to do was just go out and take photos?'

Copy link to clipboard
Copied
Imagewerx wrote
I did view them and must congratulate you on a very well made and easy to understand explanation about the science behind photography.
But as per the title of this thread 'How does Lightroom build previews when processing RAW images',this has nothing to do with what I need to know.Knowing any of this won't help to improve my photographs,that is to get an image with colours that look right to ME.
I'll quote myself here if that's alright.......
'It's easy to lose sight of why we take photos and just bury it in techno babble.Wouldn't it be nice to get back to a simpler time when all we wanted to do was just go out and take photos?'
Yeah, reading through some of these, since I posted my thoughts on it, I do see what the others mean. However, I have to agree with you whole heartedly on this part too.
Of course how you go about managing and editing your images may depend on so many factors. Are you a pro? Are you a 'hobbyist', or do you just take family snaps? All are valid reasons for taking, and enjoying, photography.
However, the priorities for each can be very different.
I take photos for the pure enjoyment of the hobby, but also take a fair few family and holiday snaps. As such I may well like to see my photos starting off as an accurate representation of the original scene. But only to a point. I can afford to spend only a certain amount of money on equipment, and have other uses for my home computer etc. My camera is an old model, and only have low end lenses, but it takes good enough photos for my needs.
But regardless of all that, it should be reasonable to expect that images taken on any equipment should initially appear on your editing screen as a neutral version of the original scene, at least as a starting point. Although I feel that the latest Adobe profiles are failing in the respect, and over-cooking some colours.
Certainly for me a 'near enough' approach suffices, and probably does for many others too. Like yourself I mainly view onscreen, but on different devices, such as my iMac, iPhone, wife's iPhone, or the TV (via an AppleTV). Occasionally I might print some, sometimes I might send these off to family members.
Not one of those is likely to match my original editing device. As such, a near enough approach simply has to do. I agree that it's possible to get near to what you want by eye alone, indeed for many of us it's perhaps the only way we can do this (unless we start bunging loads of money the the problem). It's certainly been obvious to me that colours are off, even if I can't match then exactly, I can usually get them near to what I expect, or want.
But, as you say, in the end, I just go out an enjoy shooting photos, doing some editing, and showing them to my family and friends. Most of which would have no darn idea whether I colour matched them all, or not. But then I don't sell any photos, or ever intend to.
Sorry I haven't tackled the 'Previews' part of this, but on the whole I don't think that's anything to do with the issue anyway.
All the best
Andy
Copy link to clipboard
Copied
Thanks Andy.Nice to know that at least one person is on the same wavelength as me!
I am just an amateur and have been for nearly 50 years now.I don't have an eye for spotting a good composition when I'm out and about,so just take photos of what ever takes my fancy.I just can't do the arty farty stuff so gave up trying a LONG time ago.
I take photos of cars and motorsports events,landscapes,historical buildings or anything vaguely related that takes my fancy.Doing as much of the editing workflow myself and solving my own problems by just doing it will teach me a lot more than just watching a video on Youtube ever will.It's always reassuring that we can always come on somewhere like this and ask questions if they can't be answered any other way.
The memories or emotions an image brings forth has nothing to do with any sort of science or expressing it as numbers.If we start to believe that I think we are forgetting the true meaning of photography as an art form.
Copy link to clipboard
Copied
Imagewerx wrote
https://forums.adobe.com/people/Todd+Shaner wrote
The blue truck picture was also shot on an overcast day and the WB adjustment is not correct. Even a small 500K Temp difference (5000K vs 5500K) can cause the small color shift you're seeing.
It doesn't make any difference I can see if it's on +9 or back at zero and this was done using the Standard camera profile.I'll wait until the next car show on a sunny day and will go from there.
The LR WB controls (Temp & Tint) allow you to correct the 'As Shot' WB to make the colors more accurate. It doesn't matter if the sky is cloudy or Sunny you just need to use a higher WB Temp setting for cloudy and lower Temp setting for sunny. Let your eye be the judge, but a white balance card can help. Shoot it under the same lighting condition so it fills about 1/4 of the frame. Then use that image file with the LR WB Eydropper to set the WB and Sync the WB settings to the other files shot under the same lighting.
B&H Photo Video White Balance Card
You've got to start with a proper WB before attempting to make any further corrections. That's why Adobe placed the WB controls at the very top of the Develop panels.
Copy link to clipboard
Copied
I get what you're saying and will try this when I get the chance,but $5 for a small bit of white cardboard ?
?
-
- 1
- 2

 AdChoices