 Adobe Community
- Home
- Lightroom Classic
- Discussions
- Re: Lightroom changes the appearance of my images ...
- Re: Lightroom changes the appearance of my images ...

Copy link to clipboard
Copied
I dont understand this or why it does it. my preferences has everything unchecked.
I import my images
i see the thumbnails which look fine but when i click on image, it displays on my 2nd monitor and looks perfect. but here is the problem, a second later it makes an adjestment to it which ruins my image, it makes it too bright. its like its auto toning yet i dont understand why it must do this.
my goal is to simply view my image on 2nd monitor w/o lightroom making any adjustments to it.
how can i prevent this or why is it happening?
can anyone please help me...any help would be greatly appreaciated.
Message title was edited by: Brett N


 1 Correct answer

Are you recording images in RAW format?
If so, this post might have the explanation.
 189
Replies
189
189
Replies
189

Copy link to clipboard
Copied
DdeGannes wrote:
I think this historic thread has served its purpose.
"Hysteric" is the word I'd go for sooner... but, it has at least served to expose some vaguenesses - and some hard truths, too.
Of course the reality will always fall messily in between the two extreme positions:
- camera settings have 0% control over what you see in LR,
- camera settings have 100% control over what you see in LR.
The basic issue is that for every extra camera parameter which Adobe started to add recognition for - for every extra % on the scale - a million complaints would be generated: why is this kind of camera support present for this model but not for that; why is this camera mode represented by those particular LR settings which aren't quite what I wanted; perhaps due to the interaction of these OTHER processing parameters which are not being taken into consideration at all.
The whole thing's a Gordian knot, IOW. Either some kind of overt rules-based setup is necessary which we can engage with; or else we need to conduct ourselves pragmatically, hard-headedly, and not get entangled in the first place.

Copy link to clipboard
Copied
richardplondon wrote:
The whole thing's a Gordian knot..
I prefer the term "can o' worms", but I'm inclined to agree - the more Adobe gave, the more people would see how perfect it isn't, and want more..
In my opinion, it's really best to wean from camera settings, and embrace Lightroom - learn to enjoy deferring settings for post-processing at computer - my favorite thing about shooting raw is not having to worry about anything when shooting except focus, composition, and exposure.. which is still a lot.
I don't use iPhones or iPads, but I sure would like some Lightroom firmware in my camera. I think Adobe should team up with Nikon, or maybe Sigma - and let them concentrate on hardware, with Adobe doing Lightroom compatible camera UI / preliminary processing - fingers crossed for 202X.
Cheers,
Rob

Copy link to clipboard
Copied
I have experienced the same problem - I love the way my RAW files are rendered on the LCD of my Nikon D750, and LR has them look just like that when I import them ... but after a few seconds, or after I click on a thumbnail to enlarge it, WHAM - it brightens WAY up, tones etc - it used to be that none of the sliders would move, but now they do (LR5.7) ... so confused. Help!

Copy link to clipboard
Copied
Read carefully- Post 120 above,
and-

Copy link to clipboard
Copied
I have your answer!! The same was happening to me. Go to the Develop tab in Lightroom, scroll to the bottom on the right panel where is says Camera Calibration. You need to make sure you select the same profile you shot in. For example, if you shot in Portrait mode on your camera, you need to select Camera Portrait in Lightroom. Try it! Here's the article I found: How to Get Accurate Canon Colors in Lightroom

Copy link to clipboard
Copied
Thank you - this works

Copy link to clipboard
Copied
This always happens when you work with raw, if you want to see the original preview not the one that Lr generates, just go to camera calibration>profile> and select the option "camera neutral" this option comes along with the default option that Lr uses that is "adobe standard", when you select "camera neutral" it shows you the pic as you see from the camera.

Copy link to clipboard
Copied
I am having the same problem, suddenly. These are pictures from 2003, jpgs only. When I look the first time, the good ones are fine, but the second look blows the highlights out to the point of the whites being red. (clouds, slightly overexposed window bits where I was capturing the people inside, etc.) It's fixable, in that I can dump the highlights, but why is it doing this? If I had been blowing up the highlights on a regular basis, I would think it was "learning." But I haven't.
This just started happening today, I am on Dell Inspiron 7537 laptop, Windows 10 Home 1511. Lightroom 6.6 (Camera Raw 9.6). I did not change anything between yesterday and today intentionally other than the size of my database, and editing images within.
Friend's camera in question was a Canon EOS 10D, and mine a Canon Powershot G2. Happening every time with the EOS, only occasionally with G2. No, monitor not calibrated, but it was not yesterday either. What would change it between yesterday and today?

Copy link to clipboard
Copied
You are not having the same problem!! What you are seeing is the highlight clipping indicator. Click the triangle with the square around it in the upper corner of the histogram to turn the indicator off.

Copy link to clipboard
Copied
Ok, then - two questions:
1. How did it suddenly get turned on (I had not had this experience
prior to a couple days ago)? Believe me the other 19000 photos were
not all perfect!
2. Why does it not show the clipping right away? I view the file, no
red or blue bits, then go back, and there it/they is/are.
It's a useful feature, but not if it doesn't show on the first view,
since that first view is when I want to make any processing changes to
the file. To find that more are necessary after I"ve thought I was done
is annoying.
Thanks,
Nancy
Copy link to clipboard
Copied
You probably accidentally hit the "J" key which is the shortcut to turn the clipping indicators on and off. Getting rid of ALL the clipping is not necessarily good for all your photos as some photos look better with some highlight/shadow clipping, especially shadow. If they looked good when you edited them than this is probably the case. Depend more on your creative eye than Lightrooms clipping indicators.
See here for more info on the clipping indicators. Don't Get Clipped! — Lightroom Secrets

Copy link to clipboard
Copied
I'm not placing blame on Lightroom or Leica, but I can empathize with the OP. I have not experienced this much of a difference w/ my other RAW images from Canon, Nikon, or even Sony:
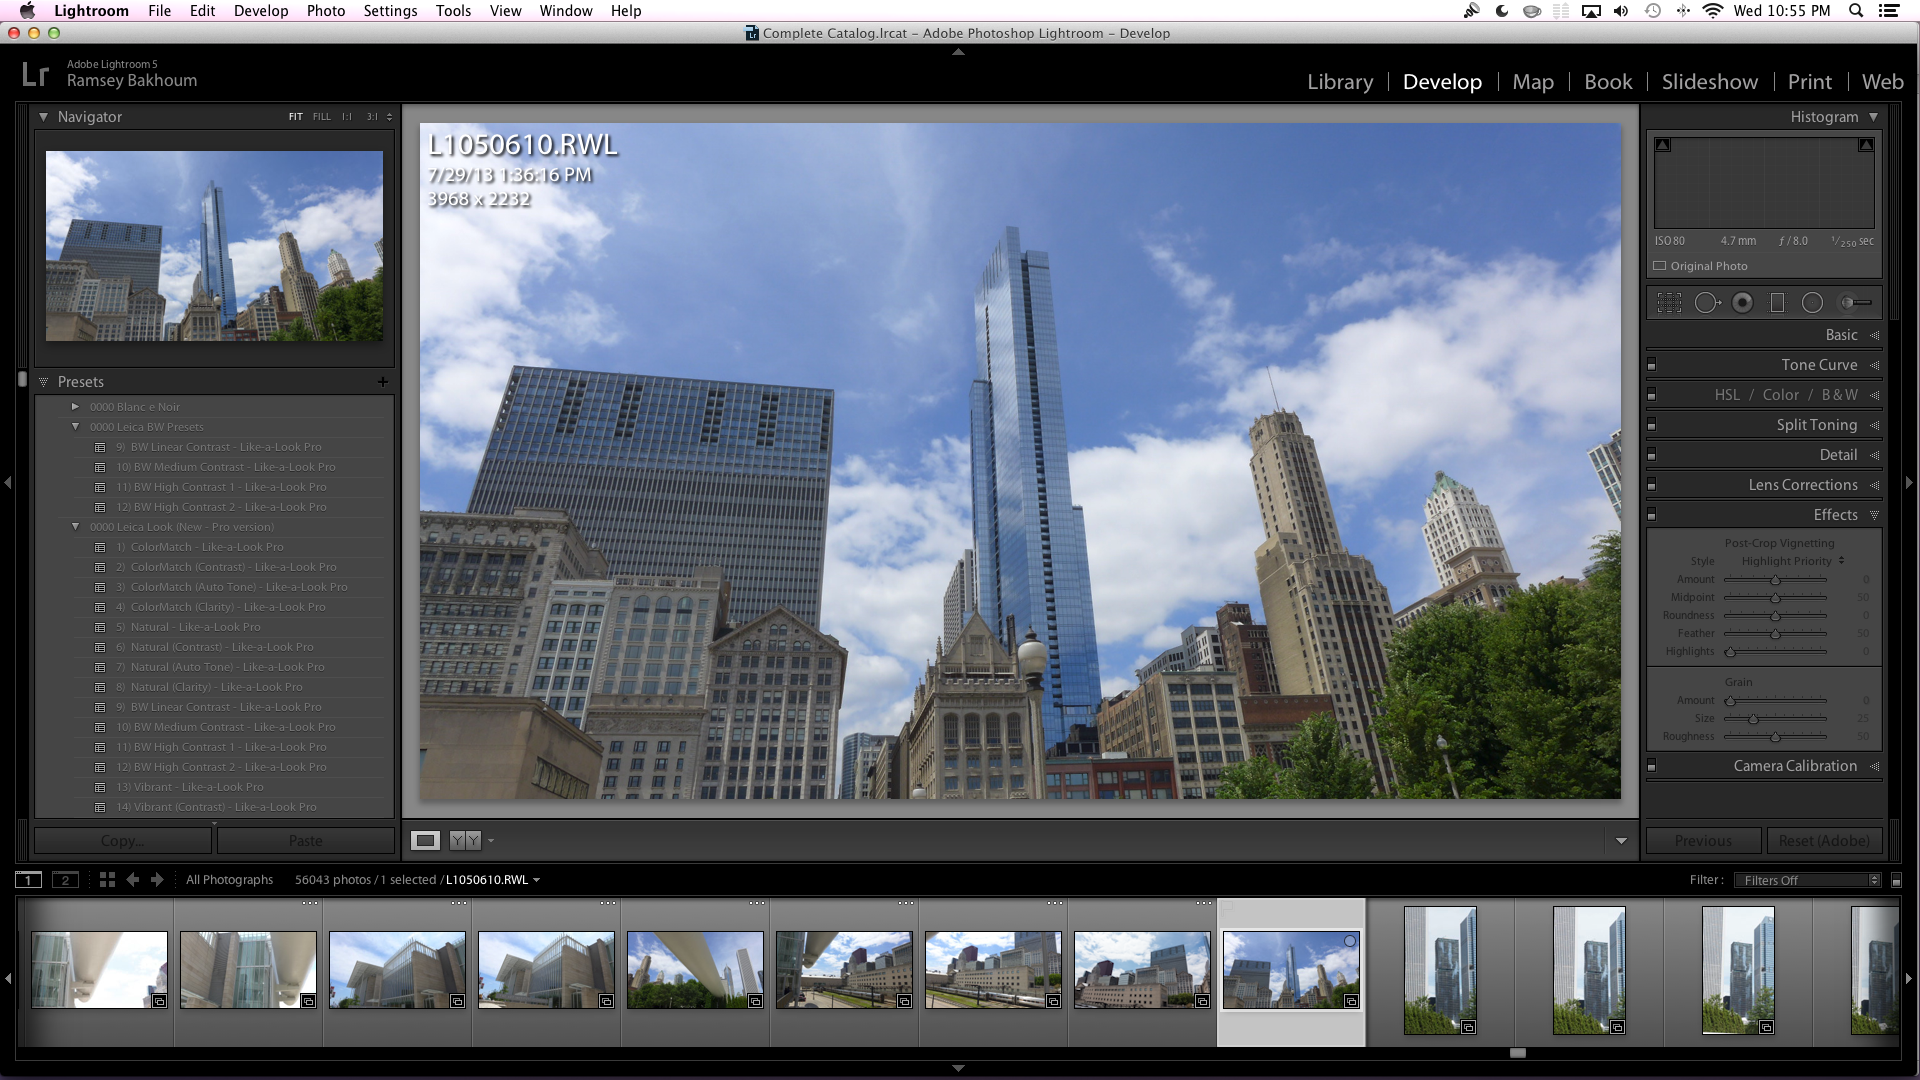
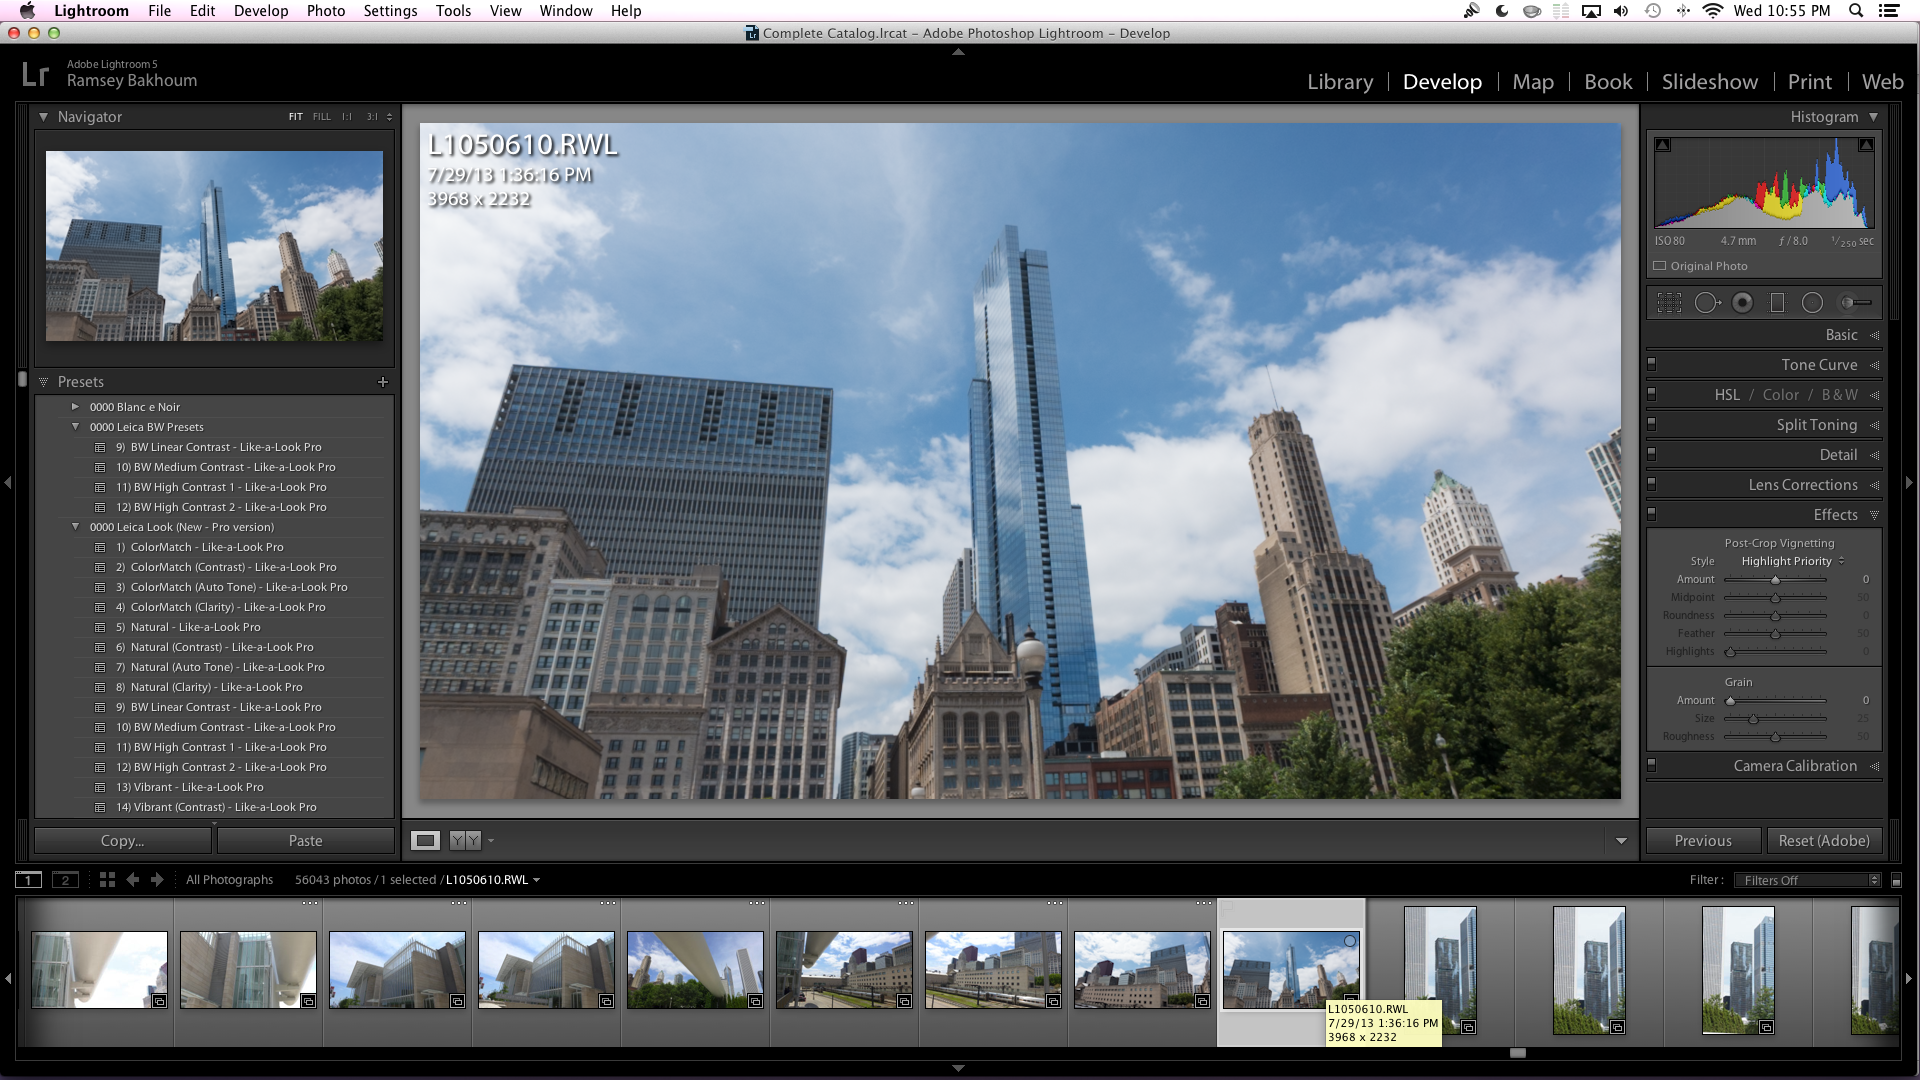
Here is what I have observed (These images are taken 8 seconds apart, with embedded JPEG preview and after preview disappears)
The first image is a screenshot of a RWL image file taken with the Leica D-LUX 6 less than a second after clicking the thumbnail (embedded JPEG preview). The second image is the RWL file after processing. While I completely understand the purpose and the difference in Raw files vs JPEG (and would obviously never use JPEG) there is something else going on here. Aside from the noticeable and expected color differences, the second file becomes considerably blurrier, to the point where the sharpness achieved in the JPEG can't be replicated. I've tried.. and tried.. and tried... and it is not achievable with these Leica images (I'm talking about image sharpness). Notice the detail in the vertical ribbing of the high-rise on the left side of the picture in both photos. And the sharpness of the trees, for example. The vertical ribbing on the building is pixels wider, achieving a blurrier appearance in the second image. The first image looks great in terms of sharpness. And that's just the image sharpness. The color, obviously, has that perfect "Leica Look" sought after and familiar w/ Leica glass, and colors that are very true to life. There does not appear to be any combination of adjustments I can make to even come close to the color range in the original JPEG, it seems. The only desire to resemble the original JPEG recorders in camera is that the colors are very true to life. In the second image, after unembedding the in-camera jpeg, the reds in the sky are lost, the highlights are never quite the same. I get it. I understand raw will look different and that it does not have the same appearance, but I think Leica is doing something to these RWL's that scramble their proprietary Leica Look once the RWL is created or once the JPEG preview is unembedded. I want to use the RWL's. I really do. but I have spent countless hours trying to replicate curves and color adjustments to "resemble" (let alone replicate) that beautiful first image and I can't get there. And once the RWL has dismissed the embedded JPEG in Lightroom, I can't even use the original embedded JPEG as a reference. Has anyone else experienced this? I wish Leica would provide a proprietary RWL to DNG converter that carried over that Leica Look over to its RWL's without losing sharpness and dynamic range (and having to recreate it for each image). Again, no issues with the other camera manufs raw formats.. These are just downright blurry as RWLs. Anyone else experiencing this and or know a fix? I'm happy to provide full size original files if necessary.

Copy link to clipboard
Copied
I believe what you're seeing, the difference in sharpness, between the embedded camera JPG and the camera raw, when viewed in Develop using Fit Zoom, is Develop's severe oversharpening of non-whole-number-zoom preview images, and there is much more initial sharpness in the Leica JPG for the oversharpened Develop view to bite onto, compared to the raw sensor data that you see with the AWL.
If you want a camera JPG for reference, then shoot RAW+JPG if your camera allows it, but don't get hung up on Develop's non-accurate Fit Zoom preview guesstimate. Fit previews are for toning not judging sharpness which should be done at 1:1 zoom.
If you want some more detailed analysis upload that AWL to www.dropbox.com and post a download link to it in a reply, here.
Copy link to clipboard
Copied
Original RWL: L1050610.RWL
Copy link to clipboard
Copied
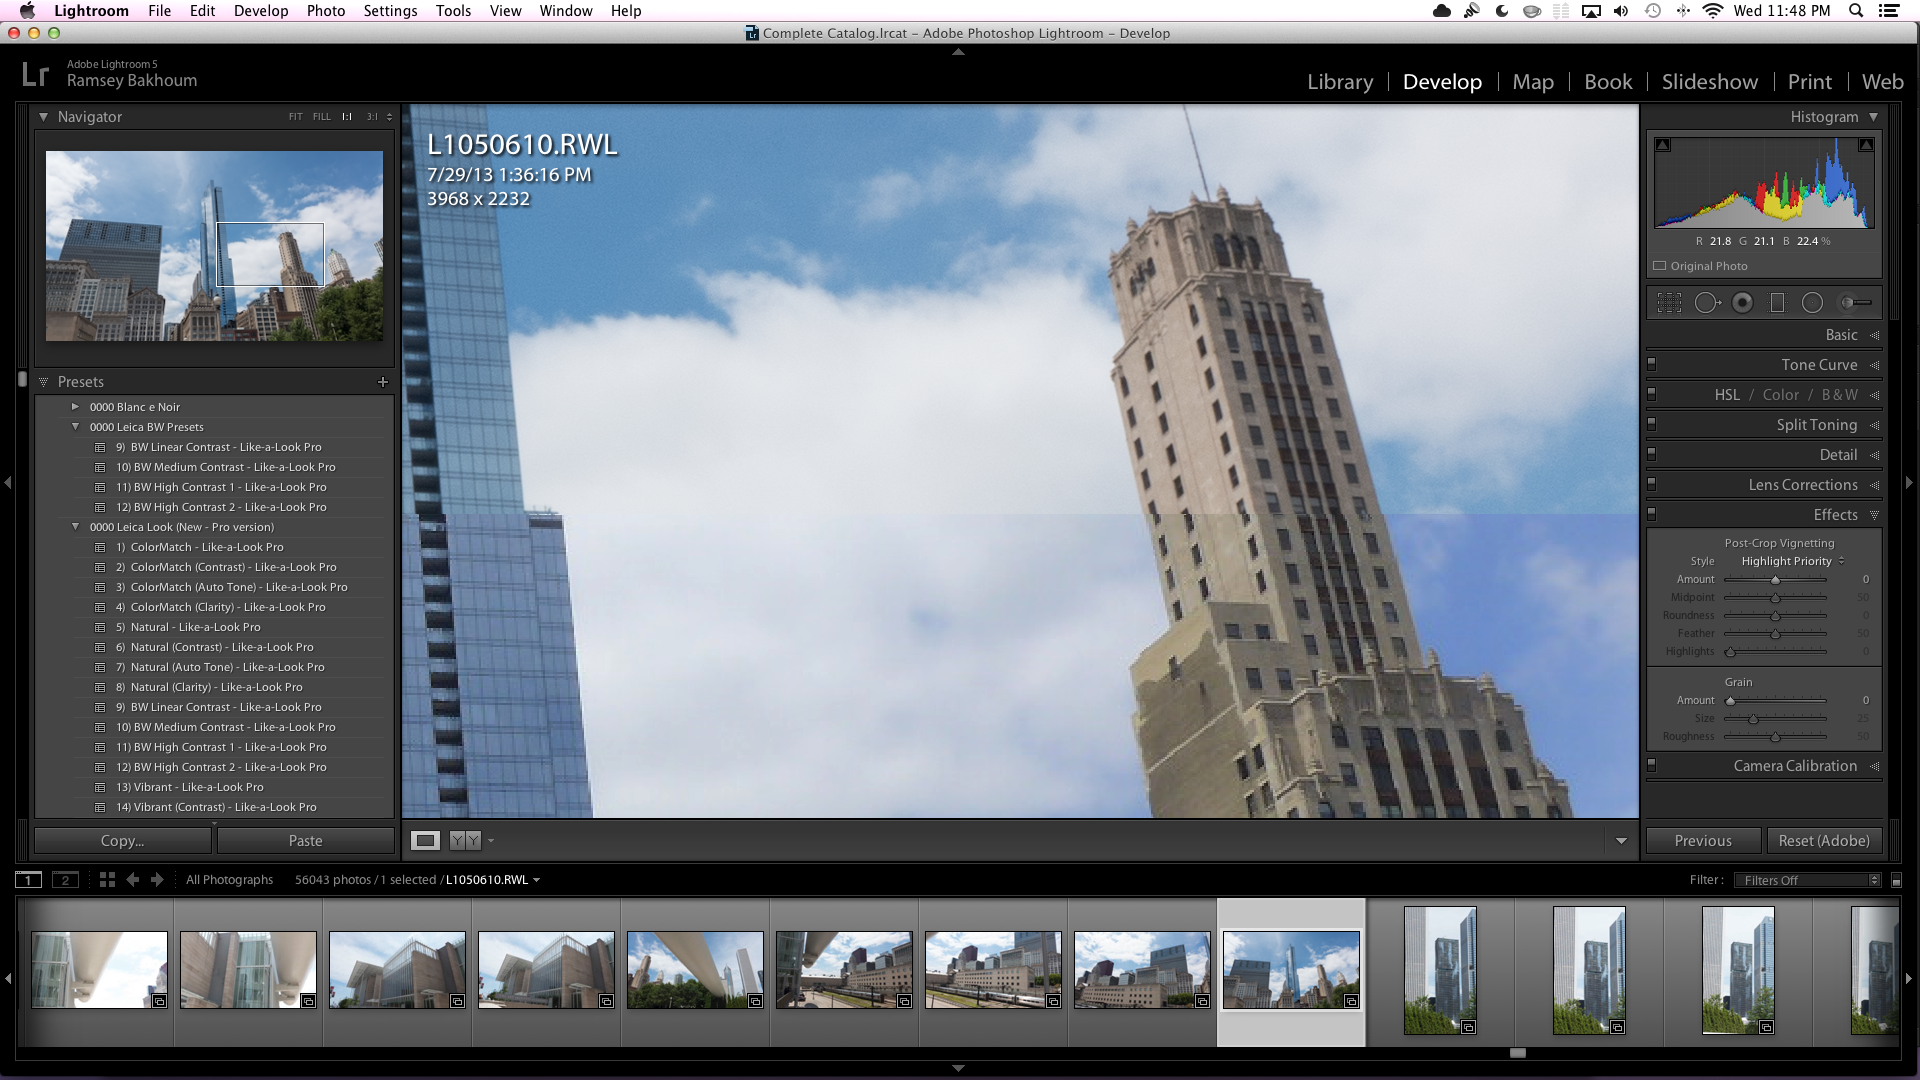
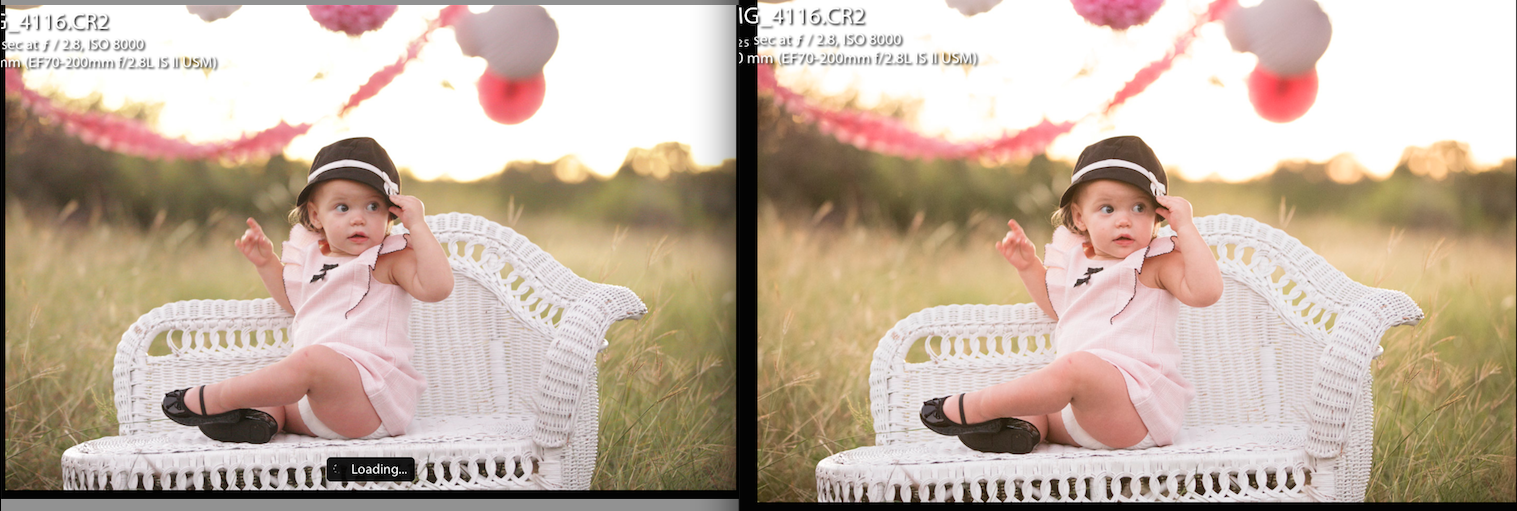
Hi, ssprengel. Thanks for your input. The link to the original file is being moderated... but here is something in the meanwhile that may describe the difference as well. I used the 1:1 view as you suggested in Develop mode. I seem to be getting the same results, but check this out. As I use the mouse to pan, the embedded in camera preview shows up for a brief while where the screen hasn't had a chance to refresh. In this image, you can see that there is a shifting of pixels, as if the in-camera JPEG is using an entirely different lens correction algorithm altogether. See towards the left side of the image for a clearer example of the embedded JPEG pixel alignment comparison vs RWL pixel alignment of the same image.
Copy link to clipboard
Copied
Your top-bottom-split view shows the difference more clearly. The original preview LR is showing is much lower resolution.
Extracting the camera-embedded preview JPG from your RWL file using the following website -- Jeffrey's Exif viewer -- one can see that the camera JPG is 1920x1080 pixels or a little less than half the resolution of the raw data and has been sharpened in camera at that resolution so it looks sharper but with more pixilation than the original raw data processed by LR.
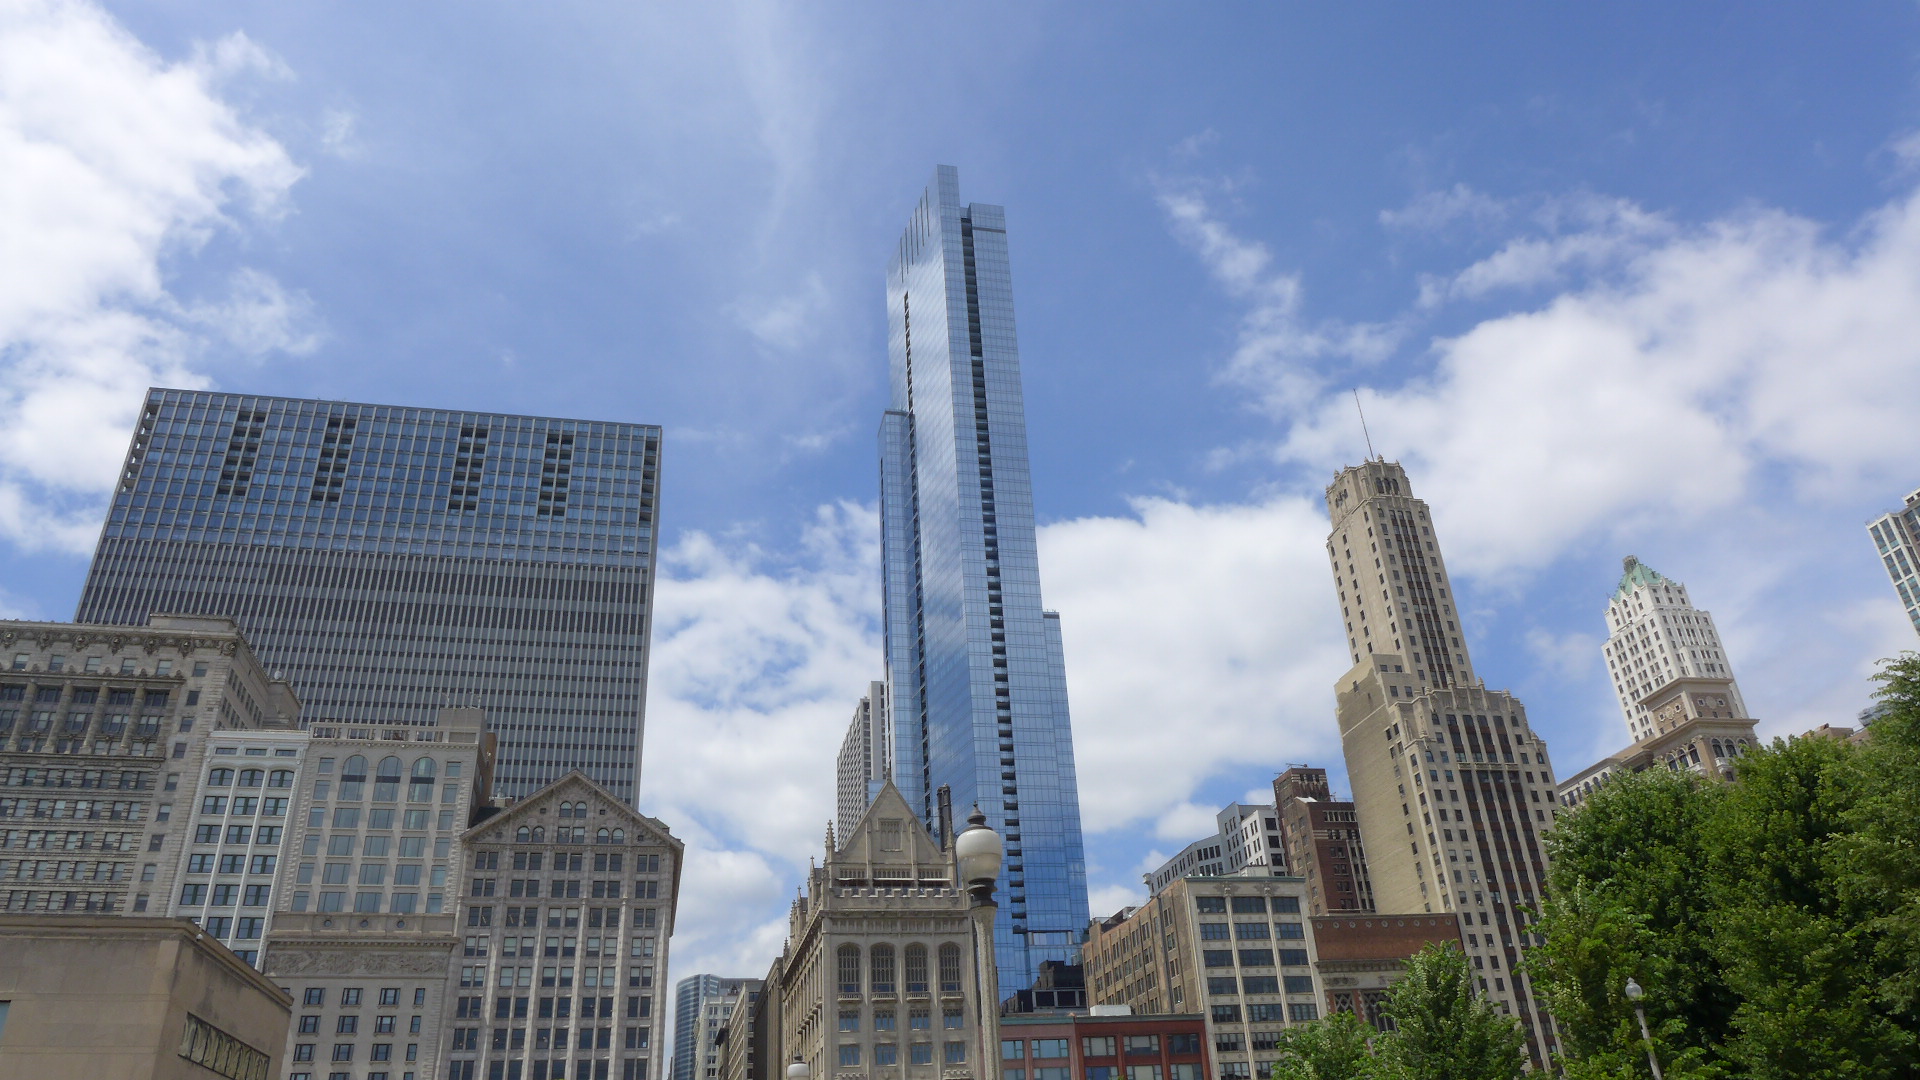
Here is your preview JPG -- right-click Open Target/Link in New Tab/Window to view full size:
Copy link to clipboard
Copied
Thank you.. Would you be able to help me decipher the in-camera color balancing from the exif and how I may be able to simulate it in lightroom?. The link above was helpful, however, I believe there is still some proprietary processing which is not evident in the exif in addition to a different distortion algorithm applied. Why else would there be such a drastic misalignment in the pixels as seen in the far left of the image as seen with the vertical ribs on the high-rise. The JPEG, while smaller, as you say, is in the same proportion of the image.
Copy link to clipboard
Copied
If you scale the preview and the raw file to the same size, and alternate between them, it seems as though the image is shifted slightly diagonally between the preview and the raw, rather than the lens distortion corrections being different.
Adobe only supplies one Adobe Standard profile for Leica cameras. Canon, Nikon, Olympus, Fuji have other profiles from Adobe that try to simulate the camera color processing for various modes.
--
You can make your own color profiles with a Color Checker standard target and either Adobe or X-Rite software. The standard color target is what costs money. It won't be the same as what the camera does, most likely, but you can match your raw conversions to the lighting characteristics more closely:
http://xritephoto.com/ph_product_overview.aspx?ID=1257
Here is another possibility, but they seem to have trouble getting cards produced. They seem better because they can make color profiles that clip bright colors, less, preserving more detail:
http://www.qpcard.com/en_b2c/color-profiling/
I've used an X-Rite Color Checker Passport for years although a lot of times I use Adobe's Camera Match profiles for my Canon DSLR, instead. I ordered a QPCard from B&H Photo May 1st, and now they are backordered until the end of July. They are a small Swedish company.

Copy link to clipboard
Copied
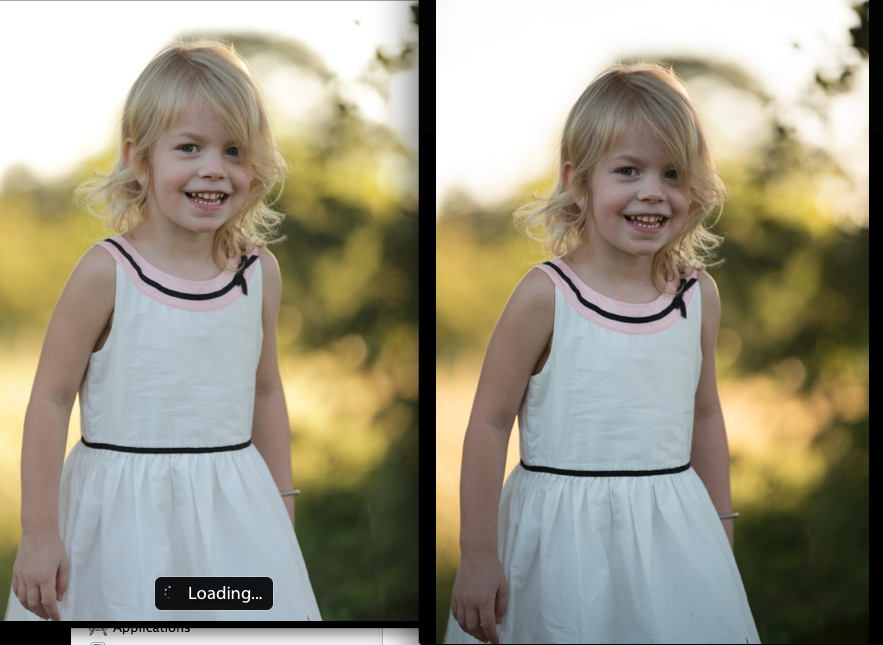
Can you please let me know if my images are the result of jpg preview then RAW convert via Lightroom? Image on left is before it "loads" and image on right is after. These are from last night and are minor compared to previous imports. As an example the shadows and tone look worse after it loads. her skin color and hair color changes. Thank you!
Copy link to clipboard
Copied
Also may be hard to tell by the magentas always seem saturated.
Copy link to clipboard
Copied
TishyB2013 wrote:
Also may be hard to tell by the magentas always seem saturated.
That's the Adobe Standard camera profile, which does seem pretty magenta-y to more than one of us.
Consider:
* Creating a variation of Adobe Standard using the DNG Profile Editor with the maganta-y-ness toned down, or
* use a preset with camera calibration sliders tweaked to suit, or
* change the tint toward green.
Rob

Copy link to clipboard
Copied
Can you please let me know if my images are the result of jpg preview then RAW convert via Lightroom? Image on left is before it "loads" and image on right is after.
As far as I know, that is the only possible explanation of the change of appearance after you import a RAW.
Copy link to clipboard
Copied
That is what I thought. Thank you for your time!

Copy link to clipboard
Copied
I think that your default settings are the fault here. In the develop module, with one of the screwed up images chosen, hold down alt on a pc opt on a mac and click "set default" on the lower right corner in lightroom. Holding down alt changes the "reset" button to "set default". After you click on this, in the new window, select "Restore Adobe Default Settings". This should result in a "better" rendition of your previews. Now, if you want to make changes (including camera profiles that may be available to match your in camera processing) to the "default" settings, you can and make these new settings your default by alt/opt>set default>Update to current settings.

Copy link to clipboard
Copied
Ninjapimp,
I feel your pain! I am having the exact same issue but it turns my image way way too dark. I understand what everyone is saying about jpegs out of camera for the preview versus raw files in LR. This still does not seem to make sense. In my case, the image on the camera screen and thumbnail preview when initially viewed in LR looks beautiful, sharp, and well exposed. After the "loading," completes, the image turns dark.
At first, I didn't fret and attempted to adjust exposure, fill light, etc. Now my image looks grainsy as SH*T! Complete loss of detail. Not how I exposed the picture and the picture out of LR is unusable.
Someone please help. This is not just a "JPEG" issue. It seems like my camera (Sony Nex 7) can understand data in the file that LR cannot.

 AdChoices