 Adobe Community
- Home
- Lightroom Classic
- Discussions
- Moving from Lightroom Classic Library - > develop...
- Moving from Lightroom Classic Library - > develop...
Moving from Lightroom Classic Library - > develop module , Photo gets a lot darker
Copy link to clipboard
Copied
I know this has been asked before but I could nto find the answer yet. I appologize in advance and appreciate if you can point me in the right direction.
I use Nikon-D850 , I shoot in Raw, my camera is set to use adobe color space. Picture control is set to NL (minimally processedig camera). Camera LCD brighness is set to -1. When I look at the photo in the Camera it shows good light. When I import it in Lightroom Classic, the Library module shows it bit darker but still acceptable. LR Classic > Preferences > preset = Camera settings.
When I move it into Develop module, the image is now a lot darker.
What do I need to do in order for the images to match across the board ? My flow is Camera > Lightroom > photoshop
I use Adobe CC with autoupdate so I am in the latest version. Working in windows 10.
Thanks
Copy link to clipboard
Copied
This could be caused by a bug in the GPU driver, or by a defective monitor profile.
First of all, try to disable the GPU.
Edit > Preferences > Performance > Set Use graphics processor to Off.
If this fixes the issue, update your graphics driver, and then try turning the GPU back on.
If it doesn't fix the issue, you probably have a defective monitor profile.
As troubleshooting, and as a possible temporary fix, try setting it to sRGB. (use Adobe RGB if you have a wide gamut monitor)
If this fixes the issue, you should ideally calibrate the monitor with a hardware calibrator, which will also create and install a custom monitor profile that accurately describes your monitor.
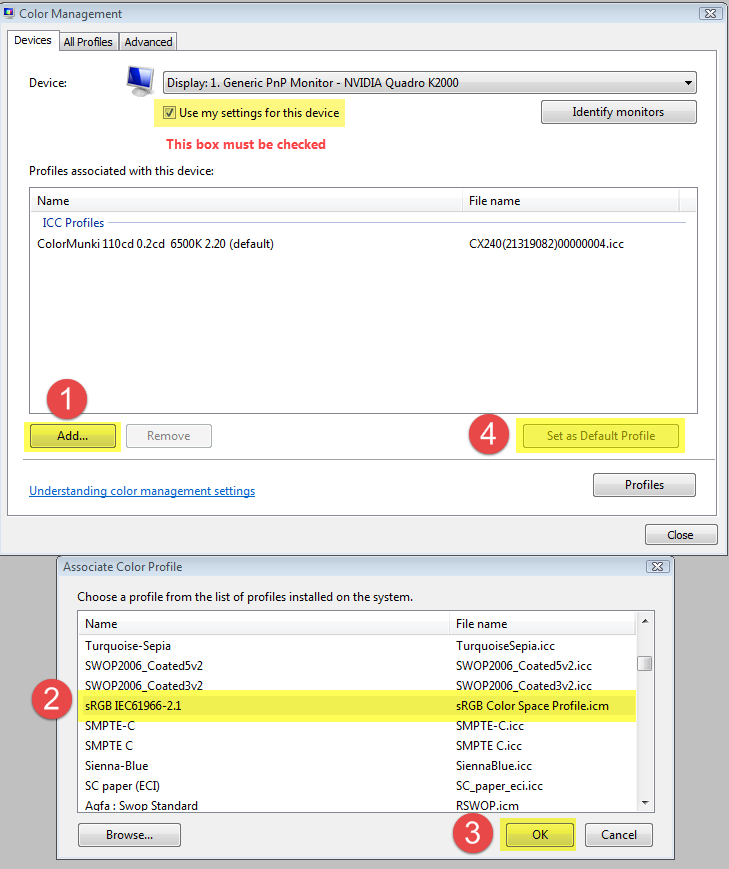
Press the Windows key + R, type colorcpl in the box and press Enter.
Add the sRGB profile and set it as default.
Lightroom will have to be restarted to become aware of the new profile.
Note that the color space setting in the camera only applies to jpgs.
Also, the image you see on the back of the camera can't really be trusted. (and it doesn't show you the raw file, but the raw file's embedded jpg)
This is not a high quality display, and the viewing conditions will vary considerably.
It might be better to use the histogram for image assessment, although this is also somewhat misleading, since it's for the embedded jpg.
