 Adobe Community
- Home
- Lightroom Classic
- Discussions
- Re: RAW Image imports way too contrast
- Re: RAW Image imports way too contrast
RAW Image imports way too contrast
Copy link to clipboard
Copied
Hello Everyone,
I have started to use Lightroom Classic recently in order to make adjustments to the RAW images I take with my GoPro. It all worked fine in the beginning, but recently I have calibrated my monitor and since then it seems that when I open my catalogue, every RAW image is way to contrast.
To be clear:
- My edits look the way they should (used to)
- Jpeg imports look the way they should (used to)
- Unedited RAW files look way to contrast
It seems like Lightroom is applying some kind of default edit or filter on all images. Has anyone else ran into the same problem?
Thanks,
Denis
Copy link to clipboard
Copied
Things to try-
1) Reset the Develop Defaults-
Select a raw image, go MENU / DEVELOP > SET DEFAULT SETTINGS...
Choose and click [Restore Adobe Default Settings ] from the dialog-
Now your future imports will use the Adobe 'Default'.
or
2) Select a raw un-developed image, Choose a Profile from the Profile Browser that you like, and-
go MENU / DEVELOP > UPDATE TO CURRENT SETTINGS...
As well as Profiles, you can even include Develop adjustments (reduced contrast slider, etc) to be included in your preferred 'Default' settings.
or
3) Check you do not have any Develop Preset set in the Import dialog.
4) Recheck your calibration process. Without a calibration device, doing it visually, is very prone to errors!
Copy link to clipboard
Copied
Thanks, however unfortunately none of these methods worked.
I have calibrated using the X-Rite i1Display Pro and the DisplayCAL software. It seems that even when I go to the import browser, the thumbnails are already way too contrast. That also seems to happen in Photoshop, so I’m not sure if both of them do an automatic adjustment somehow.
For reference, below are how the images used to look before and how they look now:
Copy link to clipboard
Copied
Monitor are usually set from factory with a luminosity much too high for photo editing. It's often around 200 Cd whereas it is recommanded to set it at around 100 Cd for photo editing. Therefore, when you calibrated your monitor, there is a great probability that the luminosity of the monitor has been decreased.
That's why your image looks darker after calibrating. It's the way they look before calibrating that was wrong.
Also, RAW files doesn't contain an image (as jpeg or tif files do). To show an image from a RAW file, raw data have to be interpreted (developped). The image you see on the screen of your camera is in fact a small jpeg image created by the software of the camera after developing the raw data. When LR import raw data, it also has to "interpret" them to be able to show an image. This develop is done with some default values (which you can change by using a preset or setting a default value). However, the algoritm used by LR to "interpret" the raw data is not the same than the algorithm of your camera, hence a small differnce in the result. The profiles in the develop module are a way to simulate as much as as possible what the rendering of the camera.
Copy link to clipboard
Copied
"Thanks, however unfortunately none of these methods worked."
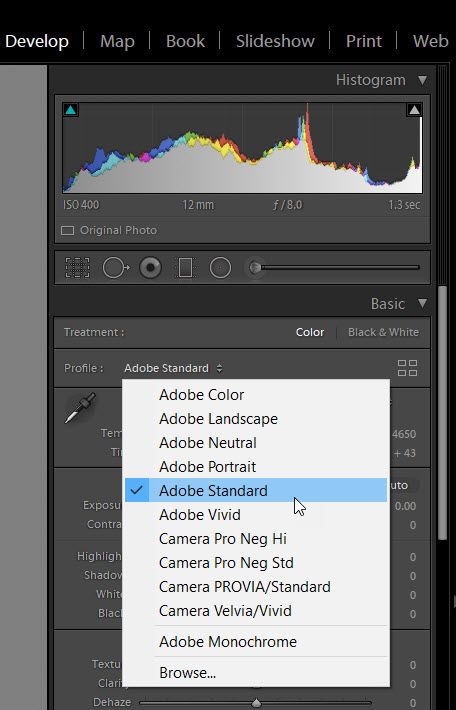
As suggested you need to change the default Adobe Color camera profile to a profile closer to your in-camera settings. Try Adobe Standard as shown below.


