 Adobe Community
- Home
- Lightroom Classic
- Discussions
- Why Does Print Module Export Increase File Size an...
- Why Does Print Module Export Increase File Size an...
Why Does Print Module Export Increase File Size and 'Stroke' Borders
Copy link to clipboard
Copied
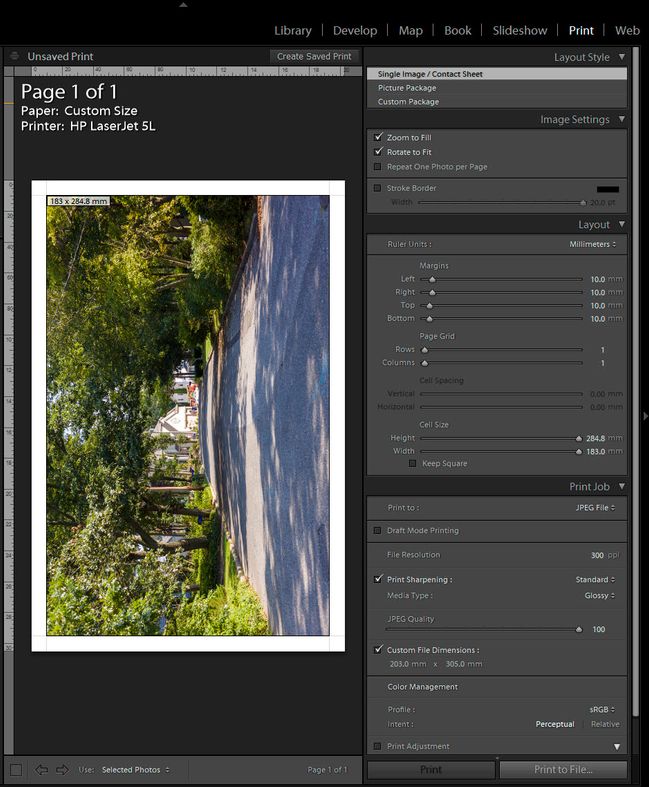
Help!! Im so confused . . . Does anybody have an explanation as to why when exporting from the Print module in Lightroom Classic, at 300dpi the file size has increased from 5.4 MB to 8.4 MB having added a white 'stroke' border?
Exporting not via the print module keeps it at 5.4 MB. Can't figure out why, what appears to be the same specificaitons gets two very different results?
Also, how big is 20 pts on the 'stroke' border in mm? Internet gives me so many different answers and is there a way to increase this so I know its 10mm?
A confused non-expert lightroom user!!
Copy link to clipboard
Copied
A digital file does not have any dimension in millimeters, so you can't really talk about a 10 mm wide border in a digital file. The resolution in ppi (not dpi) is only relevant when the file is printed. So if you would want to have a 10 mm wide border when printed, then the math would be as follows: Your print will be 300 pixels per inch. An inch is 25.4 mm. So in order to get a 10 mm wide border, that border needs to be 300/25.4*10=118 pixels wide.
You can't compare the file sizes just like that. When you export your image via the export menu, you will export it at the original size (unless you resize it in the export dialog). When you print to file, you will print a file that has the dimensions of the chosen paper size, multiplied by the resolution in pixels per inch that you chose in the Print module. That could give quite a different size image. It could be smaller than the original, but it could also be bigger.
Copy link to clipboard
Copied
Thank you Johan - this was very helpful!
Copy link to clipboard
Copied
Hi Karen,
Not seeing the original dimensions of your project it's hard to be exact but probably the issue is one of resolution. Piece of trivia, if you double the width of an image, it's storage size quadruples. So, for example, if you have an image that is 2000 pixels wide and 1500 pixels tall, it's a 3,000,000 pixel image. If you now double that (4000 x 3000), it's a 12,000,000 pixel image. The issue here is that each pixel adds to the storage size of an image.
So, if creating that white border added to the total size of the image (by adding pixels around the original image), that's probably where the extra storage size came from.
As far as the font issue, whew, welcome to fonts. Technically, fonts are measured in points and each point is 1/72 of an inch. But in real life what does that mean? In the font world, the size is based on an invisible box which encompasses the tallest ascender to the lowest decender (notice that width doesn't enter into the conversation).
Try this experiment: Take the fonts in question and make a test sample of the text you wish to use. Write it out multiple times (one for each font) and then print that out. E.g.,
Mary had a little lamb
Mary had a little lamb
Mary had a little lamb
But each line should be a different font BUT ALL OF THE SAME SIZE.
You will see that each one is a different width even though they are all (sic) 12 point.
So, to answer your question, you will have to experiment to find your answer with your own fonts.
Last piece of trivia: When the Mac was first introduced, it had one extra piece of uniqueness: each pixel on the screen was 1/72" so that when you were using text, it truly was WYSIWYG. Something that was 72 pixels tall was in real life 1" (and would print on your Imagewriter that way. That is significantly why, to this day, you will see references to screen resolution as 1/72" even though that has nothing to do with (for example) my screen which is a 5k iMac.
Let us know if this helps you out.
Copy link to clipboard
Copied
Thanks Gary - so helpful!
Copy link to clipboard
Copied
The file size should be very close to the same using the Print module and Export module using. JPEG compression of the added stroke border should not increase the file size significantly. Check your size, resolution, quality, and sharping settings in both modules to make sure they are identical.
You can use an online converter to calculate the stroke border size in pts. 20 pts = 7.06 mm. A 10mm stroke is 28.35 pts, which is not possible in the LR Print module since its limited to 20 pts.
https://www.unitconverters.net/length/point-to-millimeter.htm
Copy link to clipboard
Copied
Thanks Todd - I'll try that out. Much appreciated!
Copy link to clipboard
Copied
You can create a 10mm white border using the Margins settings as in the below example. To keep the border uniform you will need to check 'Zoom to Fill' which may crop a small amount of the image area dependent on the actual image aspect ratio and target paper size. Leave it unchecked if a non-uniform border is acceptable. You also need to set the Print Sharpening for the target paper type (Glossy or Matte). The below example uses a standard uncropped camera image with a 2x3 aspect ratio and target paper size of 203mm x 305 mm (8" x 12"). A very small amount of the image top and bottom is cropped. You can reposition the image crop by placing the curso over it and holding down the left mouse key.
Copy link to clipboard
Copied
Hi Todd - I'm hitting another issue which is preventing me getting my exact required print size.
Under 'Develop' I have scaled the image to 210 x 297.
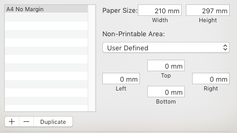
In the Print Module/ Page Setup I've got a custom size set - borderless, 210 x 297mm (or A4 in UK).
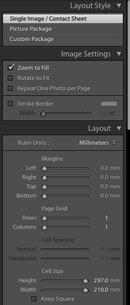
I've got no margins under the Layout Panel and the cell size is also 210 x 297mm.
However, when you look at the dimension 'label' on the image itself, it is fractionally off at 209.99 (there is a tiny white edge showing on the right - see image below) The 'zoom to fill' adjusts the height by a fraction to the right size but does nothing to the width and I can't figure out why!
There is also a white edge along the bottom of the image that disappears when I 'hide' the rulers. So I guess that's just some type of shadow and not actually margin?
The output of the photo with or without the white margin (top tip by the way) is fractionally off due to the above issues and I need it exact.
Any ideas? Thanks so much!
Copy link to clipboard
Copied
In your original post you were using the Print module to output a JPEG file, which would then be used by an outside printing facility. What you are doing now is printing direct to a local attached printer. What model printer are you using?
Also what exactly do you mean by "Under 'Develop' I have scaled the image to 210 x 297?" Please explain in detail how you are accomplishing this "scaling" and what the image size is in pixels after doing so.
Copy link to clipboard
Copied
Hi - sorry for the late response.
Ignore my comments about resizing under the Develop menu before printing. I think I'm making it more confusing than it is.
So I have my original image and want to print to file at A4 or 210 x 297 mm. Below are my print options.


The output for an A4 should be 2480 x 3508 px and mine comes out at 2480 x 3507 px!
And as my picture below shows, in lightroom there is a tiny edge of 'white' on the right that simply won't go! Also corroborated by the image size, which is 209.99 instead of 210.
I hope that makes sense and hope you can help once more! It's driving me crazy! 🙂
Copy link to clipboard
Copied
Forgot to include this pic!
Copy link to clipboard
Copied
That looks like a rounding error in a mm to inches conversion. 297 mm is 11.69 inches rounded to two significant digits. 11.69*300=3507 pixels. If you do the mm to inches conversion with one more significant digit, you get 11.693*300 = 3507.9, which rounds to 3508. So that is likely the issue here. I would simply specify the custom file dimensions output size exactly in pixels instead of millimeters if you want exactly 3508 pixels.
Copy link to clipboard
Copied
Jao, pixels isn't a Layout Unit option in the Print module. Since the error is only 1 pixel this will never be visible in a print or onscreen so of no concern. I have no idea why her print preview shows a white edge as shown in her screenshot. I don't see it using her settings so have suggested she reset LR Preferences. Using her settings do you see the white edge and 209.99 x 297 mm paper size in the image preview?
Copy link to clipboard
Copied
Karen, you keep changing the target objective, which was originally to add a 10mm stroke border to the JPEG output print file. Either way I can not duplicate what you are seeing with Margins set to 0 mm or 10 mm. The JPEG output file is 2480 x 3507 pixels due to rounding errors, but I do NOT see the "tiny edge of white" as in your screenshot. The best way to figure out what's wrong is to provide the original file with ALL your settings applied including crop, etc. You can do this by exporting the file to DNG file format and uploading it to Dropbox or other file sharing site and pasting the share link in a reply here.
BTW what does it look like with your settings if you simply set the Margins to 10 mm, which was the original objective? It works perfectly on my system.
Copy link to clipboard
Copied
Hi Todd - yes I can get a 10mm border on all sides which is great. 🙂
I guess when I took the borders/margins down to '0' I was curious as to why the cell size showing on the image is not quite the cell size specified in the layout box.
It's not the image I'm using - I've tried several and when the cell size is 210 x 297 or 3508 x 2480, the exported file always comes out at 3507 x 2480. You mentioned rounding errors, so maybe this is as good at it gets!
Thanks for resolving my margins. I'll research rounding errors and see if I can figure out why that happens!
Many thanks!
Copy link to clipboard
Copied
"I guess when I took the borders/margins down to '0' I was curious as to why the cell size showing on the image is not quite the cell size specified in the layout box."
I'm seeing 210 x 297mm on the image for paper size. Check all of the settings as shown below, which is what I used. If your still seeing 209.99 x 297 mm paper size on the image preview I suggest resetting LR Preferences file as outlined at the below link. I suggest renaming or moving the Preferences file so you can easily restore it if of no help. Make sure to first close LR. When you restart LR it will have ALL of the settings back to their defaults. Change ONLY the settings in the Print module as shown in my screen shot and see if the white sliver and paper dimensions in the image preview are fixed.
https://www.lightroomqueen.com/how-do-i-reset-lightrooms-preferences/
"I've tried several and when the cell size is 210 x 297 or 3508 x 2480, the exported file always comes out at 3507 x 2480. "
As mentioned it's probably due to rounding when file dimensions are in mm due to files Resolution being in inches (ppi). I would call it a bug because simply using two decimal places in the calculation will provide the expected results. Regardless the missing one (1) pixel will never show when output to a printer. Due to print head to paper alignment variations all printers use a small amount of bleed to insure there is no white border on borderless prints.
Copy link to clipboard
Copied
I was referring to the custom size if you select jpeg export. You can specify in exact pixels there. If you then maximize the cell area it should cover the entire area. I am not at my computer at the moment but will try out later. I have never seen these 1 pixel errors but I do remember this being an issue with mixed units.
Copy link to clipboard
Copied
The question of course is why you would use the Print module to print as JPEG when you print borderless anyway. Why not simply export the image as JPEG? The Print module is normally only used to print to file if you want to add a border.
Copy link to clipboard
Copied
Johan the original request included adding a 10mm stroke border to the JPEG output print file, which can't be done using the Export module.
"Does anybody have an explanation as to why when exporting from the Print module in Lightroom Classic, at 300dpi the file size has increased from 5.4 MB to 8.4 MB having added a white 'stroke' border?"
Copy link to clipboard
Copied
I know that (and answered that), but the OP now asked a different question and so this time my answer is: "Why would you use the Print module to print to file if you do not want to add a border this time"?
Copy link to clipboard
Copied
A good reason to do this is to not have to generate new virtual copies to crop every image in a set in develop to the same aspect ratio as you want to print at. Or even if you want to print just one image at 8x10 but it is cropped at 4x6 ratio and you don't want to create a copy or lose the 4x6 ratio crop. The print panel gives you a quick and conventient option to do a quick and controlled crop. Also, export and print do not have the same choices for rendering intent if you are exporting to a certain color space specified by the printer. Export only does perceptual intent, which is usually what you want and inconsequential when you are exporting to a reference space but not always the right choice when printing an image.
Copy link to clipboard
Copied
The bigger filesize from the print module is likely because you selected jpeg quality 100. That is never necesary and jpegs from cameras never use quality 100 so your original file probably wasn't at that quality setting. There is no visual difference in prints from quality 85 up. I tested this thoroughly and it is just not possible to see it. A second factor is that you have output sharpening specified, which will increase the complexity of the image and therefore the jpeg filesize. Lastly, we do not know the resolution of the original image. Perhaps you are upscaling to hit 300 ppi, which will also increase the filesize.


