 Adobe Community
- Home
- Photoshop ecosystem
- Discussions
- Re: Advice for Newbie re toning photos for newspri...
- Re: Advice for Newbie re toning photos for newspri...
Advice for Newbie re toning photos for newsprint
Copy link to clipboard
Copied
I am temping at a newspaper for a month, I'd like to do a good job. One of the things I've been asked to do is "tone" (color) photos in PS before they go to print. The person who I am temping for explained this in about 30 seconds then left and I'm afraid I understood very little of it. My notebook says:
*sharpen as much as possible
*compress each channel C,M,Y,K
*adjust levels
*use eyedropper to fix white point
*make it contrasty
Could some kind soul explain all this to me? I do understand CMYK vs RGB, but all the rest is a mystery.
Alternatively, start from scratch and tell me what you would do if you were given an already OK photo and asked to "tone" it for print production on newsprint.
Explore related tutorials & articles
Copy link to clipboard
Copied
That sounds like the old "We don't use color profiles here (or don't even know that they exist).". It's probably an internship you may not want to mention on your CV... Aside from Sharpen translating to Unsharp Mask and similar filters, the rest is probably all just down to Curve and Levels adjustments, either globally or per channel. Compressing the ranges and adjusting the levels would prevent oversaturation and excessive ink bleed on print, though this is really not much use if they don't give you a reference value. Making stuff "contrasty" is simply adjusting the Gamma by pulling teh midpoint of a curve or shifting teh respective slider tick in the Levels panel. Similarly, a white point can esily be set using the eyedroppers in these panels.
Mylenium
Copy link to clipboard
Copied
They use color profiles. But the photos that are coming in from the wire services do no have embeded profiles.
"Aside from Sharpen translating to Unsharp Mask and similar filters"
"the rest is probably all just down to Curve and Levels adjustments"
"adjusting the Gamma by pulling teh midpoint of a curve"
"a white point can esily be set using the eyedroppers in these panels"
This is like a foreign language to me, can you translate?
Copy link to clipboard
Copied
@mos10279273 Sounds like fun job and I'm sure you will do a good job because you are asking for help in the first place. There are so many things to consider here. Will the images already be processed from RAW originals by the photographers? If so, are they giving you .psd files or .jpgs? If not, are you supposed to process the RAW files? The tools are similar for getting the desired results but some editing methods are destructive while others are not. If editing in Photoshop only, I'd start with the basic adjustments.
The sharpening direction is very nuanced since printers may also do their own type of sharpening after they receive your file. And photographers should be providing their sharpest selects to begin with. But it sounds as though you are being asked to do all this work instead. Slight sharpening in RAW is usually recommended. In Photoshop, I'd tread lightly here and maybe start with Filter > Sharpen > Unsharp Mask to see if there is any improvement. Always inspect files at around 200 percent in every area of the frame. Look at the main subject to be sure eyes and other details are sharp.
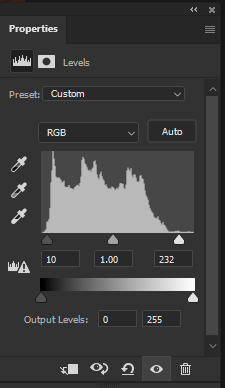
In Levels, look at the histogram and adjust the outside black and white levels inward to just where the levels start to increase. If you hold down the alt key while making the adjustments you'll see where to avoid shadow or highlight clipping.
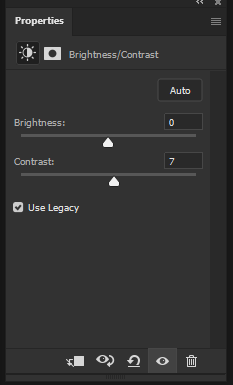
Make it "contrasty" is also rather subjective. You can use the Brightness/Contrast adjustment and start with "Auto" but that always seems to add too much brightness for me. Don't get into the habit of using "Auto" anything. Keep in mind that adjusting both levels and contrast may not always be necessary.
White balance adjustments are usually done in RAW processing. In Photoshop, you can use the Curves adjustment with the eyedropper tools. Getting the hang of Curves takes some time but once you do, it's really a terrific tool.
There are plenty of ways to approach this. These are only my suggestions and there may be many better/faster/easier ways to accomplish the same thing. It's also nearly impossible to give broad instructions with out seeing the individual image files and formats you are starting with. Good luck!
Copy link to clipboard
Copied
They are jpegs.
Copy link to clipboard
Copied
All the answers above are valid. Since this is for a newspaper (where image quaity isn't even that discernible at times) and time is an issue, I'd first try this:
1. Image>AutoTone - and then you can go Edit>Fade Auto Tone if necessary and adjust the slider to taste
2. Image>Auto Contrast - and again you can go Edit>Fade Auto Contrast and adjust the slider to taste, as this one can make the blacks too black. But that might be a feature not a bug since he wants them contrasty.
3. Filter>Sharpen>Smart Sharpen - you can adjust the intensity with the slider, and further adjust by going Edit>Fade Smart Sharpen
...........................
And FYI I'm on Photoshop CS6, so this stuff might have changed a bit with CC, not sure.
Copy link to clipboard
Copied
I found this link helpful: https://www.flasunprinting.com/tips-on-correcting-photos-for-newsprint-in-photoshop/


