 Adobe Community
- Home
- Photoshop ecosystem
- Discussions
- Re: Dynamic Watermark Opacity based on layer under...
- Re: Dynamic Watermark Opacity based on layer under...
Dynamic Watermark Opacity based on layer under it

Copy link to clipboard
Copied
Hello everyone,
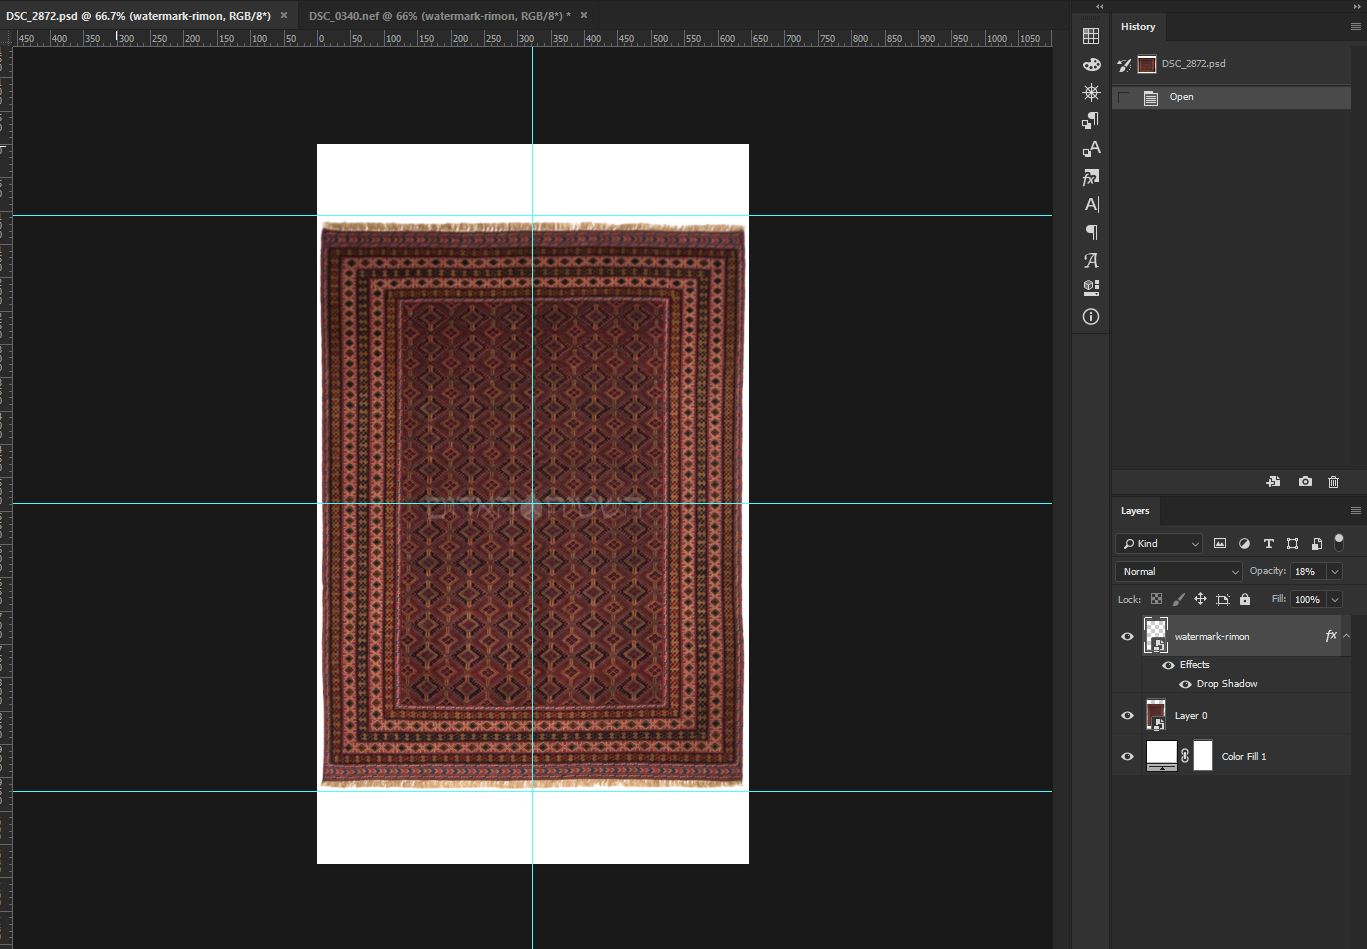
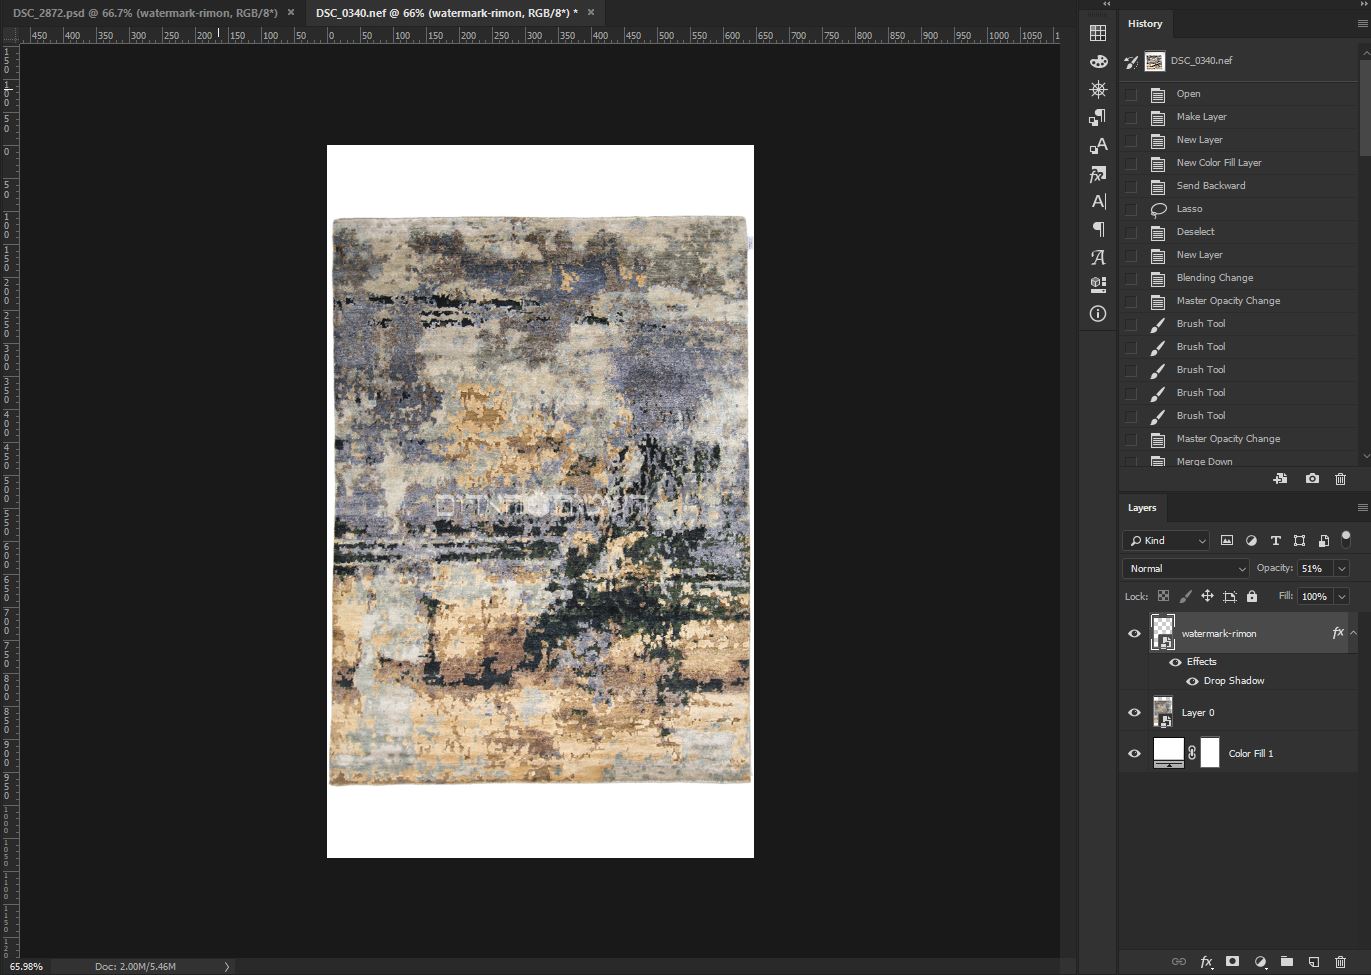
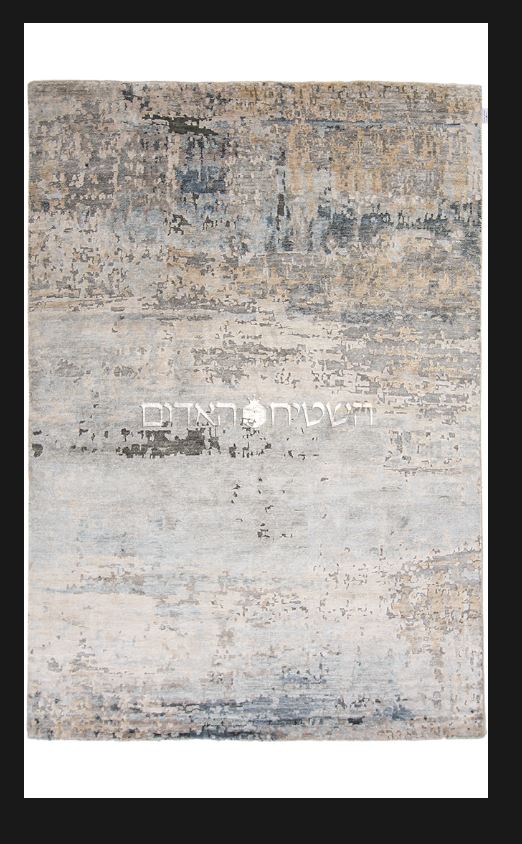
I have a watermark with opacity that needs to be dynamic according to the layer under it (in my case carpets)
sometimes there are dark carpets and the watermark will need less opacity (like the first picture: 18%) and sometimes there are brighter carpets or carpets with a lot of colors like in the second picture where the carpet is both bright and colorful, in this case the watermark will need more opacity (like the second picture: 51%)
does anyone have any ideas?


Explore related tutorials & articles
 20
Replies
20
20
Replies
20

Copy link to clipboard
Copied
Once I wrote similar script you can find here: apply logo and suitable for different sizes
Copy link to clipboard
Copied
sounds like we're going somewhere now 
but there so many parts of the code there with edits and refinements, do you please have the final version?
Copy link to clipboard
Copied
I don't have time to look into that topic, but I bieleve when you read all posts carefully you'll collect all parts into one piece.
Copy link to clipboard
Copied
Kukurykus the 2 posts are different since he wants different sizes and I need the same size, he doesn't talk about opacity he just have 2 different files:
logo_white.png
logo_black.png
where I have only one watermark file.
There was a nice idea by r-bin but he didn't wrote a code:
"The script is quite complicated. I'm too lazy to write it for free.
I can offer a scenario
1. Select the area of the expected position of the Logo.
2. Obtain an average color using channel histograms (for example, the average value of R = SUM (histogram
3. Deselect the selection.
4. Depending on the brightness of the color (avg_color.lab.l), select which file will be inserted as the Logo.
5. Insert (and, possibly, move to the desired position) your Logo in the document."
I wish we can execute this one because it sounds very good

Copy link to clipboard
Copied
You may want to play with blending modes, layer styles, Layer opacity and fill on your Watermark layer. You may fine a way of adding your watermark is such a way that it will always look good. One way the works well IMO is to set the Watermark layer fill to 0. So no watermark pixel are visible. And also add a Layer style to adds effects like emboss, drop shadow. Glows and other effects. All that is visible are the Layer style effects. A well design watermark should work well on any image IMO.
A Watermark should be sized and positions for different size images. A single size watermark is not a good idea. A simple script is all the is needed to resize and Position watermarks.
Since the watermark is a Layer if you place in a white one. If its a Black one you want all you need do is use Ctrl+I after the script adds the white watermark to make it a black one. Or just adjust the layers opacity. Its not something the need to be made complex If Image content requires a different opacity what would the correct opacity be If you have one size watermark is will cover larger are in small images and small areas in larger image. What would be the correct opacity for each area. When the Area content can be very detailed is a single color.
A Watermark should not be distracting and rune the image. A visible watermark is not going to protect you image from thief
/* ==========================================================
// 2017 John J. McAssey (JJMack)
// ======================================================= */
// This script is supplied as is. It is provided as freeware.
// The author accepts no liability for any problems arising from its use.
/*
<javascriptresource>
<about>$$$/JavaScripts/PlaceWatermark/About=JJMack's PlaceWatermark ^r^rCopyright 2017 Mouseprints.net^r^rPhotoshop Script^rCustomize using first four var</about>
<category>JJMack's Script</category>
</javascriptresource>
*/
#target photoshop;
app.bringToFront();
var logoFile = "~/Desktop/JJMack.png"; // Watermark file should be large for resize down works better than up
var LogoSize = 10; // percent of document height to resize Watermark to
var LogoMargin = 1; // percent of Document height the Watermark should have as a margin
var BottomLetf = false; // false = Bottom Right true Bottom Left
placeWatermark(logoFile, LogoSize, LogoMargin); // Place Watermark into the bottom of the document
function placeWatermark(Image,Size,Margin){
if(!documents.length) return; // if no document return
try{
var doc = app.activeDocument; // set Doc object to active document
app.displayDialogs = DialogModes.NO; // Dialog off
var strtRulerUnits = app.preferences.rulerUnits; // Save Users ruler units
var strtTypeUnits = app.preferences.typeUnits; // Save Users Type units
app.preferences.rulerUnits = Units.PIXELS; // work with pixels
app.preferences.typeUnits = TypeUnits.PIXELS; // work with pixels
var fileObj = new File(Image); // the passed file
if(!fileObj.exists){ // If file does not exits tell user
alert(fileObj.name + " does not exist!");
return;
}
var layers = app.activeDocument.layers; // get layers
app.activeDocument.activeLayer = layers[0] // Target Top Layer
placeFile(fileObj); // Place in file the Watermark png file
activeDocument.activeLayer.resize(100 ,100,AnchorPosition.MIDDLECENTER); // Insure Place did not scale layer
var SB = activeDocument.activeLayer.bounds; // get layers bounds
var layerHeight = SB[3] - SB[1]; // get layers height
var resizePercent = (100/layerHeight)*(Size/100*doc.height.value); // Percent to resize by
activeDocument.activeLayer.resize(resizePercent ,resizePercent,AnchorPosition.MIDDLECENTER); // Resize width and height by percentage
SB = activeDocument.activeLayer.bounds; // get resized layers bounds
activeDocument.activeLayer.translate(-SB[0].value,-SB[1].value); // Move resized layer to top left canvas corner
var LayerWidth = (SB[2].value - SB[0].value); // get resized layers width
var LayerHeight = (SB[3].value - SB[1].value); // get resized layers height
marginSize = Margin/100*doc.height.value; // Margin size
// move resized watermark into the document lower right corner with some margin or lower left
if ( BottomLetf) {activeDocument.activeLayer.translate(marginSize,( doc.height.value -marginSize - LayerHeight));}
else {activeDocument.activeLayer.translate((doc.width.value -marginSize - LayerWidth),( doc.height.value -marginSize - LayerHeight));}
}
catch(e) { alert(e + ': on line ' + e.line); } // inform user of error
finally{
app.preferences.rulerUnits = strtRulerUnits; // Restore user ruler units
app.preferences.typeUnits = strtTypeUnits; // Restore user type units
};
};
function placeFile(placeFile) {
var desc21 = new ActionDescriptor();
desc21.putPath( charIDToTypeID('null'), new File(placeFile) );
desc21.putEnumerated( charIDToTypeID('FTcs'), charIDToTypeID('QCSt'), charIDToTypeID('Qcsa') );
var desc22 = new ActionDescriptor();
desc22.putUnitDouble( charIDToTypeID('Hrzn'), charIDToTypeID('#Pxl'), 0.000000 );
desc22.putUnitDouble( charIDToTypeID('Vrtc'), charIDToTypeID('#Pxl'), 0.000000 );
desc21.putObject( charIDToTypeID('Ofst'), charIDToTypeID('Ofst'), desc22 );
executeAction( charIDToTypeID('Plc '), desc21, DialogModes.NO );
};
Copy link to clipboard
Copied
1. Sizing - these carpets are always the same size, we don't need to change or resize the watermark it's always the same size. an easy one for me there.
2. I know a visible watermark is not going to protect my image from a thief, I just want it to be visible but not dominant like the pictures I attached.
3. Scripting - on the script you gave me, how do I change the watermark file (line 16 doesn't work), can you please adjust it for me for
D:\1\watermark.png (can we place a psd file instead? -> D:\1\watermark.psd)
4. Blending - My final goal is it will be fully automated, I tried playing with blending like you said with drop shadow, emboss, multiply, soft light, fill 0% etc.
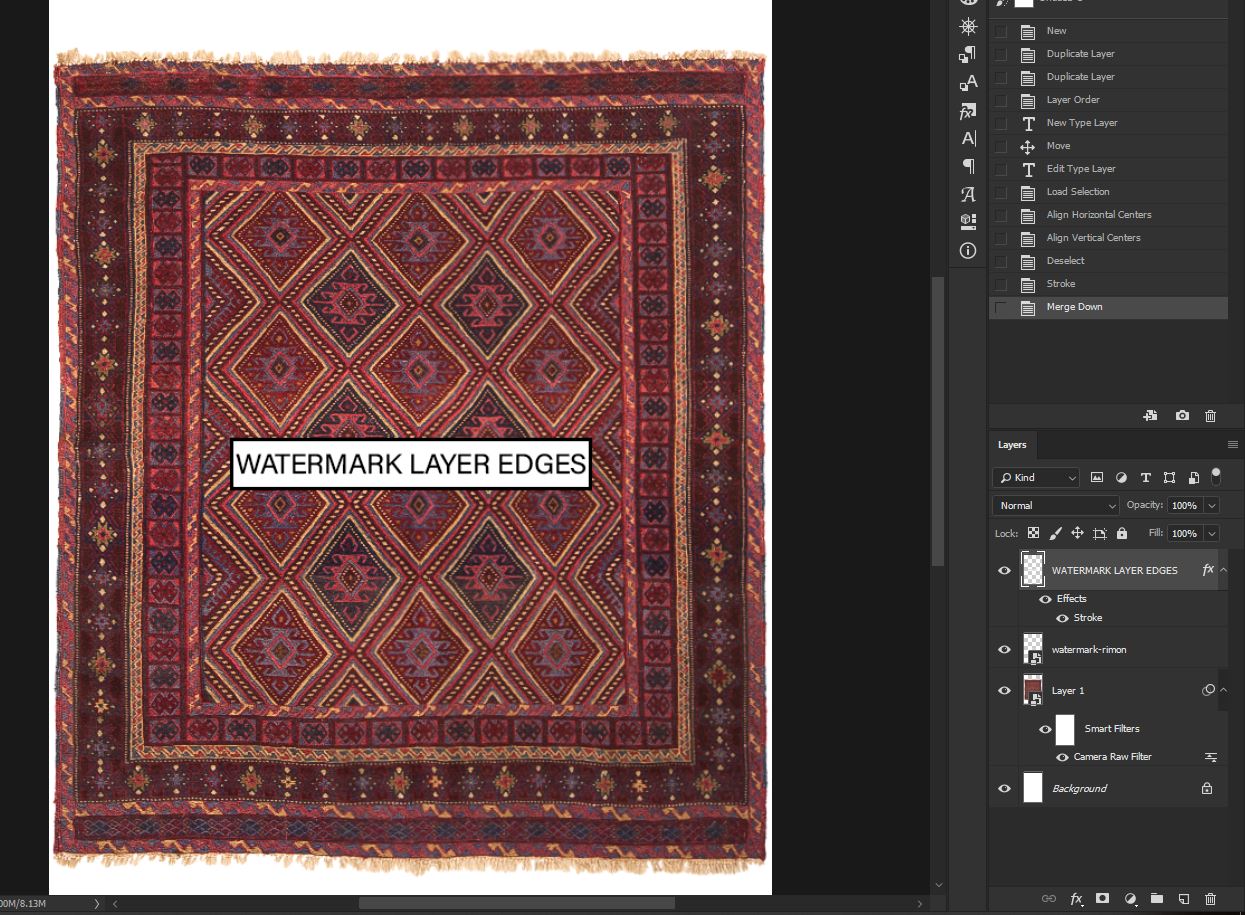
and still no, the fact that there can two entirely different carpets one totally black one totally white is so different from one another that I think some scripting is needed. scripting that will take the watermark layer edges like the one in the picture here, and maybe calculate the average brightness of the colors under it.
Copy link to clipboard
Copied
You can Place in any images file type a PSD and a PSD can have transpaency just like a PNG. Deign your watermark well so it will work well on any image.
Copy link to clipboard
Copied
I don't know how to design it in a way it'll work on any image, that's why i'm asking for help
Copy link to clipboard
Copied
Its your watermark you need to be the judge. A simple text layer with a layer style may be OK for what you want. It needs to please you and be what you want it to be.... You can customize my script by editing the first four VAR statements. However the script is designed to place the watermark on the bottom of the image left or right. You could of course use the script in an action and relocate the watermark to the centers by using Select all and align the layer to the horizontal and vertical center of the document. Line 16 identifies my JJMack.png Watermark file on my desktop.
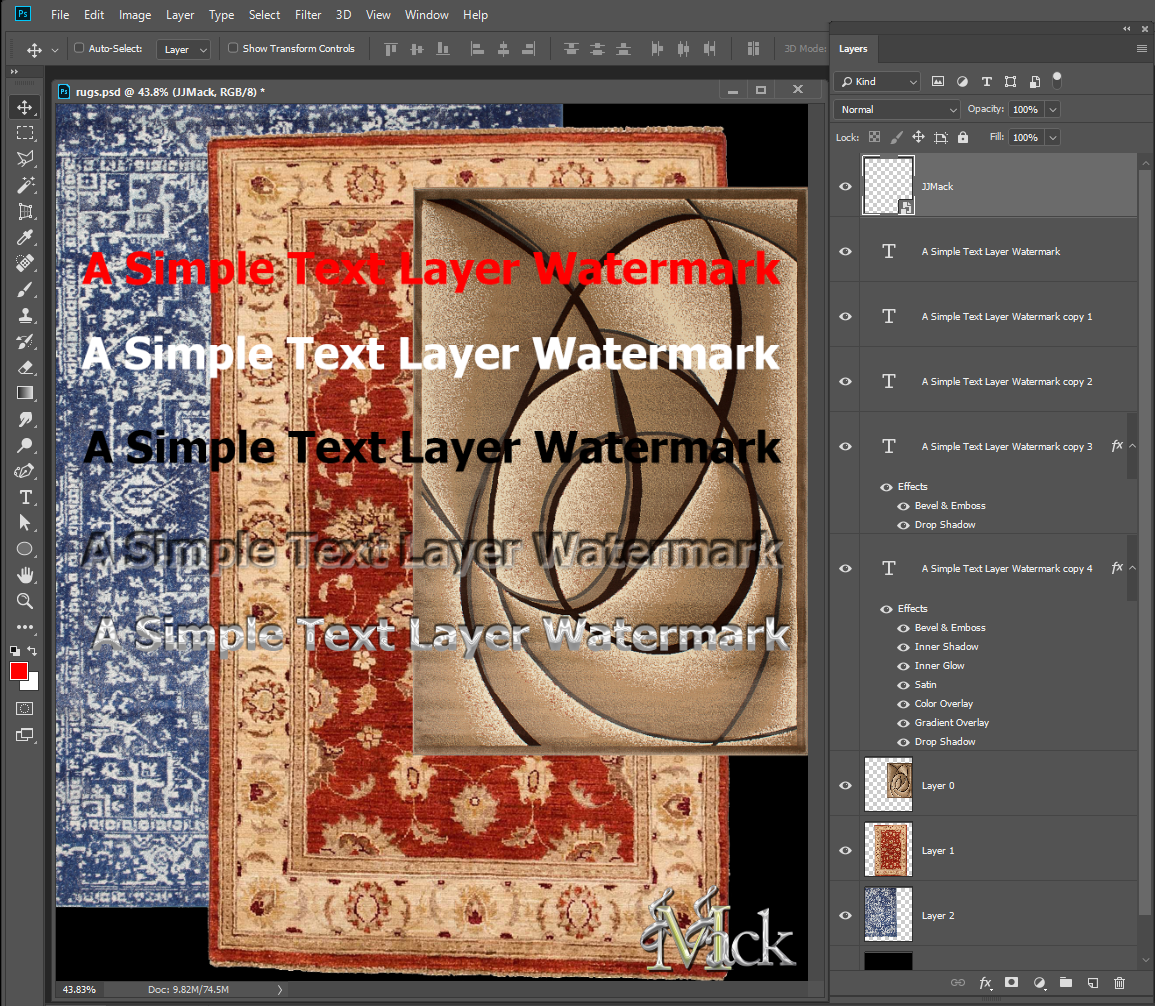


Linked Letters [Logo or Monogram ]
Copy link to clipboard
Copied
That steps of r-bin is shortly saying that my script exactly does. You want not 2 files (dark and light), like it works with my script and his idea as well, but different opacity. I can't focus on this to help, but that would be possible to change 2 files to 1 and instead of black / white files make two different opacities; however you'd like to have more than two depending on bg.
Copy link to clipboard
Copied
Kukurykus more than one file with different opacity is also a nice idea but we need to still look at the colors under the watermark (some kind of if conditional in the script, "if it is X% bright then use this opacity or use this file which has already less opacity, if it is Y% bright then use other opacity or use other file which has already less opacity"
Either way I don't think i'm using your script the right way, I've read everything in the link you gave me twice and still when i activate the script I just get a lasso square selected and that's it.

Copy link to clipboard
Copied
Try setting the color of your watermark to RGB (50,50,50) and the blending mode Linear Dodge (Add).
P.S. And opacity = 100% ))
Copy link to clipboard
Copied
r-bin it looks good on some occasions, probably even a lot of occasions, but i added 2 pictures, one where i had bright carpet and i used the RGB(50,50,50) + Linear Dodge (Add) but 60% was needed and not 100%, here:
and in the second picture here we see a carpet with a lot of colors and "noise" on it and the old watermark it's the lower one in the picture (just normal blend mode 56% opacity this time) was probably better than the Linear Dodge that is above

I'm not bad at programming and i'm actually good at actions, i think this one is for scripts though, i've tried starting the algorithm you gave by taking the watermark selection, doing an average blur then desaturate then eye drop to make it foreground color and then see if it the brightness (B of HSB) is high or low and give it ranges and based on the answer i'll make like 4-6 different opacities. i tried something but i'm new to scripting and i want to save time because it can take a while to get it right
if app.foregroundColor.hsb.brightness > 55%
then app.doAction(opacity 55%, watermark opacity);
Copy link to clipboard
Copied
It looks like you want to watermark the center of your image which is quite distracting in any image. So you seem to be trying tone it down some so it will be a little less distracting. IMO a clear watermark in a less distracting location would be a better solution.
If All your images are the same size a simple action could do that. If you do not like a results It is simple to adjust the watermark layer. after it is added by a script or action. Image conten can be very different. I think a clear consistent watermark is a better way to go. Why rune the center if your image.
Copy link to clipboard
Copied
I can agree but nevertheless I already started thousands of carpets that way. also I am using an action the places a plain watermark in the middle and then adjust manually if there's a problem, but there are also thousands of carpets that yet to be made, i want to automate it as much as possible, again look at this algorithm below doesn't it look make-able? (i never used historgram it sounds good)
1.Select the area of the expected position of the Logo.
2. Obtain an average color using channel histograms (for example, the average value of R = SUM (histogram
3. Deselect the selection.
4. Depending on the brightness of the color (avg_color.lab.l), select which file will be inserted as the Logo.
5. Insert (and, possibly, move to the desired position) your Logo in the document.
Copy link to clipboard
Copied
You seem to have some ideas on the subject. If you know that your process will work well for any carpet code it up.
Copy link to clipboard
Copied
It seems to me you will not succeed in the general case.
But you can try using the function get_average_color() from this
Re: Auto picking the most distinct accent color from an image
post in your script.
Copy link to clipboard
Copied
r-bin where do i find get_average_color() function?
Copy link to clipboard
Copied
From the script r--bin posted a link to it start at line 51

Copy link to clipboard
Copied
it seems to be working perfectly getting average color.
now I need to use the average color I got and according to it choose my watermark's opacity (lowest opacity will be 20% for the darkest average color and highest opacity will be 80% for the brightest average color)

 AdChoices