 Adobe Community
- Home
- Photoshop ecosystem
- Discussions
- Re: Merge Down Gives Unexpected Results
- Re: Merge Down Gives Unexpected Results

Copy link to clipboard
Copied
Hi,
I am geeting an unexpected result from the 'Merge Down' of layers. Under certain circumstances, when I Merge Down an image which appears full colour on the screen, the layer icon goes monochrome and the image will only save in monochrome. The details are as follows.
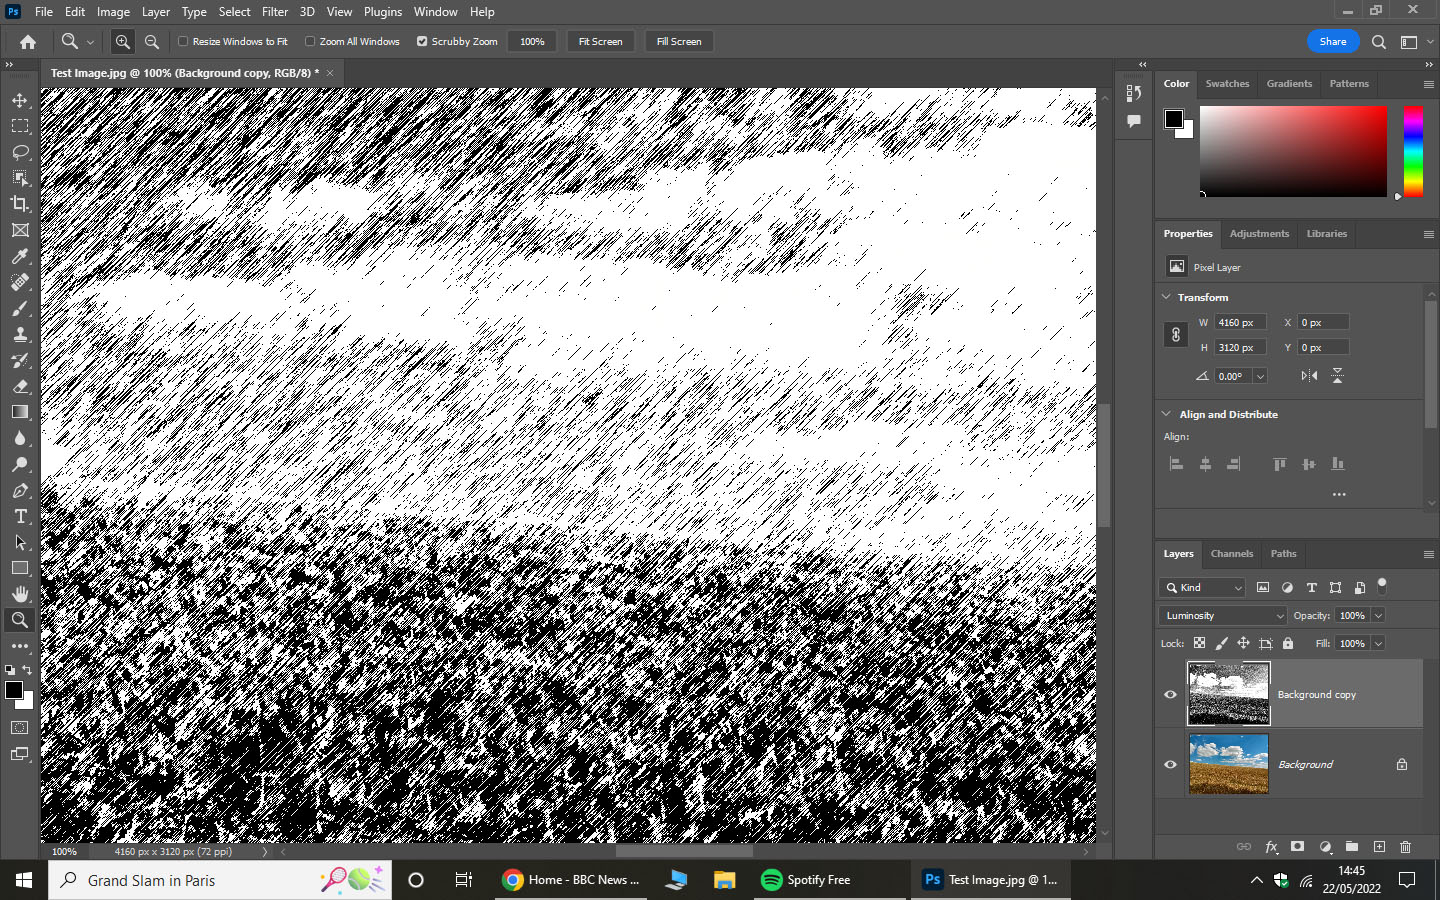
I load the image (Test Image below) and I create a duplicate layer (Background Copy). I apply the 'Graphic Pen' filter to the new layer and I then set the blend option to luminosity (Screen Shot 1 below). I now select 'Merge Down' for the Background Copy layer. The image remains in colour mode but the layer icon is monochrome. (Screen Shot 2 below). The image will now only save in monochrome.
Can anyone suggest a work around so that I can save the colour image. Thanks


 1 Correct answer

From the menu View > 100% or shortcut ctrl+1.
100% is a significant number, because it means one image pixel is represented by exactly one physical screen pixel. This is the only way to see the actual pixel structure in the file, without any scaling or resampling.
Then take one screenshot before merging, and one after merging, and post them here.
Explore related tutorials & articles
 14
Replies
14
14
Replies
14

Copy link to clipboard
Copied
Could you please post a screenshot taken at View > 100% with the pertinent Panels (Toolbar, Layers, Channels, Options Bar, …) visible?
»The image remains in colour mode but the layer icon is monochrome. (Screen Shot 2 below). The image will now only save in monochrome.«
How so? It appears to have color on screen, does this disappear after re-opening the image?
Copy link to clipboard
Copied
"Could you please post a screenshot taken at View > 100% with the pertinent Panels (Toolbar, Layers, Channels, Options Bar, …) visible? "
I don't know what you mean by this. I tried playing around with the interface etc but couldn't get any thing close to what you are suggesting. I have a fairly clean set-up, I don't think I have any unusal settings; most if not all are in their default state.
How so? It appears to have color on screen, does this disappear after re-opening the image?
The image on screen goes monochrome during the save process (and remains so after the save). The stored image is monochrome on reopening.
It would be helpful to me if someone else could try this on their setup and see if they get the same result or a different one.
Copy link to clipboard
Copied
From the menu View > 100% or shortcut ctrl+1.
100% is a significant number, because it means one image pixel is represented by exactly one physical screen pixel. This is the only way to see the actual pixel structure in the file, without any scaling or resampling.
Then take one screenshot before merging, and one after merging, and post them here.
Copy link to clipboard
Copied
Thank you for that clear explanation.
I attach the screenshot. At 100% the image is monochrome even before merge down (and performing the merge down leaves the image in this state). If I click the 'Fit Screen' or Fill Screen' buttons as seen in the attached screenshot, then the on-screen image reverts back to colour. Photoshop Elements appears to show exactly the same behaviour as Photoshop in this regard. Also the same is observed when I unlock the Background layer, move it in front of the Backgound copy layer and select 'color' as the Blend option.
It is very frustrating. I have drafted an article for publication on Medium. In the final part I intended to show how an image could be split into its ‘colour component’ and ‘shading component’ and how each component could be separately processed and then combined. But now I have no way of combining the two parts and saving them as a single image. (The actual processing in the article is more complex than the processing example I present here.)
Also, what I am demonstrating here is a method for generalising the ‘Graphic Pen’ filter from a monochrome (or two-tone) facility into a full colour facility. There are many other filters that could be similarly generalised if only the software were to work ‘as advertised’.
Copy link to clipboard
Copied
Well, now you should understand why I asked for a screenshot taken at View > 100% – 100% display is what matters.
If you see different results at smaller magnifications they are irrelevant and your approach is not useful for what you were trying to illustrate.
Do you understand what the Blend Mode »Luminosity« and the Filter Graphic Pen do?
Like how there are no intermediate pixels in the Filter’s result?
Why did you decide on that Filter anyway?
What exactly are you trying to do?
Copy link to clipboard
Copied
Now that I understand the requirement for 100%, I have posted a screenshot in response to another contributor. The image is monochrome under ‘100%’ but coloured under ‘Fit screen’ and it is possible to flip between these two states.
I am still asking if someone else can take just two minutes to implement the same processing sequence as I describe here and advise whether they see the same anomaly or not.
Copy link to clipboard
Copied
The faulty display at the smaller magnification is irrelevant.
Other people being able to reproduce it does not change that your approach does not achieve what you are apparently trying to achieve.
Again: Do you understand what that Filter and that Blend Mode do?
Copy link to clipboard
Copied
‘The faulty display at the smaller magnification is irrelevant.’
I know that now but you can’t seriously expect users to anticipate this without some mechanism or warning message to alert them to this anomaly. Basically, the on-screen image is different from the layer icon and most users would regard this as an implementation error. If the icon is correct then the larger display image should be correct also.
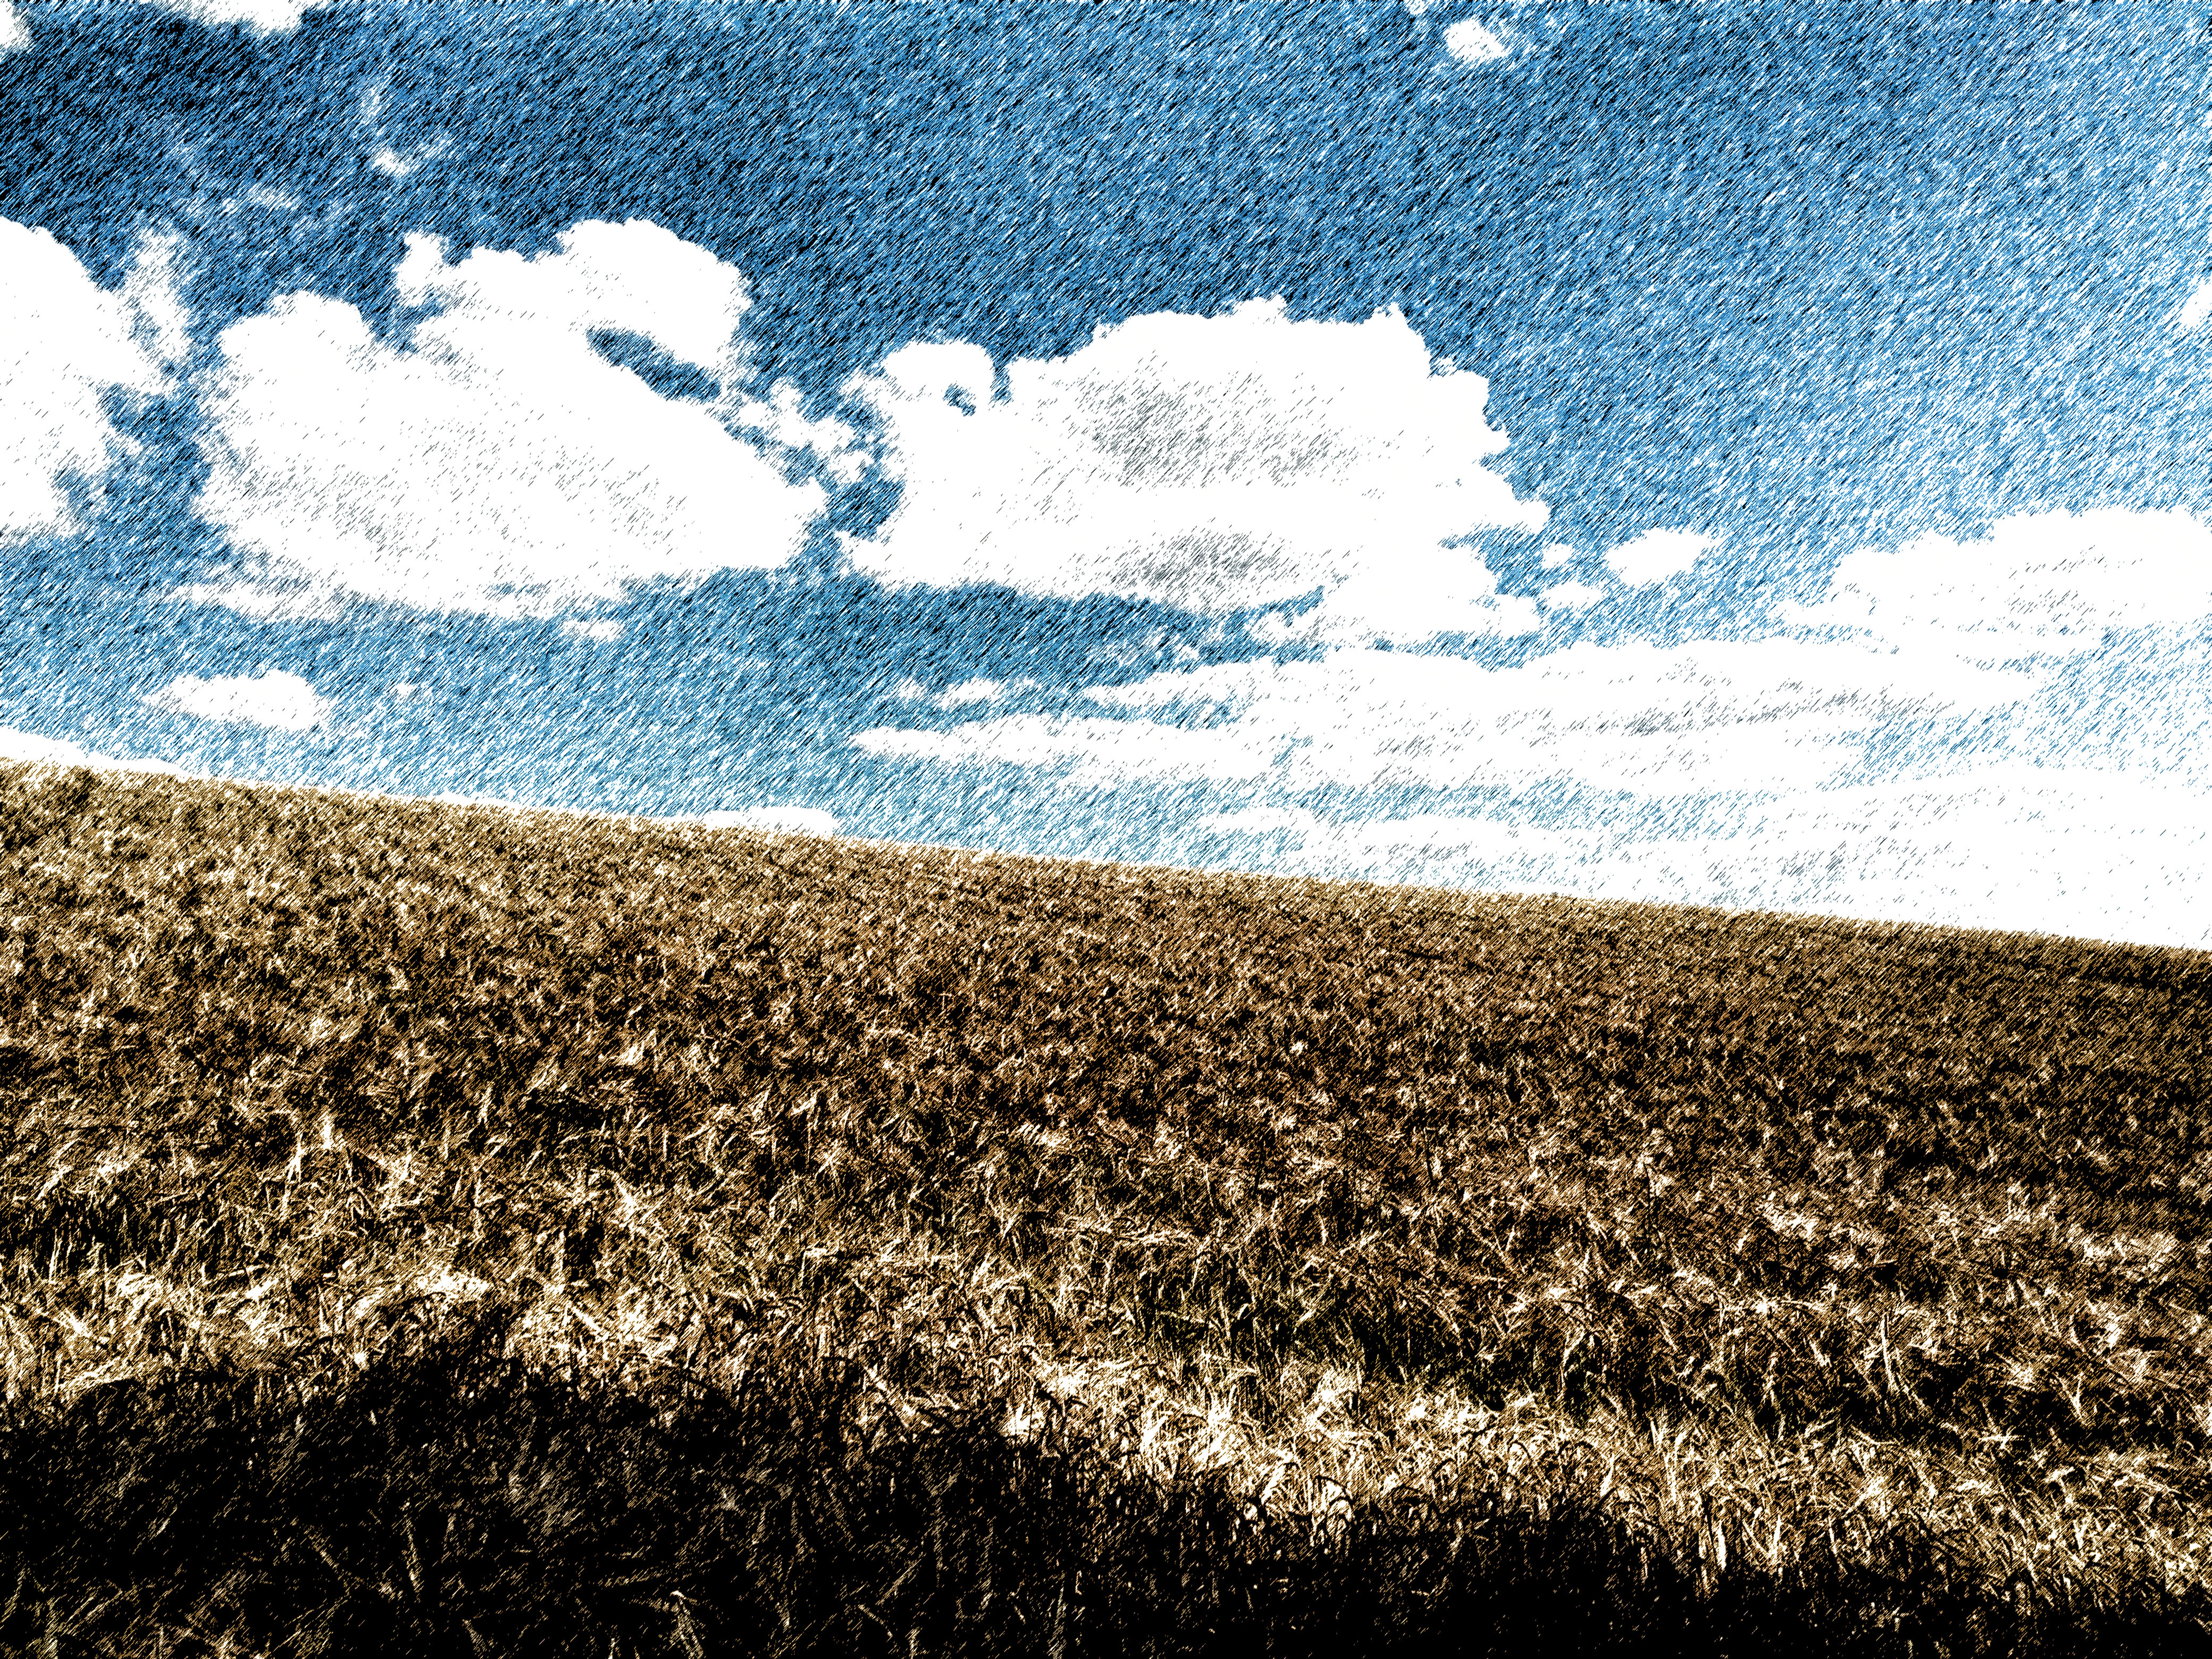
I understand how the blend mode works what I had failed to fully appreciate was the fact that the particular filter only produces outputs that are (0,0,0) or (255,255,255) and these cannot carry colour. From my viewpoint the solution is to apply a 1 pixel motion blur to the Graphic Pen image along the stroke direction. I attach the example image processed in this way.
Copy link to clipboard
Copied
All adjustment and blending previews are calculated based on what you see on screen at any time. So if you're zoomed out to fit the image on screen, it's calculated from this downsampled version. In other words, many image pixels are averaged out to very few screen pixels. A large array of black and white pixels come out as a small number of gray pixels.
Only at 100% is this mapped 1:1.
It's always been done this way for performance reasons. It could be done so that all calculations were always performed on the full image data - but that would increase CPU load, GPU load, and not the least memory and scratch disk usage, by a significant amount. It might work on a high-spec desktop machine, but bring an average laptop to its knees in seconds.
As hardware improves over time, so do average file sizes to take advantage of that. The ratio between them doesn't change nearly as much.
I'm not saying there is no solution to this, but it's not nearly as simple as it would seem immediately. It would be nice to have a choice, and take the performance hit, with a setting in Preferences. It used to be possible to set cache levels to 1, which would do exactly this. But that's no longer possible for some reason.
In a "normal" continuous-tone photograph this isn't a problem. It's only a consideration with binary or very noisy images where one pixel can be very different from its neighbor pixel.
Copy link to clipboard
Copied
It would be nice to have a choice, and take the performance hit, with a setting in Preferences. It used to be possible to set cache levels to 1, which would do exactly this. But that's no longer possible for some reason.
An unfixed bug, but with only 6 votes so far it seems to affect few Photoshop users.
Copy link to clipboard
Copied
I had failed to fully appreciate was the fact that the particular filter only produces outputs that are (0,0,0) or (255,255,255) and these cannot carry colour.
I had specifically mentioned »there are no intermediate pixels in the Filter’s result« …
And your observation does not seem to be completely correct – the Filter uses the Foreground and Background Color, so the result could contain two colors, but still no intermediate values.

What are you actually trying to achieve?
One could create a (Pattern) Layer with an appropriate Blend Mode to superimpose a »halftone pattern« on an image.


Copy link to clipboard
Copied
"Can anyone suggest a work around so that I can save the colour image. "
Image > Duplicate... (check the option)
Does it do the same thing there? If not, you can save that way.
If you're merging down anyway, you can save in any image format you like w/o merging down.
Copy link to clipboard
Copied
Thank you for your response. 'Duplicate image' duplicates the image in monchrome.
Yes I could save the image in say .psd but then it would only be good for viewing in a Photoshop environment. As far as I can tell (from my limited familiarity with Photoshop print) the image will only print as monochrome.
Copy link to clipboard
Copied
Ok, that's no fun then...
Yes, I know you want a file to use, but I'm just saying you can save or export that at any time — you don't have to merge down to save a jpg, png, tiff, etc. (although if you want .tiff that keeps your layers, you will of course save a lot of space by merging down, but... have no layers LOL)
So, if you don't mind merging down (as you are doing that), I'm saying you might as well save it out as a file (= skip the merging down and even throw out the psd if you like). Of course, preferably you'll want this file to be a non-lossy format (tiff, ...) so you can do further work later.

 AdChoices