 Adobe Community
Paths and selections
Copy link to clipboard
Copied
PSers,
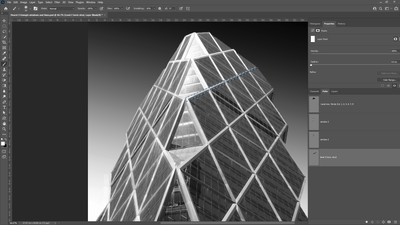
I am working on an architectural photo. I can make the paths I need in one part of the photo, save them and make my selections followed by an adjustment in the Layers panel and save that image. However, when I move to another section of the building to make more paths and a different adjustment, the first selected area also responds. How do I prevent that response short of deleting the first paths entirely? They usually entail a lot of work which I don't like to lose in case I want to go back for other changes.
Thank you,
Photodoc16
Explore related tutorials & articles
Copy link to clipboard
Copied
Hi
I'm not completely following. Are you naming your paths and creating new paths — or are all the subpaths going onto one work path?
Show a screenshot of your Paths panel if you are not sure.
~ Jane
Copy link to clipboard
Copied
Thanks for answering my query.
I must confess that after thinking about this I realized that when I first
opened my photo, I was experimenting with a few ideas and may not have not
named and closed the first path I made. When I then made some changes on
path 2, path one also responded. Today when I closed and named paths, the
subsequent path adjustments did not affect the first. I should have known
better.
Sorry for the false alarm.
Richard
Copy link to clipboard
Copied
Hi again Jane,
I surely did not think I would be getting back to you so quickly. I thought I had been well trained in
the language of Paths, Pen Tool and Vector Masks. Now another problem that I know must have a simple solution but
I am having a problem with it. I create a path in the Layers Panel, go to the Paths Panel to name the work path and make a selection. Back to Layers and I add a curves adjustment layer. However, instead of a 'horizontal strut' becoming lighter, the entire image lightens up. The last time this happened, 20 minutes ago, I tried another layer that had already been named and that worked! No such luck this time - all layers work on the appropriate paths. Also, I notice that the layer mask where I am having a problem is white and all the others are black. What is happening?
Thanks again,
Richard
Richard
Copy link to clipboard
Copied
Jane, I forgot to say that all the paths are on separate layers.
Richard
Copy link to clipboard
Copied
@richardg52861327 wrote:
Jane, I forgot to say that all the paths are on separate layers.
Richard
I'm confused. Paths are in the Paths panel and Layers are in the Layers panel. Can you drag the two panels apart to separate them and post a screen shot of what you are seeing in both panels so we can better assist?
~ Jane
Copy link to clipboard
Copied
Jane,
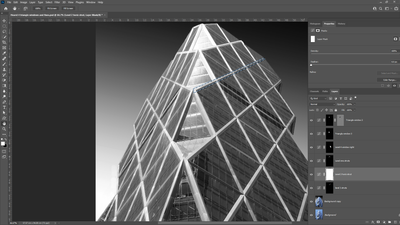
Here are the screenshots of my Paths Panel and also my Layers Panel. Hope these help. You can see the selection of a horizontal strut in the upper right which I cannot adjust.
Richard
Copy link to clipboard
Copied
On bottom screenshot you have layer mask but... White means to reveal so your mask is revealing everywhere your adjustment beside small part which I may not be able to see.
Solution: invert layer mask if you have small part of mask in black color (thats what you want to adjust and that part should be white while remaining - large part shoul be black)
Second solution: deselect everything, fill layer mask with black then load selection using path and fill selection using white. Mask should be black with one small part white color (part that you want to lighten)
Copy link to clipboard
Copied
I have tried everything to turn the layer mask to black. No luck. I even
changed another mask from black to white and now cannot change it back to
black. I may have to start over on some of my paths and selections.
Thanks,
Richard
Copy link to clipboard
Copied
@richardg52861327 wrote:
Jane,
I have tried everything to turn the layer mask to black.
Hi Richard,
I was out of my office yesterday and did not get back to this, but I see you solved it by starting over. (We can see all the replies.) Looking at your screenshot, your foreground layer is white and your background layer is black. When working on masks, I typically start by typing "D" to set the default colors to pure black as the foreground and pure white as the background.
To change the white mask to black, click on the mask first to select it, then:
- Fill with the foreground color of black.
- Paint with the Brush tool (large size if you are doing the entire mask) with the foreground color of black.
- Cmd+I (Ctrl+I on Windows) will invert the colors. On a white mask, the inverse is black.
Try this on another image to see how it works. Make a copy of the image first and work on the copy.
I'm glad your image is working now! 😊
~ Jane
Copy link to clipboard
Copied
I was hitting CTRL + I all day. No luck. Your comment about the black
foreground for a mask change to black was intriguing. I will experiment.
Anyhow, glad to know you and Bojan are there. Don't go away.
Richard
Copy link to clipboard
Copied
@richardg52861327 wrote:
Hi Jane,
Anyhow, glad to know you and Bojan are there. Don't go away.
We're here — along with lots of other volunteers who may step in! 😊
~ Jane
Copy link to clipboard
Copied
Hi Bojan,
After trying all your suggestions, nothing succeeded in turning the layer mask Black. So...I said the 'hell with this'
and deleted the problem paths and layers and started over. This time everything worked. Don't you just love computers? Please tell Jane.
Thank you and Jane,
Richard
Copy link to clipboard
Copied
"After trying all your suggestions, nothing succeeded in turning the layer mask Black."
You could fill mask or delete it and create brand new. If you hold down Alt while clicking on Add layer mask button at the bottom of Layers panel that should fill it with black without any further action from your side.


