 Adobe Community
- Home
- Photoshop ecosystem
- Discussions
- Re: Task of changing colours of a home office in a...
- Re: Task of changing colours of a home office in a...
Task of changing colours of a home office in a garden

Copy link to clipboard
Copied
Hello,
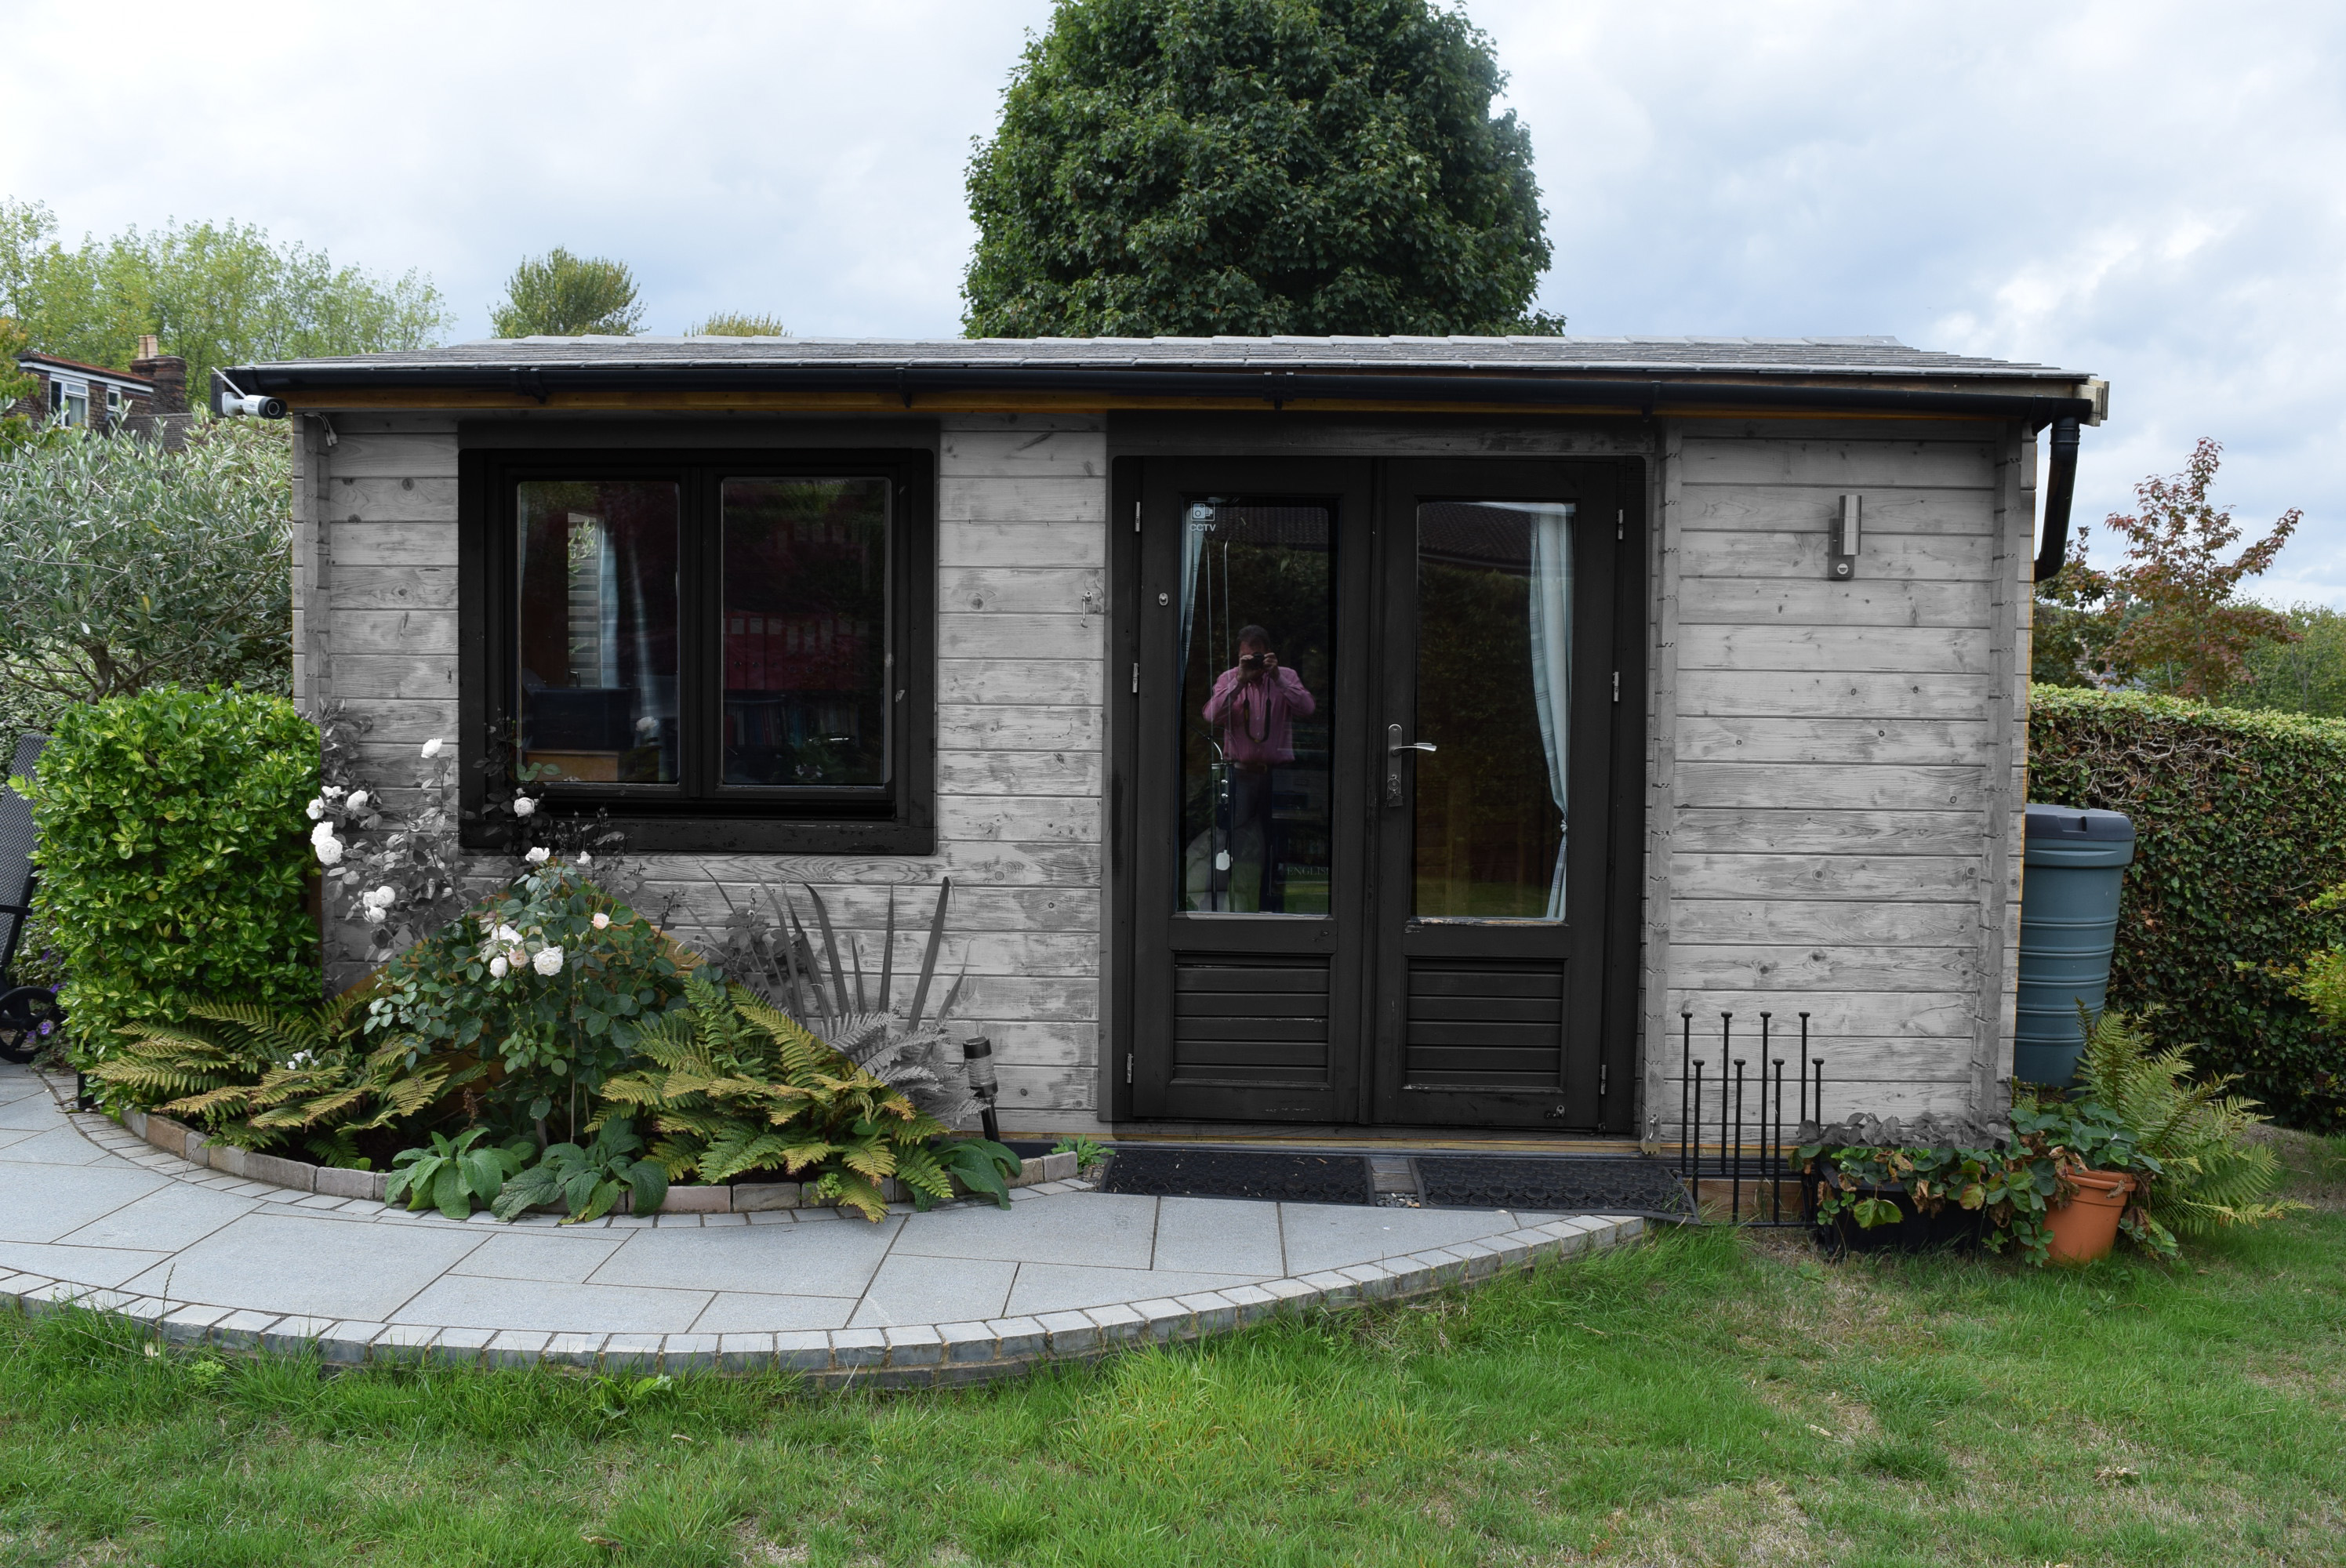
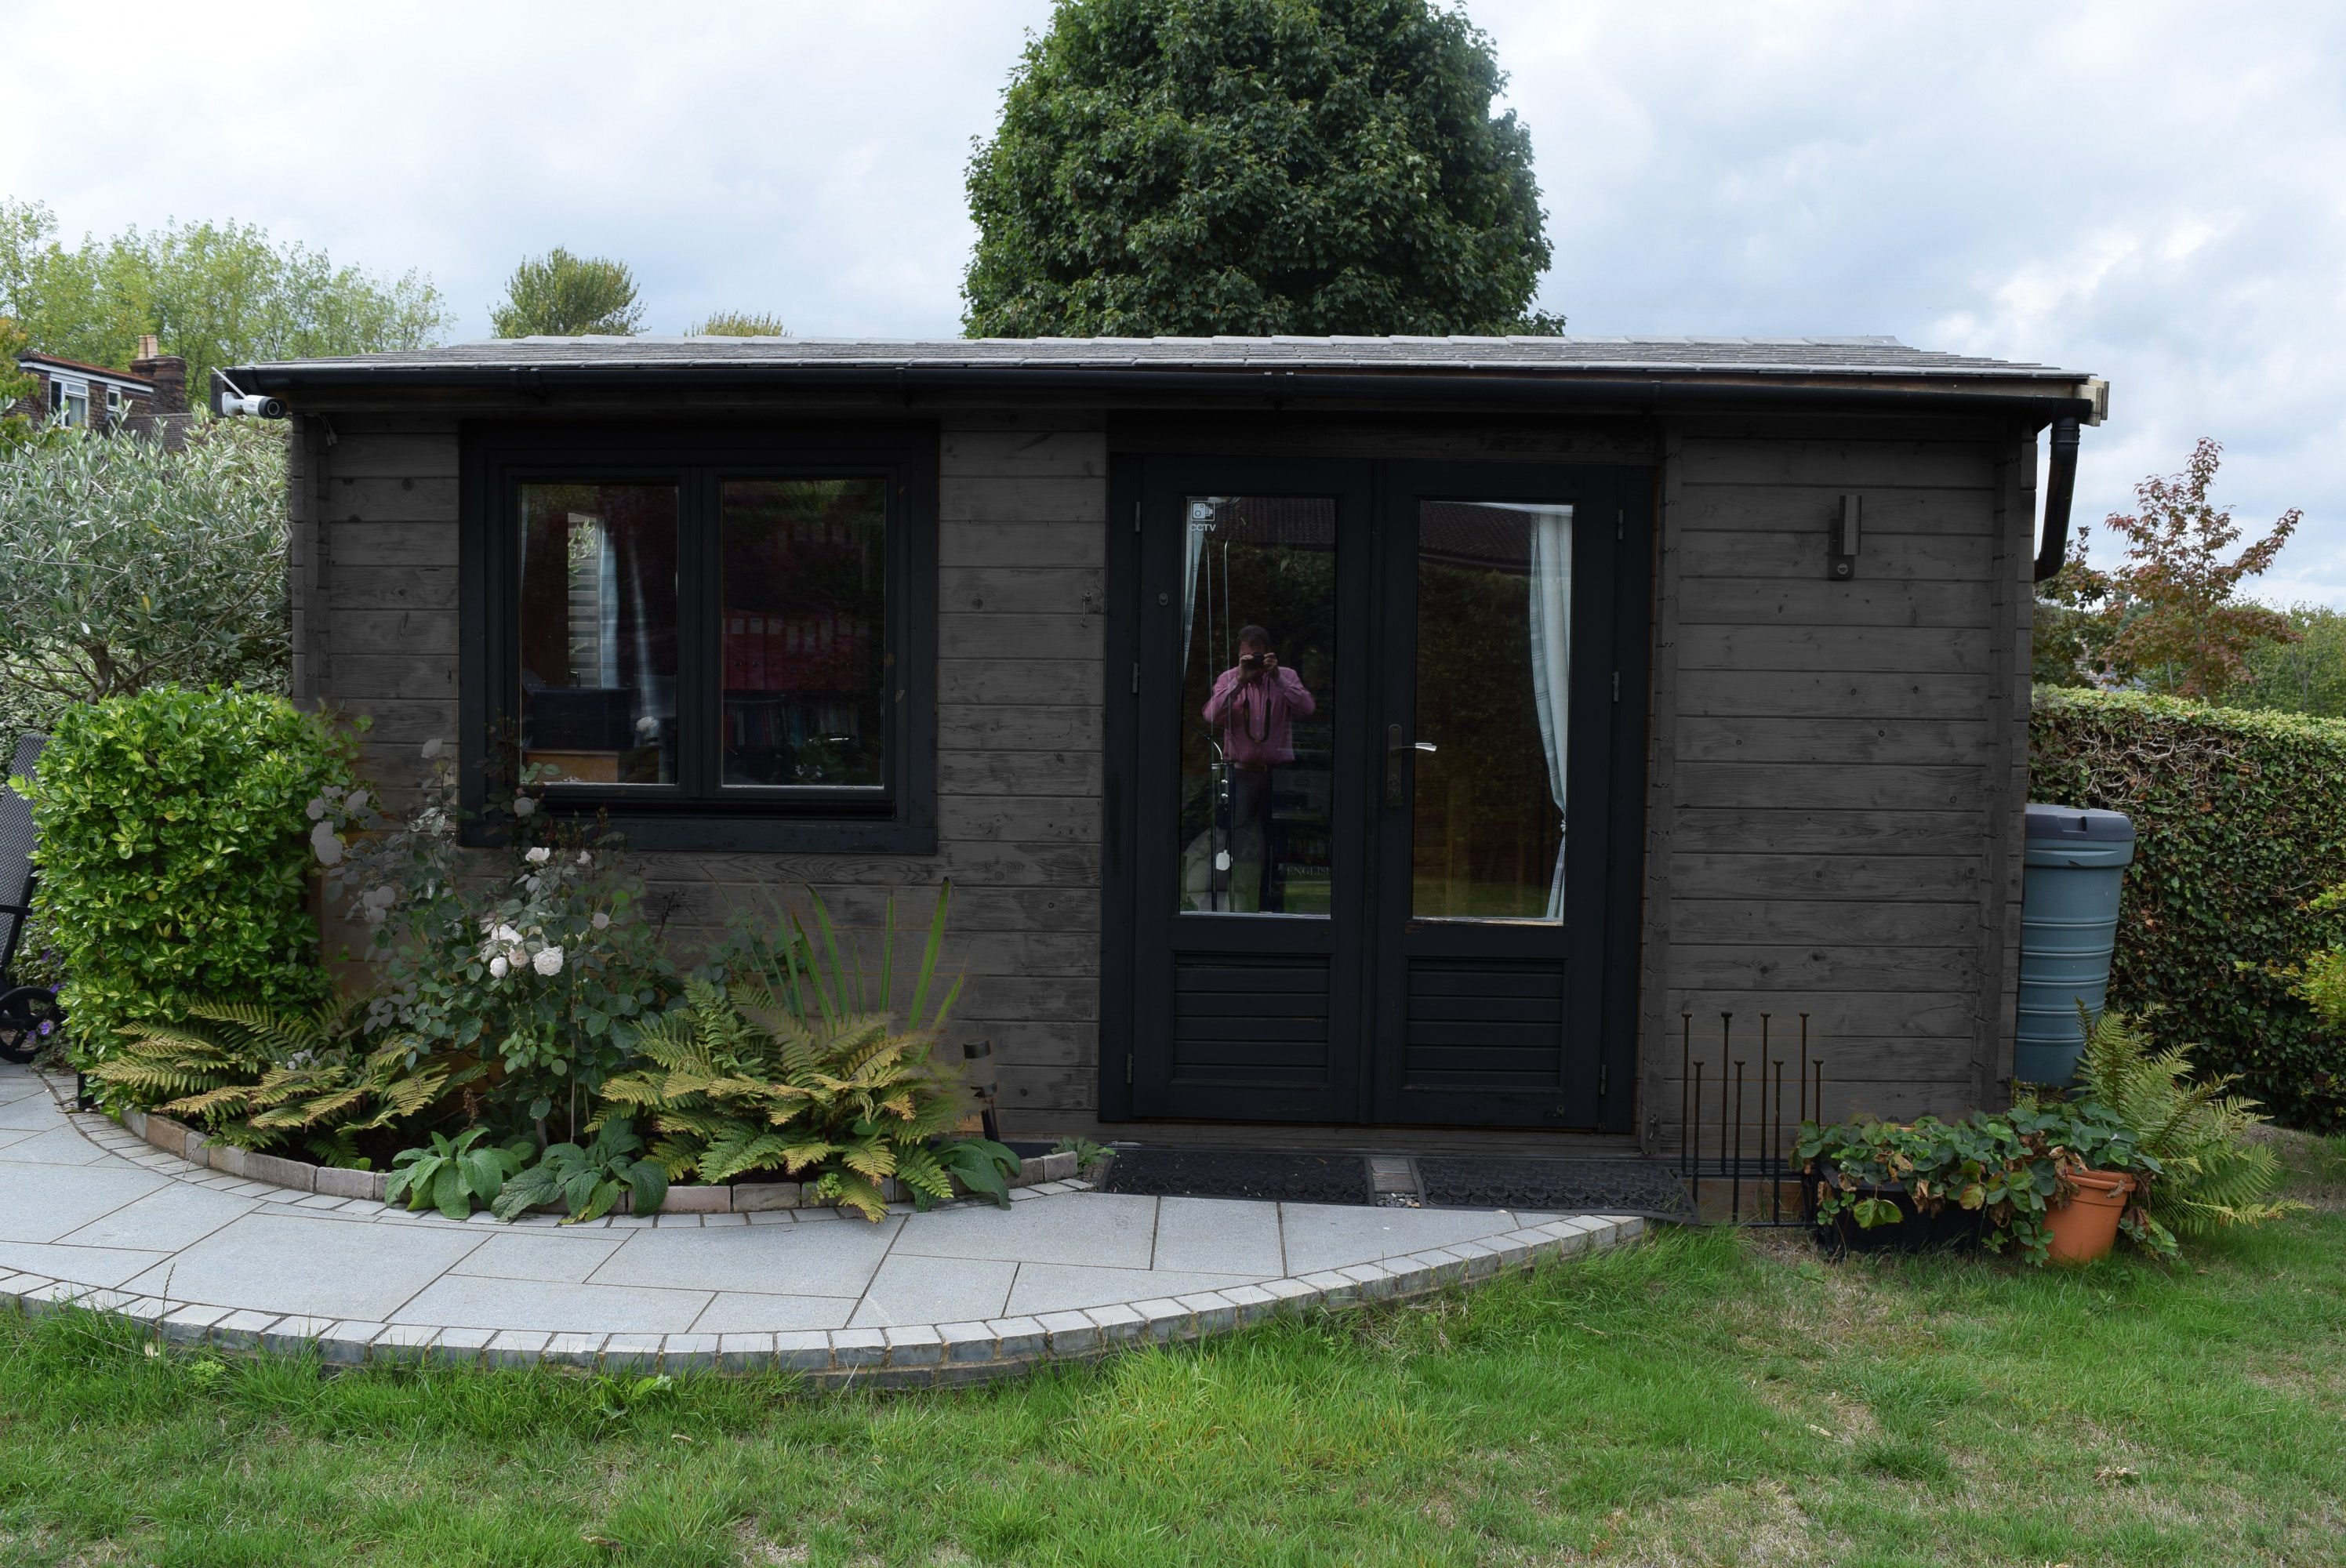
I have been asked asked to change the colours of an image of an existing small wooden building so that the owner can see what it would look like in different colours. The building is wooden so I need to retain the texture of it.
The colours that have been requested are black for the window and door frames and a mid grey for the rest.
I have tried using the Color Replacement Tool but it seems as though mid grey and black do not work. As the change only shows as a light grey. From looking at other posts it seems as though black is not a colour and I would guess mid grey can also be problematic.
Can anyone suggest possible solutions?


Explore related tutorials & articles
 13
Replies
13
13
Replies
13

Copy link to clipboard
Copied
Hi @garyp4593654, did you create separate selections of the building wood and the window/door frames? Once that is done you can try a couple of methods including a color layer with a blend mode or trying a hue/saturation layer. Be sure to clip those adjustment layers to the layer with the selection. Helen Bradley shows one of these techniques on YouTube. Even though the videos are older, the method remains the same. Hope that's helpful!

Copy link to clipboard
Copied
Can anyone suggest possible solutions?
There are countless ways of dealing with this in Photoshop. The most successful solutions will depend on the image itself.
Can you upload the image you're using so we can see what you are dealing with?
Copy link to clipboard
Copied
Copy link to clipboard
Copied
This might be kind of advanced, but a flexible way to do this is to create each element as a separate Solid Color fill layer with a vector mask. This lets you adjust or completely change the color scheme at any time, and the vector masks can be much faster to edit than a selection. The demo below shows the basics being set up in about a minute, but it requires knowing several Photoshop skill sets, and paying close attention to what is going on in the options bar, the Layers panel, and the Paths panel. The image is a low-res preview from Adobe Stock.
First,with the Pen tool (in Path mode in the options bar), draw a path matching the shape of the overall wooden areas. With that Work Path selected in the Paths panel, create a new Solid Color fill layer in the Layers panel. The layer automatically converts the Work Path to a vector mask. Choose the gray color you want. Then set the layer blending mode to Color, so that it replaces the color while letting the luminance (the texture) show through.
Next, use the Rectangle tool (again in Path mode) to draw two rectangles for a door or window frame, But first make sure the tool is set to Subtract Front Shape in the options bar; that makes the smaller second rectangle cut a hole out of the first rectangle. Then create a Solid Color fill layer set to black. But because black is not a color, the Color layer blending mode won’t work, so try Hard Light, Overlay, or Normal instead, and reduce Opacity as needed to let the texture show through.
Although the basics are done in a minute, of course this example is very quick and dirty; for example, the door windows obviously need twelve cutout rectangles, not one (I would draw one cutout and duplicate it 11x to save time.) So it will take somewhat more time to make the paths precisely match the exact shapes and perspective in your specific image. But once you set it up, this method can be easier and faster to edit precisely, compared to painting with selections.

Copy link to clipboard
Copied
Thanks for your reply. I've posted the two images that I have been given. It looks like the is method is one that would fit the bill. The images have more foliage in them which makes the selection a bit more difficult. But, if I can get to the point of it showing what it would be like then that will be ok.
Copy link to clipboard
Copied
I've had a quick go using @Conrad C suggestions(see attached image). There is some spillage over onto the foliage which as I mentioned makes the selection more difficult. The main issue is the same as when I used the Color Replacement Tool. The grey does not reflect the chosen one. I have brought the colour selection down to the edge of dark grey/black and it still comes out as a light grey.
Copy link to clipboard
Copied
@garyp4593654 Thanks for posting your image. I see what you mean now. I can't get the gray to a darker shade than this, either. Hmm... Conrad, any ideas?

Copy link to clipboard
Copied
The basic problems seems to be the starting point of the colour. I created a blank new file which was white. I then created 3 squares and filled then with 3 different shades of grey. That worked fine. I also created a coloured square and painted over with grey and that was fine.
So, it would seem that the original colour of the building which is in effect the base or starting point does not accept being changed to the grey variations.
I did find that by using the brush in multiply mode and painting with a grey colour it would darken the tone. Not particularly efficient. As it doesn't really create a particular tone of grey. More of a fudge than a fix.

Copy link to clipboard
Copied
You may need to use a Curves layer first so you get close to the desired tones, then change the color.
Copy link to clipboard
Copied
Good thought, @Lumigraphics. This might work with some experimenting, @garyp4593654? Here is a quick preview:

Copy link to clipboard
Copied
About darkening the gray, yes, I was thinking along the same lines as you guys. First I tried an adjustment layer as a clipping mask over the solid color layer. That didn’t work, but what does work is having the solid color layer as a clipping mask over the adjustment layer. I used Brightness and Contrast for simplicity, but it could have been Levels or Curves too.

About the overall selection: As some mentioned, the plants in the front do make a Pen tool selection alone impractical. But this is a great example of where the new AI-powered selection tools can save a lot of time. The demo below starts after selecting Select > Select and Mask, so we’re already inside the Select and Mask workspace. First, I click Select Subject to get the overall house outline. Then, I use the Object Selection tool in Subtract mode to rapidly exclude the plants and other parts that are not the wall, including the window and door. Sure, it might still need some cleanup, but getting this far takes a lot less time than with older selection tools.

Copy link to clipboard
Copied
Thank you @Conrad C @J E L @Lumigraphics @John Waller for all of your replies and advice. The combined efforts have found the solution.
I have tried the selection process using the Object tool but for some reason it will not delete from the selection. I have tried using the Object tool in isolation. On this image and another and it doesn't select the selected object. The message it has been showing is "Couldn't find an object to select. There might not been enough edge contrast, or the object might be too small." As you can see from my screenshot when I try and delete using the Object tool it just leaves the 'marching ants' on the image.
Could this be related to my hardware I am using? Or am I making a stupid mistake when carrying out the process?

Copy link to clipboard
Copied
The selection isn't perfect as I haven't been able to get that right but I've managed to get 3 images which show different tones of grey. Used a combination of techniques as illustrated in previous posts. I couldn't get the Object selection tool to work. Using the Refine edge tool worked to a degree but not totally succesful.

 AdChoices