 Adobe Community
- Home
- Photoshop ecosystem
- Discussions
- The agony of flattening layers with blend modes
- The agony of flattening layers with blend modes

Copy link to clipboard
Copied
I need to flatten a series of layers within a group, which have different blend modes. I've tried merging group, that resorts all layers to 'normal mode', I have also tried merge visible which does the same as 'merging group', convert to smart object, same results. I don't want to go the route of flatten image, it has worked to a degree, my photoshop file is organized how I want it and I want to strictly take the group or select those layers and merge them while keeping the blend mode in tact.
've searched for answers and none of the answers were anything I haven't tried. Is there not a script, filter that can solve this dilemma it's quite common as you may or may not be aware of.


 1 Correct answer

View at 100% and try again!
The blend modes are preserved. What you see is something else.
Adjustment and blending previews are calculated based on the on-screen image for performance reasons. Zoomed out, that means a scaled and softened version. With all these noise effects, that means a lot of intermediate values that aren't there in the full data.
To be absolutely clear - the final result is correct. The preview is misleading because you don't see it at 100%.
100% is a very significan
...Explore related tutorials & articles
 91
Replies
91
91
Replies
91
Copy link to clipboard
Copied
Not possible. But for some reason you won't listen to people with more experience than you have. People who actually understand how layering works.
One can do some quite fancy stuff with Photoshop layers, inasmuch as a single layer can have a combination of transparency, masks, a blend mode (singlular!), and opacity and fill percentages. But you can't have more than one blending mode per layer. How many times does this have to be said and by how many people before it sinks in?
There might be an acceptable way to get an effect closer to what you want - beside just leaving the layers as they are and just closing up the group to keep your composition tidy. What's your obsession with merging, anyway? But for some reason you refuse to describe your actual goals.
My advice is to go read everything you can, watch all the videos you can, and learn how layers really work in Photoshop, rather than focusing on this specific problem. Then you'll be able to combine them intelligently and do all the things Photoshop can do, rather than trying to tell experts they don't know how things work.
I wanted to help you understand Photoshop, but you won't accept reality, so I'm through here. Have fun!
I have read, not listened to what everyone has suggested.
Mistuner, Emil, Christian have all contributed or understood what my goal was. You never showed any example on how to solve my problem, I have described my goal numerous times, how come the other users specifically Emil and Mistuner all closely hit the mark. The issue with Misturner procedure was that it was a perfect square cut out their was no semi-transparent pixels. The two textures are rusty textures in the sample photoshop file, if I want to save the file with opacity as a transparent GIF or PNG24 that is not possible by Misturner method unless I want a perfect square. The goal is and always has been to blend the textures in the group which are semi-transparent as a GIF or PNG24 with transparancy. I want to merge only a specific group, not my entire composition that has 15+ layers/groups while keeping the groups blend modes as I have repeating over and over and over.

Copy link to clipboard
Copied
As the thread has gotten rather long now, have you tried these methods:
- Do a Save_As, so that your original will be safe, but the "new" Image will be Open. Delete the Layers, that you do not care about, and then Save_As the formats that you want.
- Do a Layer Comp, with just the Layers that you desire.
Good luck,
Hunt

Copy link to clipboard
Copied
StrongBeaver wrote:
...Emil, could you post your results using the sample composition and what I had just wrote in this thread.
No, problem but I got somehow confused by the fact that you confirmed that what MTSTUNER demonstrated is the final result you want from the file posted. If that wasn't the case, I would assume that the final result, as explained originally, is to flatten the Group 1 copy (Ctrl + E when the group is selected) and this should not change the appearance and also will preserve the fully transparent pixels of the group. Currently when you select the group and press Ctrl + E this changes the image by showing the additional strip to the right of the intersections from the two layers in the group.
If you want to apply my instructions from post #29 on the file you posted, first here are the steps I already posted:
Make sure you have a fully opaque white layer (not background) at the bottom of all layers. In some cases this is not needed but it doesn't hurt to have it and it ensures the expected result.
Hide all layers except the layers in the group to be merged. If you have a complex hierarchy of layers with different visibility, use Layer Comps to save a layer visibility stage.
With a layer in the merging group selected, take the Magic Wand tool making sure the Tolerance is 0, Contiguous is unchecked, Sample All Layers is checked, and click on a fully transparent pixel to select all fully transparent pixels in the merging group.
Show the previously hidden layers and in the Layers panel select all layers under the merging group.
Right click in the Layers panel and choose Duplicate, alternatively hold Alt and drag them under the merging group.
Add the layers from the merging group to the selection of duplicated layers (Shift + clicking the top layer of the merging group makes this easy)
Right click in the Layers panel and choose Merge Layers (Ctrl + E)
Press the Delete key to delete the pixels that were fully transparent in the merging group
And here's how you should apply them to your file:
- Doubleclick the Background and press OK to make it a layer.
- Hide Layer 2 and Layer 0
- Select (highlight) _NIK0164 layer in the Layers palette, take the Magic Wand tool making sure the Tolerance is 0, Contiguous is unchecked, Sample All Layers is checked, and click on a fully transparent pixel to select all fully transparent pixels in the merging group. In your file you have fully transparent pixels at the top left and bottom of the image. Turn on the transparency grid in the preferences if is is not already, to see these transparent pixels.
- Show Layer 2 and Layer 0, and select Layer 0.
- Right click in the Layers panel, choose Duplicate Layer and pres OK, alternatively hold Alt and drag Layer 0 under the merging group.
- Add the layers from the merging group to the selection of the duplicated "Layer 0 copy" (With Layer 0 copy selected, Shift + clicking on "Group 1 copy" merging group makes this easy)
- Right click in the Layers panel and choose Merge Layers (Ctrl + E)
- Press the Delete key to delete the pixels that were fully transparent in the merging group
That's it now you have merged the group without altering the appearance and the fully transparent pixels in the merging group remain after the merging which with your file become more obvious if you hide Layer 0 and have the transparency grid on.
The file you posted is not very good example of the solution I suggested. Also Layer 2 doesn't make any difference but for the purpose of this exercise let's assume there could be something on it. If you want to see more obvious example, instead of the white Background in your file use something more complicated like a image build with multiple layers having common fully transparent pixels or at least a photo image instead of the white background.

Copy link to clipboard
Copied
Hey,
I havent read all the replies so I might be repeating something, but, this is how I get aorund it...
1) Put everything above your group into a new Parent Group. (create a folder at the top, select all layers above your group and move them into it)
2) Put everything below your group into a new Parent Group. (create a folder at the bottom, select all layers below your group and move them into it)
**You should now have 3 groups - the one you wanna merge, one above it and one below. (and maybe a pesky background layer outside of groups)
3) Turn visibility off on the Parent groups. (and any pesky background layers)
4) Inside the group you wanna merge, create a new layer at the top.
5) With new layer selected hold ALT then click the Floating Layer Windows sub-menu/drop down thing (just below the close icon) and click megre visible.
6) That should megre the goods to one layer and retain your effects.
7)..up to you...but i usually push all the stuff below that new layer into a subgroup and name it "source".
Hope that helped.
Rob

Copy link to clipboard
Copied
by all means, don't post your PSD file, StrongBeaver!

Copy link to clipboard
Copied
StrongBeaver.
All I can say is that at least I UNDERSTAND your problem. I have just encountered it myself.
You are one of the few people who has actually worded it properly, and STILL you received patronising and completely misunderstanding replies.
I am using Photoshop Elements 4.0 on a mac and when I merge layers with blending, the visual effect of the blending is lost. This is completely ridiculous: Layer blendings have no purpose if you cannot flatten the image while keeping the VISUAL EFFECT of a blending mode (NOT the blending mode itself, as some people have misinterpreted). You need to flatten an image to do almost anything with a photoshop document.
In older versions of photoshop, this was not an issue - flattening an image reproduced EXACTLY what appeared on screen.
If there is no solution to this very real problem, then Layer Blending is COMPLETELY useless, and only for show. This is a very serious problem with the program and I am surprised that it hasn't been brought up more often.
I apologise if someone did post a solution that works.
Copy link to clipboard
Copied
post .psd file, JanusII
(reduce image resolution if file size too big)
Copy link to clipboard
Copied
Christian Davideck, thank you.
That was simply the solution!
Because my file was a very high resolution, the preview of the layer blending in the unflattened image looked radically different to the rendered version of the blending when flattened.
Hence, when I lowered the resolution, the unflattened preview and the flattened final looked almost identical.
Similarly, in the original file, if I zoomed in, the unflattened and flattened versions looked identical.
I take back all the bad things I said about Photoshop. Sure inaccuracy of previews while editing are annoying, especially the change in appearance at different zoom levels, but the flaw is nowhere near as heinous as I imagined.
I am not sure if this is a solution to StrongBeaver's original problem, but it might help...
Copy link to clipboard
Copied
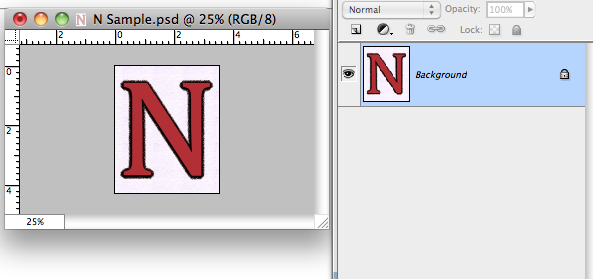
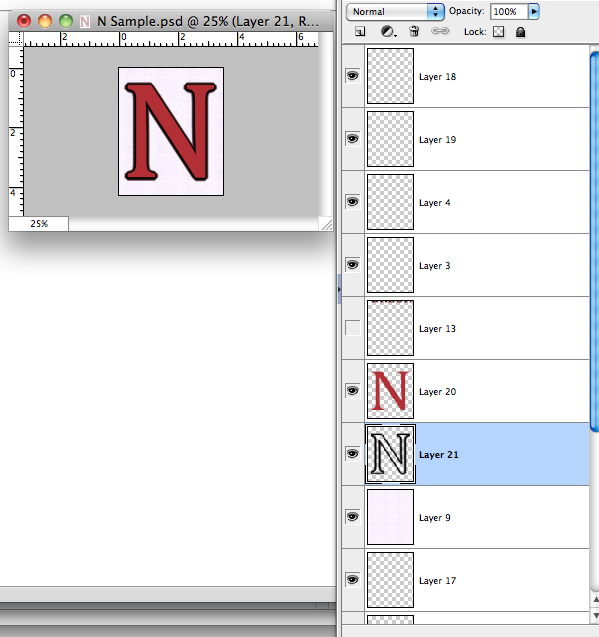
Here are some screenshots demonstrating what happened.
This is the file before flattening:
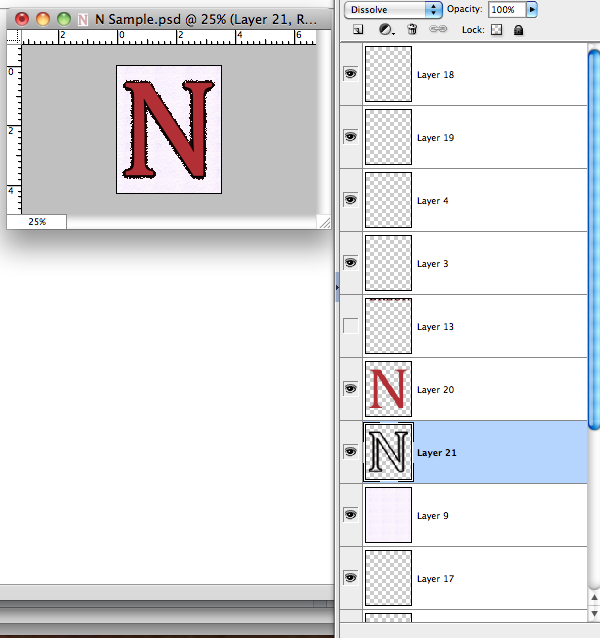
After flattening:
And without "dissolve" on Layer 21:

Copy link to clipboard
Copied
Especially for things noise effects like dissolve, you have to zoom in to 100% to get an accurate preview.
You were zoomed out at 25% -- seeing a downsampled preview (subsampled for the dissolve blend) before flattening, then seeing a downsampled (slightly blurred) preview after.
Unfortunately, noisy effects like dissolve are impossible to preview accurately at downsampled sizes.
Copy link to clipboard
Copied
StrongBeaver.
All I can say is that at least I UNDERSTAND your problem. I have just encountered it myself.
You are one of the few people who has actually worded it properly, and STILL you received patronising and completely misunderstanding replies.
Thank you for understanding and yes I did post a very clear explination to which no one understood.
I am using Photoshop Elements 4.0 on a mac and when I merge layers with blending, the visual effect of the blending is lost. This is completely ridiculous: Layer blendings have no purpose if you cannot flatten the image while keeping the VISUAL EFFECT of a blending mode (NOT the blending mode itself, as some people have misinterpreted). You need to flatten an image to do almost anything with a photoshop document.
In older versions of photoshop, this was not an issue - flattening an image reproduced EXACTLY what appeared on screen.
If there is no solution to this very real problem, then Layer Blending is COMPLETELY useless, and only for show. This is a very serious problem with the program and I am surprised that it hasn't been brought up more often.
I apologise if someone did post a solution that works.
I can't recall if this wasn't a issue in previous versions of Photoshop, I can't think that it wasn't a issue if it's an issue in present versions of Photoshop.
Reducing the image size won't solve the problem not this problem, from the looks of it JanusII problem is not the same. This problem remains unsolved, I've resurfaced the issue and I've posted the original photoshop file which was stripped of most elements there is a annotation within the photoshop file with an explination. The photoshop file attachment was reduced to half it's size to 44 megs.
Copy link to clipboard
Copied
wow, not bad. I asked you to do exactly that in post #4, #16, #36, #39, #43, #49, #51
and
in post #55 you finally came round to do it
StrongBeaver wrote:
I've posted the original photoshop file
OK, anyway,
StrongBeaver wrote:
Merge the SubGroup `MERGE` then merge the SubGroup `MERGE2` keeping all blending modes intact then merge both those merged SubGroups and save as PNG-24 image.
The result should look as it did upon loading the Photoshop file with the black background but with all transparent pixels removed, including the black background.
So is that how you want your PNG-24 file (click to enlarge)?

If so, it's easy:
(1) select the top-most element (layer or group) (in your case the group "GroupMerge")
(2) CTRL+ALT+SHIFT+E (stamp visible)
(3) with magic wand (tolerance 0, contiguous: OFF, sample all layers: ON, sample size: point sample) click somewhere in a black area (e.g. bottom right corner)
(4) image > crop
(5) file > save as > png
And that's only if you absolutely want to merge, which in this case (if I understood your instructions quoted above correctly) is absolutely not necessary. All you have to do if you want to obtain the PNG file I posted are: steps 3-5.
Steps 1+2 (merging) are unnecessary in this case.
Hence why Noel Carboni rightfully said:
So DEFINE WHAT YOU'RE TRYING TO ACCOMPLISH INSTEAD OF GETTING BOGGED DOWN IN THE DETAILS OF HOW YOU'RE DOING IT WRONG! There's most likely another way to get there than the way you've set this up.
[...]
There might be an acceptable way to get an effect closer to what you want - beside just leaving the layers as they are and just closing up the group to keep your composition tidy. What's your obsession with merging, anyway? But for some reason you refuse to describe your actual goals.
Copy link to clipboard
Copied
Is that image with the black background or without. I would like to have it without the black background but look as it does with the back background.
Copy link to clipboard
Copied
StrongBeaver wrote:
Is that image with the black background or without. I would like to have it without the black background but look as it does with the back background.
Is the 1st sentence a statement or a question? If it's a question, please use question marks, it helps understanding.
The image is a png file. PNG does not support layers, so by definition there is no backgound layer because this is technically impossible. You only have one layer in PNG.
As for the 2nd sentence: how can it be with AND without black background at the same time? It's like asking for a red apple that is not red.
Can anyone help me understand what StrongBeaver meant?
Copy link to clipboard
Copied
StrongBeaver wrote:
Is that image with the black background or without. I would like to have it without the black background but look as it does with the back background.
You said "The result should look as it did upon loading the Photoshop file with the black background" and "I would like to have it [...] look as it does with the black background"
The png file I posted ABOVE looks exaclty as the Photoshop file looks upon loading (opening). So why doesn't that meet your requirements?
If you toggle the bottommost layer's visibility and save as png file, you obtain the following file which corresponds to "I would like to have it without the black background", does it meet your requirements?
Note that the black areas in the image above are there REGARDLESS of what color your background layer has.
If I remove the 100% opaque black pixels from the picture in my previous posting (according to "with all transparent pixels removed, including the black background"), you obtain this:

If I remove the black "proportionally", the result is this:
Does any one of the 4 pictures posted above obtain or at least come closer to what you actually want to achieve?

Copy link to clipboard
Copied
This has got to be one of the most confusing threads in any forum I have ever been a witness to.
I did download the PSD file posted and looked at it. Turning on and off layers inside and outside the grouped layers. It seems to me that there is conflicting blending modes and adjustments throughout this image, as I see it.
There is a black background that does affect the rest of the image. Turning it off give you you a completely different take on the image.
But then I'm just a amateur photographer and even more of a amateur when it come to PS.
Copy link to clipboard
Copied
Yes most of this thread is misleading nonsense.
Stong Beaver, there is only one answer to this kind of thing - Copy Merged. This does a completely different thing to Merge Visible which you have tried already.
You make an accurate selection of the areas that you want to "merge" and then choose Edit - "Copy Merged'. Shortcut Control > Shift >C. Then you Paste this into a new layer. This will always work to preserve the appearance of the area, with the modes rendering with the same visual effect. If this does not work, then you are viewing the image at a strange viewing percentage before and after your Copy Merged. Always view at 100% or 50% for this kind of thing.
Copy link to clipboard
Copied
If so, it's easy:
(1) select the top-most element (layer or group) (in your case the group "GroupMerge")
(2) CTRL+ALT+SHIFT+E (stamp visible)
(3) with magic wand
(tolerance 0, contiguous: OFF, sample all layers: ON, sample size:
point sample) click somewhere in a black area (e.g. bottom right corner)(4) image > crop
(5) file > save as > png
And that's only if you absolutely want to merge, which in this case (if I understood your instructions quoted above correctly) is absolutely not necessary. All you have to do if you want to obtain the PNG file I posted are: steps 3-5.
Steps 1+2 (merging) are unnecessary in this case.
I tried steps 3-5 and I didn't get the same results instead I got a image with a black background, if I turn off the black background layer the results are the unexpected.
You said "The result should look as it did upon loading the Photoshop file with the black background" and "I would like to have it [...] look as it does with the black background"
The
png file I posted ABOVE looks exaclty as the Photoshop file looks upon
loading (opening). So why doesn't that meet your requirements?
I made a typo that should have read "The result should look as it did upon loading the photoshop file with the black background except I would like the result to look as it does without the black background" My fault !
The thrid image in post #59 is exactly the result I want, I have to apply this technique a few times 
There is a black background that does affect the rest of the
image. Turning it off give you you a completely different take on the
image.But then I'm just a amateur photographer and even more of a amateur when it come to PS.
The image goes either direction when the black background is turned off.
Yes most of this thread is misleading nonsense.
I explain this all in earlier messages, the advice before post #56 was either off or didn't work. Name calling for a thread is a waste I can understand 'where do I find the liquify tool', or 'how do I make a selection' but techniques such as this are far from non-sense, most always have to simply a situation as either good or bad, that is non-sense.
Stong Beaver, there is only one answer to this kind of thing - Copy Merged. This does a completely different thing to Merge Visible which you have tried already.
You
make an accurate selection of the areas that you want to "merge" and
then choose Edit - "Copy Merged'. Shortcut Control > Shift >C.
Then you Paste this into a new layer. This will always work
to preserve the appearance of the area, with the modes rendering with
the same visual effect. If this does not work, then you are viewing the
image at a strange viewing percentage before and after your Copy Merged.
Always view at 100% or 50% for this kind of thing.
I tried this technique out once I get Christians working, hopefully.
It appears as though Janusull was the only one who could figure out my problem and I'll include Christian as well. I suppose I was speaking a foreign language to everyone else.
I need to flatten a series of layers within a group, which have
different blend modes. I've tried merging group, that resorts all
layers to 'normal mode',
That was the original question, then I went into it with follow up replies then things started to go wakcy with questions from Noel. You can take sides all you want but I would have went in circles with post after post well beyond what it is currently, if I kept on the Charade with Noel.
Copy link to clipboard
Copied
StrongBeaver wrote:
I made a typo that should have read "The result should look as it did upon loading the photoshop file with the black background except I would like the result to look as it does without the black background" My fault !
The thrid image in post #59 is exactly the result I want, I have to apply this technique a few times
The 3rd image in post #59? Ok.
But are you aware that "The result should look as it did upon loading the photoshop file with the black background" corresponds to the image in post #56. That's how your .psd file looks out-of-the-box (upon opening).
And "The result should look as it did upon loading the photoshop file with the black background except I would like the result to look as it does without the black background" corresponds to image 1 in post #59? That's when you just disable visibility of the bottommost layer.
Copy link to clipboard
Copied
The 3rd image in post #59? Ok.
The third image from the top, down makes sense, no ?
But are you aware that "The result should look as it did upon loading the photoshop file with the black background" corresponds to the image in post #56. That's how your .psd file looks out-of-the-box (upon opening).
And "The result should look as it did upon loading the photoshop file with the black background except I would like the result to look as it does without the black background" corresponds to image 1 in post #59? That's when you just disable visibility of the bottommost layer.
No, the third image in post #59 is the result I'm after. Load that PNG into photoshop and slap on a black background the results are basically identical to my original composition. The first image in post #59 is wong.
Copy link to clipboard
Copied
Reynolds (Mark) wrote:
...Stong Beaver, there is only one answer to this kind of thing - Copy Merged.
...This will always work to preserve the appearance of the area, with the modes rendering with the same visual effect...
Only in the fully opaque pixels. I haven't checked Beaver's file, but if the resulting layer has semi-transparent pixels that were with some blending mode before the merging and if there is interaction with other layers below, there appearance will be altered and there is no way around this.
Copy link to clipboard
Copied
Christian - I followed only steps 3-5 in post #56. I'm not getting the resulting image, which when loaded in photoshop with a transparent background layer saves beautifully. I've selected the GroupMerge SubGroup with the magic wand tool with the settings described in post #56 then proceeding File > SaveAs > PNG and the result saves with a black background.
As for CopyMerged it works but the blackbackground is saved along with it, I don't want no blackbackground I want to save the file as a transparent PNG. I realize it's not difficult, but why am I not getting the results as displayed in the image below ?

Copy link to clipboard
Copied
StrongBeaver wrote:
...As for CopyMerged it works but the blackbackground is saved along with it, I don't want no blackbackground...
If you don't want the background hide it when you Copy Merged and save.
Copy link to clipboard
Copied
I can successfully create the first image in post #59 (top-down) then I hit a dead end on how to get the final image (buttom) in that post.
Copy link to clipboard
Copied
For pity's sake, you're trying to make a partially transparent image with some textures on it. People normally do this in a few minutes.
I really don't want to sound critical, but doesn't it seem clear to you that you need to re-examine your approach, rather than repeatedly asking for step by step advice to achieve what could at best be called a vague goal from an ill-prepared starting point?
WRONG APPROACH: You have an image in Photoshop that looks one way, but you want to save it as an image that looks a different way.
That, coupled with an inability or unwillingness to express what it is you're trying to achieve in terms others can understand, is at the core of your problem - and why a question that was answered in the first few posts has gone on to two pages.
-Noel

 AdChoices