- Home
- Photoshop Elements
- Discussions
- Copy paste a color from one part of a picture to a...
- Copy paste a color from one part of a picture to a...
Copy paste a color from one part of a picture to another in PSE14
Copy link to clipboard
Copied
I am only an occasional user of PSE 14. I have a picture where I need to COPY a color from one part of a picture and paste that color into a selection in another part of a picture, and then feather it so that it blends in smoothly. I used to be able to do this in PSE 9 but can't figure out how to do it in PSE 14. I have gotten as far as using the Quick Selection tool outline the "defective" area that needs to be covered up. There is plenty of usable background elsewhere in the photo that I could paste there, but every time I try to do that it creates a "hole" and deletes it from where I'm copying FROM. What tool and procedure should I be using. I know this is pretty elementary, I'm just not in this program often enough to be proficient.
Gary L.
Copy link to clipboard
Copied
Try something like this:
1) Make the selction where you want to change the color;
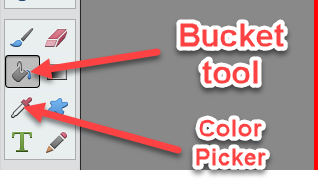
2) Click on the Color picker tool once and then on to your source color; This copies the color;
3) Activate the Bucket tool from the Tools bar;
4) Click on your selection.
This should change it.

Copy link to clipboard
Copied
The problem with this suggestion is where you say to choose the color picker tool "and then on to your source color". That is where I get stuck. My source color will come from elsewhere in the picture. I am not interested in just picking a solid color from a table or palate. And so I don't know how to "pick" my color from the other part of the picture.
Gary L
Copy link to clipboard
Copied
Gary,
- Open your picture file
- Use one of the selection tools, e.g. lasso tool or selection brush, to select the "defective" area
- Place the selected area on its own layer (CTRL+J)
- Open a Hue/saturation adjustment layer above the layer created in step #3
- Link these two layers (CTRL+G)
- In the hue/sat dialog, check "colorize", and work the 3 sliders (hue/saturation/lightness) to obtain the color match.
Copy link to clipboard
Copied
garyl50 wrote:
The problem with this suggestion is where you say to choose the color picker tool "and then on to your source color". That is where I get stuck. My source color will come from elsewhere in the picture. I am not interested in just picking a solid color from a table or palate. And so I don't know how to "pick" my color from the other part of the picture.
Gary L
In that case you need to select the entire "source area", copy it and this can now be pasted to your target area using another new layer and to reposition this layer to fit the requirement. I suggest the best thing is to post the mage here otherwise we are just going to discuss the theory without seeing the practicalities.
Selection is an art and people have made careers out of it. In some magazine companies, people specialise in how to select part of an image for some other artists to handle it in the project.
Copy link to clipboard
Copied
I had to play around with the tool settings to get it very close, but it worked great. I wish you could set the color and opacity and then play around with the tools and see the changes in real time. Thanks for the useful tip.
Copy link to clipboard
Copied
garyl50 wrote:
I am only an occasional user of PSE 14. I have a picture where I need to COPY a color from one part of a picture and paste that color into a selection in another part of a picture, and then feather it so that it blends in smoothly. I used to be able to do this in PSE 9 but can't figure out how to do it in PSE 14. I have gotten as far as using the Quick Selection tool outline the "defective" area that needs to be covered up. There is plenty of usable background elsewhere in the photo that I could paste there, but every time I try to do that it creates a "hole" and deletes it from where I'm copying FROM. What tool and procedure should I be using. I know this is pretty elementary, I'm just not in this program often enough to be proficient.
Gary L.
Gary,
- Open your picture file
- Use one of the selection tools, e.g. lasso tool or selection brush, to select the "defective" area
- Place the selected area on its own layer (CTRL+J)
- Open a Hue/saturation adjustment layer above the layer created in step #3
- Link these two layers (CTRL+G)
- In the hue/sat dialog, check "colorize", and work the 3 sliders (hue/saturation/lightness) to obtain the color match.
Find more inspiration, events, and resources on the new Adobe Community
Explore Now