 Adobe Community

Copy link to clipboard
Copied
Maybe this is not a PE problem per se. When I print an image after working or restoring a photo the dark areas are shiny. I am so far from an expert I have no idea why or how to fix it. Any suggestions would be appreciated. Using an HP printer. Thanks.


 1 Correct answer

Try this:
1. Open the picture file
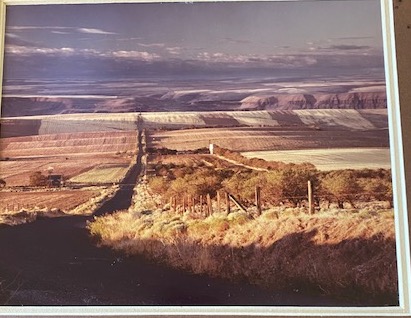
2. Go to Enhance>Adjust Lighting>Levels. Access the white eyedropper in the dialog to reset the white point. With the eyedropper, click on a "light " area below the fence. When I did this the entire picture came to life - the foliage at the bottom became visible!
3. Open a levels adjustment layer at the top and play a little with the 3 sliders. With my equipment this had little additional effect.
4. As for printing, we have to consider the resolution. The reso
... 11
Replies
11
11
Replies
11
Copy link to clipboard
Copied
Several questions:
1. Does the picture look ok on screen?
2. Have you calibrated your monitor?
3. Are you using branded ink & paper, e.g. Epson for Epson printer?
4. If you are so inclined, post a representative picture for us to look at.
Copy link to clipboard
Copied
Thank you for the response. The only time the darks are shiny is after printing. Image looks fine head on but if you look from the side the darker areas shine. Looks fine onscreen, no issues there. Monitor is calibrated as best I can do without buying fancy software. No...I will go buy some HP paper and try that. I didn't consider it might be a printer/paper/ink incompatibility issue. Like I said...I'm far from an expert. The photo is prior to restoration. All the darker areas shine, even some of the darks in the sky.
Copy link to clipboard
Copied
Try this:
1. Open the picture file
2. Go to Enhance>Adjust Lighting>Levels. Access the white eyedropper in the dialog to reset the white point. With the eyedropper, click on a "light " area below the fence. When I did this the entire picture came to life - the foliage at the bottom became visible!
3. Open a levels adjustment layer at the top and play a little with the 3 sliders. With my equipment this had little additional effect.
4. As for printing, we have to consider the resolution. The resolution of this file is 72 px/in. That is ok for web work, but for printing the rule of thumb is that the resolution should be in the 240-300 px/in range, although I have printed successfully below this value.
Go Image>Resize>Image size. Change 72 to 240, check Resample and Constrain proportions. ok it.
5. Make a test print

Copy link to clipboard
Copied
I will most definitely try that....that I understand! Thanks so much. That picture I sent was prior to me scanning it at 400 dpi but since I don'r really understand all that it may have made no difference. But the pixels....I never knew that.
Copy link to clipboard
Copied
dpi=dots per inch. This is a metric realated to your printer/scanner.
ppi=pixels per inch - - - resolution.

Copy link to clipboard
Copied
That paper idea is probably your issue. When I printed with my inkjet I happened to like shiny prints. Now I onl yprint on a color laser printer- or I take it to a local printshop and they print it out.
Copy link to clipboard
Copied
I can try that too! Thanks
Copy link to clipboard
Copied
Thanks....I found some HP paper and that and the post form hatstead solved the issue. I only wish there were classes in my area so I could really get this down. Guess I could look for online info but my needs are small and I can't do anything sophiscated.
Copy link to clipboard
Copied
I was thinking about this image, and opened it in "camera raw."
Go to File>open as. Point to your image, and in the drop-down select Camera Raw
This brings up several sliders which are intuitive and can enhance the scan. Then, if you wish to open in conventional Editor, cick the Open Image button, lower right.

Copy link to clipboard
Copied
I did all of the above except camera raw which I will try next. Then I found a few sheets of HP paper. My issues is now solved. Thank you so much for all the good advice. The enhancement was amazing. My scan was from a photo that had faded over the years and I didn't recall how good it really looked.
Copy link to clipboard
Copied
You're welcome. Glad to help.

 AdChoices