Exit
  • Global community
    • Language:
      • Deutsch
      • English
      • Español
      • Français
      • Português
  • 日本語コミュニティ
  • 한국 커뮤니티
0

How do I brighten (not whiten) a portion of a photo using gradients?

New Here ,
Apr 02, 2017 Apr 02, 2017

How do I brighten or lighten (not whiten) a portion of a photo using gradients?

I have used "levels" and "brightness/contrast" to lighten or brighten the entire photo.

But I want to lighten only certain areas of a photo.

When I use the gradient tool it can whiten a photo.

However, I do not want to add white.  I only want to lighten certain areas of the photo.

E.g., I am trying to lighten some plantings in a night photo and leave the rest of the photo unchanged.

How do I do this?

Thanks.

13.5K
Translate
Report
Community guidelines
Be kind and respectful, give credit to the original source of content, and search for duplicates before posting. Learn more
community guidelines

correct answers 1 Correct answer

LEGEND , Apr 02, 2017 Apr 02, 2017

toasted  wrote

How do I brighten or lighten (not whiten) a portion of a photo using gradients?

I have used "levels" and "brightness/contrast" to lighten or brighten the entire photo.

But I want to lighten only certain areas of a photo.

When I use the gradient tool it can whiten a photo.

However, I do not want to add white.  I only want to lighten certain areas of the photo.

E.g., I am trying to lighten some plantings in a night photo and leave the rest of the photo unchanged.

How do I do this?

Thanks.

  1. Us
...
Translate
LEGEND ,
Sep 19, 2017 Sep 19, 2017
  1. Open the picture file
  2. Duplicate the Background layer, shut off its visibility by clicking on its eye icon, work on background copy layer. If you need to start over, delete this layer and create a new background copy layer.
  3. Working on Background copy layer, go to Enhance menu>Adjust lighting>Brightness/contrast and boost contrast with the slider
  4. Activate the Magic wand tool. On the tool's option bar, set tolerance=20 and check "contiguous." Left click on the background in the work area and hit delete on the keyboard. This will remove some of the background. Repeat this process in other (remaining) areas. The goal is to remove as much of the background as possible. The checkerboard pattern that you will see denotes transparency.
  5. The next steps are to isolate the left & right chains and the pendant.
  6. Duplicate the Background copy layer, and on this duplicate use the eraser tool to erase everything but the right portion of the chain.
  7. Go back to the Background copy layer, duplicate it, and erase everything but the left portion of the chain
  8. Go back to the background copy layer, duplicate it, and erase everything but the pendant
  9. You should now have 3 layers: right chain, left chain, pendant.
  10. Open a Hue/saturation adjustment layer above the left chain and adjust saturation and lightness, and do the same for the right chain.
  11. You can toggle the eye icon on each layer to turn its visibility on/off
  12. Open a blank layer at the top of the stack of layers and press CTRL+SHIFT+ALT+E to generate a stamp visible layer, a combination of all of the layers we have been working on.
  13. Open a blank layer below the stamp visible layer and fill it with black, or any other color, or a pattern, or a gradient.

chain_3.jpg

Translate
Report
Community guidelines
Be kind and respectful, give credit to the original source of content, and search for duplicates before posting. Learn more
community guidelines
Mentor ,
May 05, 2018 May 05, 2018

I duplicated the Background layer, and on the duplicate layer I used the Dodge tool with the default options

Range: Midtones, Exposure: 50-%.

Using a large brush size, 1300 px, I painted over the shadow to lighten it. Here is the result:

sshot-1.jpg

Because of the large brush size, this also lightened part of the cup, dish, and table.

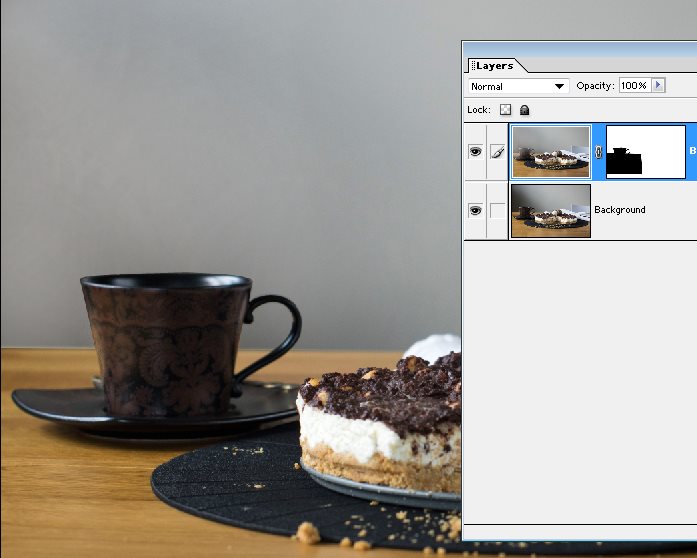
To restore the original, I added a Layer Mask.

Using the Brush tool with a small hard brush size, I painted with black on the mask those portions  to restore the original. You might want to zoom in close while painting the mask.

Note that if you paint too far, restoring for example the original shadow in the wall, you can paint with white on that excess to restore the lightness from the Dodge tool.

Tip: If you set the Foreground/Background color swatches to their default black/white values, you can type "x" while painting the mask to toggle between black and white.

sshot-2.jpg

Here is the final result if you wish to save it to your PC.

IMGP2900 fix.jpg

Translate
Report
Community guidelines
Be kind and respectful, give credit to the original source of content, and search for duplicates before posting. Learn more
community guidelines
New Here ,
May 06, 2018 May 06, 2018
LATEST

Thank you Mark! I appreciate your help. The result is great!

Translate
Report
Community guidelines
Be kind and respectful, give credit to the original source of content, and search for duplicates before posting. Learn more
community guidelines