

- Home
- Photoshop Elements
- Discussions
- Re: I have many b/w group photos and when I colour...
- Re: I have many b/w group photos and when I colour...
I have many b/w group photos and when I colourise them the ccolour is ok on the right but fades to c

Copy link to clipboard
Copied
I have many b/w group photos and when I colourise them the colour is ok on the right but fades to b/w on the left. How can I overcome this problem?


 6
Replies
6
6
Replies
6

Copy link to clipboard
Copied
This may be a problem with your scanner or how you are creating the digital copy of the photos. Can you post some screenshots, and/or some sample photos.
Copy link to clipboard
Copied
Hi Greg,
Thanks for picking up on my request for guidance.
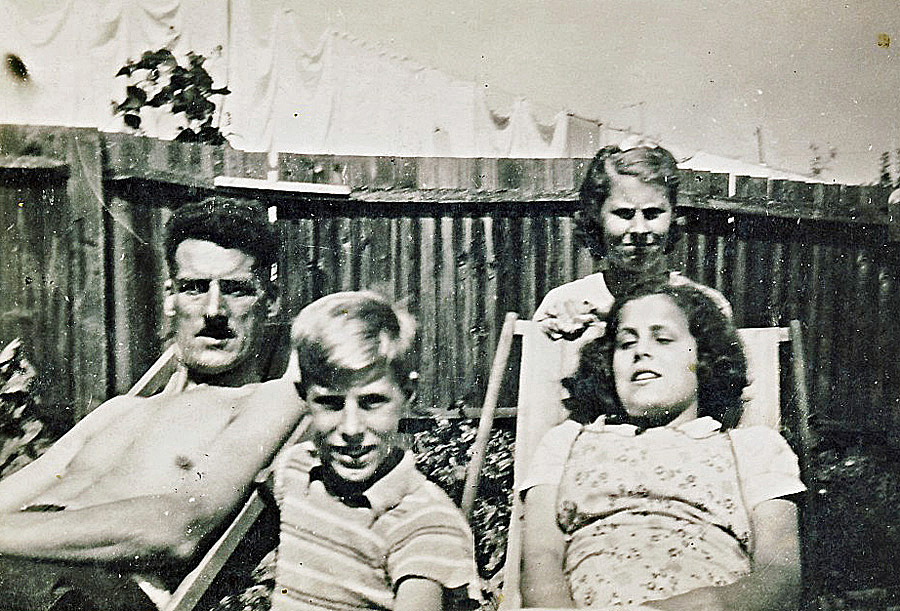
I've attached four b/w photos together with the same 'colourised' pictures.
In the judo group with trophies there is a lack of colour on the faces of the two children on my immediate left and a couple in the back row.
In the other judo group the colour is ok on the right but fades almost completely on the left, and some of the legs & feet are also colourless.
In he photo of me in a hospital bed the colour is mainly acceptable but my and my mother's hands are colourless.
In the family picture the overall colour is very poor and my sister in the deckchair has no colour at all.
However, I am very impressed with PSE, and if you can give me any suggestions that would help me improve my use of the colourisation programme I shall be very grateful.
Again, thanks for giving me your time on this matter,
Best wishes,
Jim
Copy link to clipboard
Copied
Thanks for giving us the samples to help figure this out for you.
First, let me say that the colorize tool is not perfect. But with a little bit of work, the results can be improved. I am guessing that the uncolored areas are caused in part by the poor exposure of the original photos, and the algorithm's inability to see the blown-out white areas as skin color, and the general lack of contrast as making it difficult to determine the skin area. So, one tip that I find to be helpful is to improve the tone of the original photo, perhaps using Levels or a Levels adjustment layer. And your original photos have been scanned in RGB mode which gives them some unwanted reddish color cast in certain areas. I would suggest changing the Mode to true greyscale and then using Levels to improve the overall tone. (If you need more help on that, let us know.) The colorize tool will then change the photo back to RGB mode.
I am also guessing that you have only used the Auto-mode colorize tool. To get a better result, you need to use the Manual mode of the tool. Here is the Adobe video tutorial which will tell you how to use the Manual mode of the colorize tool.
It can sometimes be a challenge to make the selections on a B&W photo for further colorization. I find it best to use the Quick Selection tool rather than the Magic Wand selection tool. You can use the Alt key to quickly subtract from the selection. And other standard tools are available in the workspace such as the Zoom tool (I use my mouse wheel to zoom), and Ctrl-Z and Ctrl+Y to undo and redo selections.
Now, you may find that the color palette that is available does not hold acceptable colors to use. In your case, this would be skin tones. The solution is to use the eye-dropper color selector to pick a color/hue that is already in the photo.

Here, it is important to zoom into the area of the image containing some skin, because there may be shades of pixels containing colors that are too dark or too light, or the wrong shade.

If you select a pixel that doesn't work, you can always click again and the colorization will change dynamically.
So, I worked on a couple of your photos using these manual techniques. Frankly, it would take a lot of work to make the selections perfect, but here is what I was able to achieve fairly quickly:


Copy link to clipboard
Copied
Hi Greg
Thanks for again giving me a quick response.
You advise that I should use the Levels mode and while I am aware of this facility I’ve never used it, nor do I know how to use it but I’ll now give it a go.
I have used both the auto-mode and Manual mode, sometimes switching backward and forward on the same project. One point that has puzzled me is that sometimes the eye-dropper tool is apparently not available; could there be a reason for this, am I perhaps doing something wrong?
One thing I have tried is to enlarge and Quick Select an area of skin – say a hand, arm, etc. I then paint the selected area with the brush set at a small size and low opacity and repeatedly brushing those areas which I think should be darker.
Your edited versions of my pictures are, to me, remarkable and I know that I have steep uphill learning curve ahead of me if I am to achieve similar results.
You have certainly given me the inspiration to try.
At the age of 91 I look back on over 70 years of highly intense sporting activity and over those years I have accumulated thousands of photographs; in the early days the pictures were all b/w and it was not until digital photography became available that the majority of pictures are now mainly in colour.
Again, thanks for your guidance.
Best wishes
Copy link to clipboard
Copied
Hi,
No, regrettably I did not get an answer that would help solve my problem. In your edited version of my original photograph you have shown three images one of which gives an ideal colourisation and I have tried to achieve the same result. One of the suggestions was to scan the photograph in greyscale and then use the colourisation programme, I have done this but the resulting picture continues to lose colour on the left side.
As a member of your company has achieved the result I desire, please can you send me details of the necessary actions? Either in writing or by visual tutorial, I shall be very grateful, and possibly other readers will appreciate the same information.
I am not fully computer literate, so please keep it simple.
Jim
Copy link to clipboard
Copied
OK, Jim, just to be clear, this is a user-to-user forum. Although I have been given the title of Adobe Community Professional, I am not employed by Adobe, nor am I a professional.
I have created a video tutorial to demonstrate my approach to fixing the skin tones on your photos. I used one of your photos that I had not worked on before, and I created the tutorial on-the-fly without any preparation. So, it is a little rough. Hopefully, it will give you some ideas for fixing your black and white images.
For those who don't want to watch the tutorial, here is the photo with Jim's original result and my colorized photo. BTW, I have also added a blue sky manually, which is not shown in the video. I tried using Elements' Guided Edit to add the sky, but the photo did not have sufficient contrast with the washing on the line for the AI to get a good result.

And, while I try not to spend other people's money, I thought I would give you an example of what the latest colourization filter in Photoshop Creative Cloud can do. I created the following by simply using a single adjustment slider to add more saturation than the automatic version created by the program. You said you have a lot of B&W photos to colourize. It may be worth your while to subscribe to the Photographer's plan ($9.99 in the US) for a few months to use the better tool available in Elements' big brother, Photoshop CC.

I found it interesting that the AI picked similar colours to me for the shirt and dress. And while this example is also not perfect (note the chin of the boy), you can edit it manually too.

Find more inspiration, events, and resources on the new Adobe Community
Explore Now
 AdChoices