• Global community
    • Language:
      • Deutsch
      • English
      • Español
      • Français
      • Português
  • 日本語コミュニティ
    Dedicated community for Japanese speakers
  • 한국 커뮤니티
    Dedicated community for Korean speakers
Exit
0

Blending two pictures together without outlines

New Here ,
May 12, 2010 May 12, 2010

Copy link to clipboard

Copied

I seem to have for

gotton the selection for blending an image from one picture onto another

picture so it looks part of the same.

Like a collage but without outlines on each image.

I recall you could adjust it so the image could be more or less invisable on the main picture.

Hope this helps.

Paul

Views

25.7K

Translate

Translate

Report

Report
Community guidelines
Be kind and respectful, give credit to the original source of content, and search for duplicates before posting. Learn more
community guidelines
Community Expert ,
May 12, 2010 May 12, 2010

Copy link to clipboard

Copied

Paul,

Try this:

  • File>new>blank file of appropriate size and resolution of pictures
  • Position the images with overlap
  • Add blank layer between these two
  • Access gradient tool

                Linear gradient

                Foregrouind to transparent

                Normal mode, opacity=100%

                Be sure transparency box is checked

  • Draw gradient left to right within the overlap area

Votes

Translate

Translate

Report

Report
Community guidelines
Be kind and respectful, give credit to the original source of content, and search for duplicates before posting. Learn more
community guidelines
New Here ,
May 12, 2010 May 12, 2010

Copy link to clipboard

Copied

Hi,

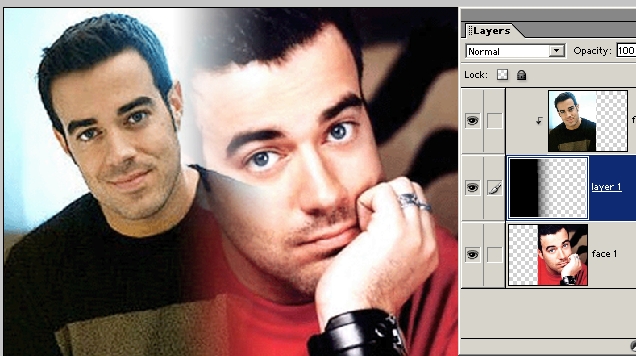
Tried it but couldn't get it to do what I wanted. It basically split the

picture where part was gone with a black fill in. Couldn't make add on extra

image appear which I lassoed from other picture.

Again, this is what I want to do. Maybe I am still missing something. Sorry.

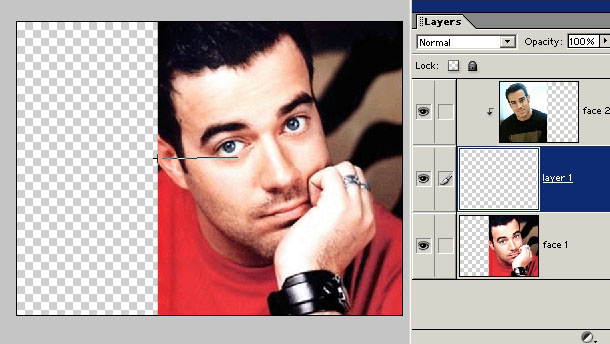
Call up two pictures on the photoshop screen.

Then take one of those pictures and lasso part of that picture,IE a face.

Take that face and move it over to the other full picture.

Then try and blend that image into the existing one. Like a transparent

setting or such.. Like an overlay but blended into the picture without

lines. A control to make it blend in or stand out more or less.

Paul

Votes

Translate

Translate

Report

Report
Community guidelines
Be kind and respectful, give credit to the original source of content, and search for duplicates before posting. Learn more
community guidelines
Mentor ,
May 12, 2010 May 12, 2010

Copy link to clipboard

Copied

This is basically what hatstead said, but with pictures:
1. Position the 2 layers with an overlap where the blend will occur.
2. Add a blank layer between the 2 layers, and group the top two.
3. Set Gradient tool options: Linear Gradient, Foreground-to-Transparent, Normal Mode, Opacity 100%, Transparency box checked.
4. Draw a gradient, left to right, within the overlap area. The length of the drawn line determines the amount of blending. In this example I drew the gradient from the left edge of face 1 to his right eye:
gradient6a.jpg

Important!  Be sure to draw within the overlap or else the pictures edges will show through.
Here's the result:

gradient6b.jpg

Votes

Translate

Translate

Report

Report
Community guidelines
Be kind and respectful, give credit to the original source of content, and search for duplicates before posting. Learn more
community guidelines
Community Expert ,
May 12, 2010 May 12, 2010

Copy link to clipboard

Copied

Paul,

Perhaps this is what you are after:

http://www.pixentral.com/show.php?picture=1tSuOnpRn6zjQsDQl0Ksqh1d4ZW6UB1

  1. Make a selection with one of the selection tools. I used the selection brush tool
  2. Go to Layer>new>layer via copy. This will put the selection on its own layer. Shut off the visibility of the other layers
  3. Press CTRL on the keyboard + left click the layer thumbnail of the selection on its layer to make it active
  4. Go to Select>refine edge, and in the dialog you can adjust with the sliders, especially the degree of feather
  5. Go to Edit>copy
  6. Open the picture to which you wish to add the selection
  7. Go to Edit>paste
  8. Access the move tool and position the added selection
  9. I reduced the opacity of this layer to 59%

Votes

Translate

Translate

Report

Report
Community guidelines
Be kind and respectful, give credit to the original source of content, and search for duplicates before posting. Learn more
community guidelines
New Here ,
Apr 06, 2020 Apr 06, 2020

Copy link to clipboard

Copied

LATEST

One last step to the original method

Go to the first image, right-click for the options and choose 'create clipping mask'. That's when you'll see that image shifted a little right in the layer window with a small arrow pointing downward.

Votes

Translate

Translate

Report

Report
Community guidelines
Be kind and respectful, give credit to the original source of content, and search for duplicates before posting. Learn more
community guidelines