 Adobe Community
- Home
- Photoshop Elements
- Discussions
- Re: create a custom color, apply to selected parts...
- Re: create a custom color, apply to selected parts...

Copy link to clipboard
Copied
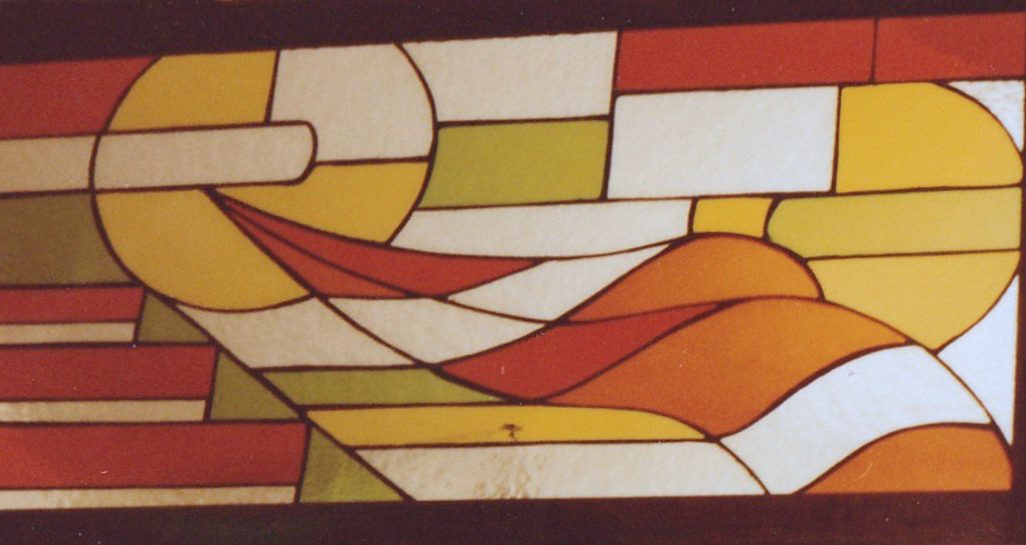
I have a jpg of a custom made piece of stained glass. I want to change the color of selected sections to custom colors I create. I have tried creating a custom solid color layer and applying and painting onto a selected area using the clone tool. This is very awkward and time-consuming using a mouse as a paintbrush. I would like to be able to save my custom color as a swatch and apply that color to an area I select using the Quick Selection tool. I would also like to be able to select the opacity of the color layer so that some underlying texture shows. I am using PSE13. I have attached before and after photos of the artwork.


 1 Correct answer

Try the following:
1.Open the JPEG file
2. Use the magnetic lasso tool to select one of the sections of the window
3. Place this selection on its own layer - -press CTRL+J
3. Open a Hue/saturation Adjustment layer above this and link the top two layers - -press CTRL+G
4. In the dialog for the adjustment layer check "COLORIZE". Work the Hue slider to colorize to a desired color, and refine with the saturation & lightness sliders.
5. In addition, you have the ability to adjust the layer opacity
... 6
Replies
6
6
Replies
6
Copy link to clipboard
Copied
Try the following:
1.Open the JPEG file
2. Use the magnetic lasso tool to select one of the sections of the window
3. Place this selection on its own layer - -press CTRL+J
3. Open a Hue/saturation Adjustment layer above this and link the top two layers - -press CTRL+G
4. In the dialog for the adjustment layer check "COLORIZE". Work the Hue slider to colorize to a desired color, and refine with the saturation & lightness sliders.
5. In addition, you have the ability to adjust the layer opacity to suit.
Copy link to clipboard
Copied


Copy link to clipboard
Copied
You are not really using the correct tools for your project. I don't have Elements 13 on my machine so I am using Elements 12 and am pretty confident they are the same in your version. More recent versions have additional tools you could use.
So, to select the desired pane of the glass, I would use the Magic Wand tool. This makes selections based on the color. For your image, I would use a tolerance of about 20. Since the panes are each a separate color (but there is some variation in similar colors), I would use the Contiguous option in the selection tool.
Once the selection of a particular pane(s) has been made, use the Paint Brush tool. If you have a particular color in mind in another image, you can open that image, double-click on the color picker and hover with your mouse over the desired color in the sample image. The cursor will change to an eye-dropper and you click on your desired color. This changes the foreground color to your desired color. (I used the brighter green from your edited image for my screenshot below.)
Return to your image for edit. In the Paint Bucket tool options, change the Mode to Hue.

This will allow you to change the color of your selection, but maintain the underlying texture. Click on your selection and hopefully, you will get the desired result.

Copy link to clipboard
Copied
As hatstead's post demonstrates, there is more than one way to skin this cat.
Copy link to clipboard
Copied
Hi Greg,
Thanks for the advice. I tried following your rules. I selected the Magic Wand and used it to select a pane. Worked great. Better than the Quick Selection. Then I went to the Paint Bucket, selectetd Contiguous, and adjusted Tolerance. Up to 32, it selected one pane in the image. When I went up one step to 34, it selected many panes, of a variety of colors. So I went back to 32 and started again. I selected a pane went to the bucket, and selected hue, which brought up the color picker. I chose a different color and clicked OK, which changed the foreground color. I then returned to my selected pane and tried single clicking, double clicking and dragging the mouse inside the selected area. Nothing worked. The color in the selected pane did not change. Any ideas?
Copy link to clipboard
Copied
I may have presented some confusing instructions because I used your two images and went back and forth between the two images. I only used the second (edited) image because it contained the brighter green color which I then used to replace a duller shade in the original image.
It also appears that in clicking around in the image, you didn't notice that the active tool or selection had changed. For example, you say that you changed the tolerance in the Paint Bucket tool and there was a big change in the panes that were selected. But once you have made a selection (of one or more panes), the Paint Bucket tool will apply color to only that selection of pane(s). You could apply the tolerance to the maximum level (255) and it would still only apply the color to your selection.
@pinY56 said:
I selected a pane went to the bucket, and selected hue, which brought up the color picker. I chose a different color and clicked OK, which changed the foreground color.
I'm not sure if you are confused here. When I mentioned Hue in the Paint Bucket tool, I was refering to the blend Mode in the drop down menu that I identified in my screenshot. (If you are reviewing my post via email, you would not see my screenshot.) Choosing Hue from the dropdown menu that I illustrated does not bring up the color picker. So perhaps you chose another tool.
pinY56 said:
I then returned to my selected pane and tried single clicking, double clicking and dragging the mouse inside the selected area. Nothing worked. The color in the selected pane did not change. Any ideas?
Did you create more than one layer, as suggested by hatstead, and did you possibly have the All layers box unchecked in the Paint Bucket's tool options? (It is always a good idea to create a copy of the background layer before beginning any editing.) If so, you may not have had the correct layer selected when using the Paint Bucket tool.

 AdChoices