 Adobe Community
How do I crop in a circle?
Copy link to clipboard
Copied
I just downloaded the trial version of Elements 9. I have had no formal training on the program at all. I want to crop some photos into a circle, but I can't figure out how! Can you help?
Copy link to clipboard
Copied
Okay, first of all you have to understand that all digital images, every single one, are always rectangular or square. But you can make an image appear to be any shape by using transparency and then saving it in a format that respects transparency. So:
1. Go over to the layers panel and double click your background layer to turn it to a regular layer. Say ok to the dialog box that appears.
2. Go to the marquee tool (the dotted rectangle) and click hold on it for a popout menu. Choose the elliptical marquee tool.
3. Use it to drag a circle in your image. Holding down the shift key while you drag will constrain it to creating a circle instead of an ellipse.
4. After you have your selection, go to Select>Invert, then press backspace/delete to get rid of the area outside the circle. (If you need a softer edge, you can add a one or two pixel feather (select>feather) before deleting.)
5. Save in a format like Tiff, psd, gif (Not jpg).
Copy link to clipboard
Copied
I have been trying to follow but it keeps saying "No pixels selected" I am using Elements 11.
Copy link to clipboard
Copied
I was able to create the circle. I did Select>Invert. But the backspace/delete did not do anything. What did I miss?
Copy link to clipboard
Copied
- Open the image file
- Activate the Elliptical marquee tool, and you can set the feather value to 1-2 px on the tool's option bar, if you desire.
- Press the shift key on the keyboard and drag out the circular outline ("marching ants") to embrace what is to be retained. The motion of the outline indicates that you have an active selection. This is critical.
- Go to Select>Inverse
- Hit delete on the keyboard
- Press CTRL+D to get rid of the marching ants.
Copy link to clipboard
Copied
Thank you very much. I will try this later. I called my nephew last night, and he gave me similar directions. They worked. #1-5 are the same.
- Open Image
- Double Click (in layers list) to rename
- Use Ellipse Marquis tool to make the circle (remember to hold shift key)
- Select>Inverse
- Press delete
- Use Rectangle Marquis tool to select the area outside of the circle
- Image>Crop
- You’re done. Save the image as a png.
Copy link to clipboard
Copied
In Photoshop Elements you are not limited to cropping in a circle as per the above method.
Open your file
Activate the Cookie Cutter tool. Within that there are multiple libraries, one of which is called "Crop Shapes."
You will find circle, rounded square, diamond, heart, etc. - they are all black.
Select one and drag it out, then click on the green check-mark to confirm
Copy link to clipboard
Copied
Thank you. I do not use Elements.
Copy link to clipboard
Copied
There are many ways to crop. Here is one which offers lots of flexibility. No doubt other readers of this forum will offer other suggestions.
Your picture when loaded into PSE has the default layer named "Background". First thing is to convert it to regular layer by renaming it; double-click it and enter the new name or simply accept the default name "Layer 0".
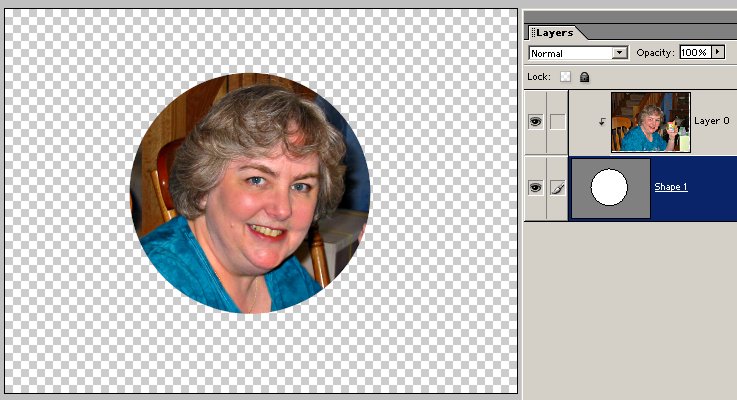
Next, active the Elipse tool. Holding down Shift, draw out a circle approximately the size you want (Shift forces the ellipse to be a circle). This creates a new layer named "Shape 1". Don't worry that the circle is a solid color and not in the exact size and position you want; we will fix this is a moment.
Move the shape layer below the picture layer and group the 2 layers.The picture will now be cropped into the circle, with a checkerboard background indicating transparency:

The nice thing about this method is that you can now resize and reposition the picture precisely where you want it within the crcle. Select the Move Tool and with either layer activated use the mouse and/or arrow keys to reposition the picture. To resize the circle, with the Move tool selected activate the picture layer and while holding Shift drag any of the corner handles to resize (Shift preserves the circle). If you want to reposition the circle-picture combination within the picture's canvas, link the 2 layers and use the Move tool with mouse or arrow keys.
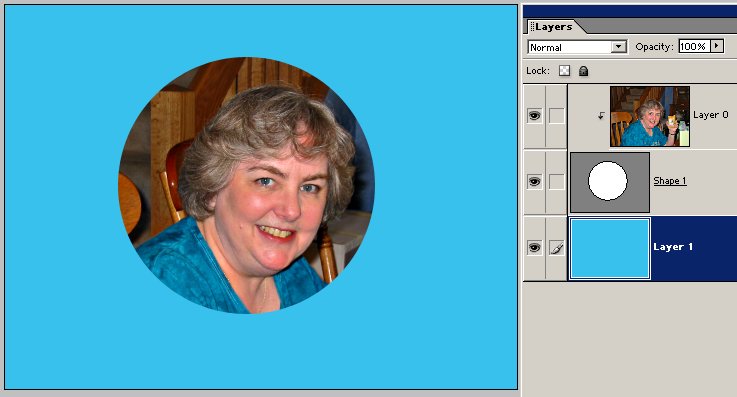
If the picture is to be used for an application that requires transparency (such as MS Word document, Web page, greeting card program), save it in a file type that supports transparency. PSD, TIFF, PNG, GIF, EPS support transparency. JPG, BMP do not. If you save it as jpg for example, you will not have transparency but instead a white background (which is maybe what you wanted in the first place). If you want a different color background add a blank layer at the bottom of the stack and fill it with your color:

Like I said, there are other (and easier) ways to crop but this offers the flexibility of resizing and positioning.
Copy link to clipboard
Copied
Yes, you could also use a layer mask in PSE 9, in pretty much the same way: make the elliptical selection on the photo layer, then click the layer mask button at the bottom of the panel. This will be editable, too, without all the grouping.
Copy link to clipboard
Copied
I did your instruction but when I drew the circle marque it did not crop the picture.
Copy link to clipboard
Copied
Thank you both very much!! This has been most helpful. I will be posting another question in a moment, because though this question was answered, I didn't know what I should have been asking when I asked to begin with!! I will however, file this info away for future projects!
Copy link to clipboard
Copied
I made some minor changes to explain the purpose of the Shift key.
Copy link to clipboard
Copied
Your msg#6 is in response to Barbara B, so I assume you are referring to her method. In which of those steps do you get the "No pixels selected" message?
Your msg#7 is in response to me, so I assume you are referring to my method. The crop does not occur when you draw the circle with the Ellipse tool. That step just creates the circle on a new layer. The crop occurs when you move the circle layer below the picture layer and then group the 2 layers.
Copy link to clipboard
Copied
I’ve finally figured it out. In Elements 11 after the circle is created I have to right click on the picture and select “Make a Selection”. Thanks.
