 Adobe Community
- Home
- Photoshop ecosystem
- Discussions
- A way to standardize saturation and lightness of a...
- A way to standardize saturation and lightness of a...
Copy link to clipboard
Copied
I'm am aware that the filter/other/hsl-hsb filter can be used to turn the red channel into one representing the hue (on a grey scale 0-255).
But what I would realy like, as a diagnostics tool, is a method that will convert a color image into one where both saturation and lightness/brightness are stadardised for all pixels (to e.g. 50%), so that the resulting images reflects only the variations in hue across the image.
Any suggestions?
BR
Karsten
#huemap
 1 Correct answer
Thanks Dave, I think this will do the trick for me - and also thanks for making me aware of the caveat 🙂
BR Karsten
Explore related tutorials & articles
Copy link to clipboard
Copied
You could try something like this :
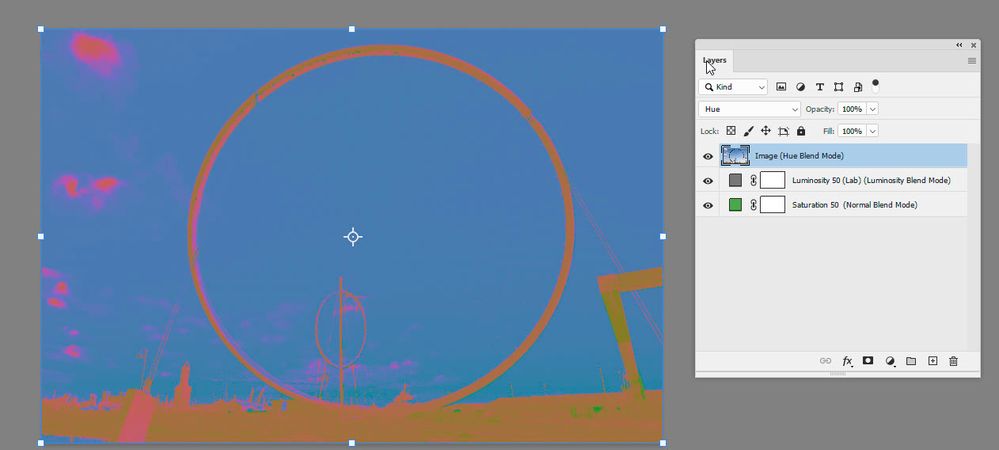
Add a colour fill layer set to S = 50 (the H and B do not matter)
Add a second colour fill layer set to Luminosity 50 (or whatever you want as standard) in Lab then set Blend mode to Luminosity
Finally add your image with Blend mode set to Hue
The issue will be that where saturation is zero, so a perfect grey, the Hue could be any value at all as it is not used. So I'm not sure of the value in doing this.
Dave
Copy link to clipboard
Copied
Thanks Dave, I think this will do the trick for me - and also thanks for making me aware of the caveat 🙂
BR Karsten
Copy link to clipboard
Copied
Since, in Lab Color:
Lightness is separate from Color and the color channels control Saturation,
you may also consider doing all the work in Curves, on a single layer in that Mode. The method takes longer to describe than to execute.
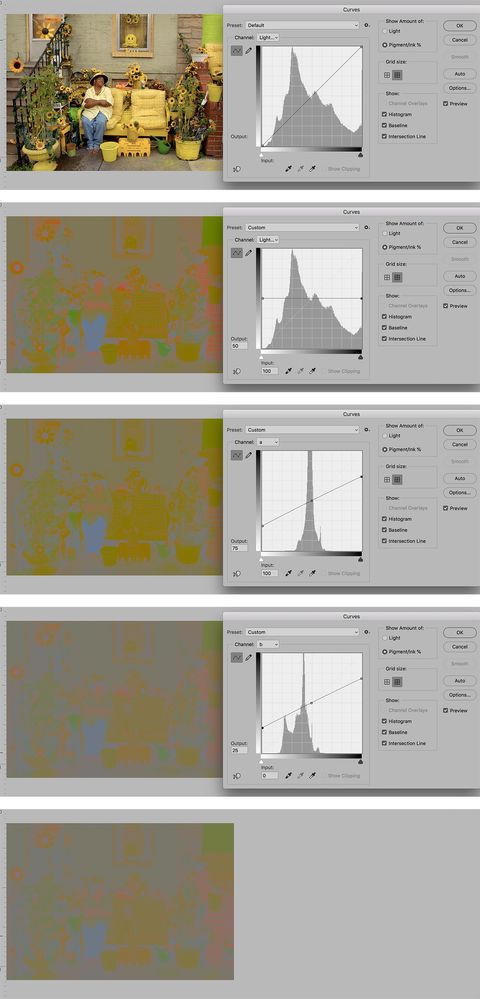
First, though, after changing the file’s mode to Lab Color and choosing Image> Adjustments> Curves, it is recommended that you change the grid to 10x10 and choose Pigment/Ink% (so that the scales run from light to dark, rather than from dark to light).
- The Lightness curve (the tonal scale) may be altered without affecting color. In the set of images above, the first one shows the startup for the procedure.
- The scale runs from zero to 100% and for this example 50 was chosen. By creating a curve shape that is a straight horizontal line across the middle of the grid, the Lightness (tonal scale) has been changed to one value, 50%, for the color in entire image.
- Color and Saturation adjustments reside in Channels a and b. Channel a controls Magenta/Green and b controls Yellow/Blue. Yes, control of two colors reside in each of the color channels. Choose the a channel. The curve required to reduce Saturation must be a straight line that pivots on the center axis. Choose a curve endpoint and use the keyboard North and South arrows move it to match the figure marked Output. Repeat for the other endpoint (25 & 75)
- Repeat the procedure with the b channel. Saturation is reduced by half.
- Return to RGB mode. I leave the use of this final image to you.
Copy link to clipboard
Copied
Thanks Norman, definately an interesting approach, and thanks for the clear and careful explanation 🙂
BR Karsten


