 Adobe Community
- Home
- Photoshop ecosystem
- Discussions
- Re: adding the image no as a copyright in photosho...
- Re: adding the image no as a copyright in photosho...
adding the image no as a copyright in photoshop

Copy link to clipboard
Copied
I use photo mechanic to download my memory cards and renumber the images to something appropriate to the images on the card, and also a date.
so for instance the images number will look like -
2116021-Bgrove-nnnnn.jpg. this translates to yr day month download-loctaion- and sequential number.
What I would like to do is have this number as part of my copyright notice on the image - so in effect every copyright notice is unique to the image.
This way is someone screen shots the image on their phone and then sends me the screen shot I can easily identify the image


Explore related tutorials & articles
 27
Replies
27
27
Replies
27

Copy link to clipboard
Copied
I presume that this is placed on the image. Are you currently using a watermark script?
Can you show a sample before and after image of the size, placement, font etc?
Just to be clear do you want:
2116021-Bgrove-nnnnn
or only:
nnnnn
Copy link to clipboard
Copied
Copy link to clipboard
Copied
/*
Ultimate Images Watermarker v1.jsx
adding the image no as a copyright in photoshop
https://community.adobe.com/t5/photoshop/adding-the-image-no-as-a-copyright-in-photoshop/td-p/11834851
Original script modified by Stephen Marsh 2021
*/
#target photoshop
function waterMarker() {
if (documents.length > 0) {
// save the original dialog display
var originalDialogMode = app.displayDialogs;
app.displayDialogs = DialogModes.ERROR;
// save the original ruler units
var originalRulerUnits = app.preferences.rulerUnits;
app.preferences.rulerUnits = Units.PIXELS;
try {
// Add copyright metadata
app.activeDocument.info.copyrighted = CopyrightedType.COPYRIGHTEDWORK;
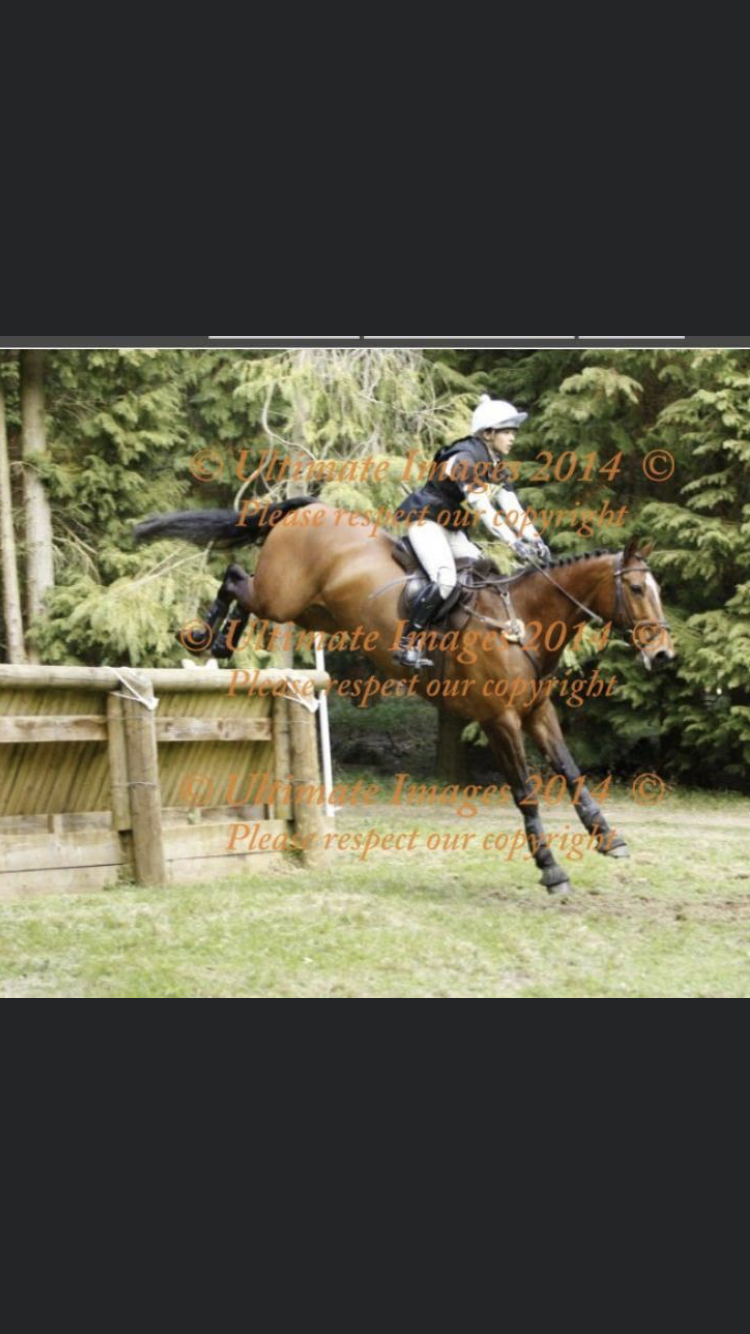
app.activeDocument.info.copyrightNotice = "Copyright \xA9 Ultimate Images 2021";
// add a text layer
var LayerRef = app.activeDocument.artLayers.add();
LayerRef.kind = LayerKind.TEXT;
var textRef = LayerRef.textItem;
var fileNameNoExtension = app.activeDocument.name;
fileNameNoExtension = fileNameNoExtension.replace(/\.[^\.]+$/, '');
// Escaped copyright symbol = \xA9
textRef.contents = "\xA9 Ultimate Images 2021 \xA9" + "\r" + "Please respect our copyright" + "\r\r" +
"\xA9 Ultimate Images 2021 \xA9" + "\r" + "Please respect our copyright" + "\r\r" +
"\xA9 Ultimate Images 2021 \xA9" + "\r" + "Please respect our copyright" + "\r\r" +
"Code: " + fileNameNoExtension;
textRef.position = new Array(0, 0);
app.preferences.rulerUnits = Units.POINTS;
textRef.size = 30;
textRef.useAutoLeading = false;
textRef.leading = 25;
textRef.font = 'Times-Italic';
textRef.justification = Justification.CENTER;
var textColor = new SolidColor;
textColor.rgb.red = 255;
textColor.rgb.green = 255;
textColor.rgb.blue = 255;
textRef.color = textColor;
app.preferences.rulerUnits = Units.PIXELS;
// Blend mode
app.activeDocument.activeLayer.blendMode = BlendMode.DIFFERENCE;
// Opacity
app.activeDocument.activeLayer.opacity = 100.0;
// Conditional resize layer by portrait or landscape orientation
if (app.activeDocument.height > app.activeDocument.width) {
scaleP();
} else {
scaleL();
}
app.preferences.rulerUnits = originalRulerUnits;
app.displayDialogs = originalDialogMode;
function scaleP() {
var iLayer = app.activeDocument.activeLayer;
app.activeDocument.activeLayer = iLayer;
var scale = Math.min(app.activeDocument.width / (iLayer.bounds[2] - iLayer.bounds[0]), app.activeDocument.width / (iLayer.bounds[3] - iLayer.bounds[1])); // Optionally change Math.max to Math.min to fit canvas short side
// Scale to 90% of canvas
iLayer.resize(scale * 90, scale * 90);
// Centre the text layer on canvas
iLayer.translate(app.activeDocument.width / 2 - (iLayer.bounds[0] + iLayer.bounds[2]) / 2, app.activeDocument.height / 2 - (iLayer.bounds[1] + iLayer.bounds[3]) / 2);
}
function scaleL() {
var iLayer = app.activeDocument.activeLayer;
app.activeDocument.activeLayer = iLayer;
var scale = Math.min(app.activeDocument.width / (iLayer.bounds[2] - iLayer.bounds[0]), app.activeDocument.height / (iLayer.bounds[3] - iLayer.bounds[1])); // Optionally change Math.max to Math.min to fit canvas short side
// Scale to 90% of canvas
iLayer.resize(scale * 90, scale * 90);
// Centre the text layer on canvas
iLayer.translate(app.activeDocument.width / 2 - (iLayer.bounds[0] + iLayer.bounds[2]) / 2, app.activeDocument.height / 2 - (iLayer.bounds[1] + iLayer.bounds[3]) / 2);
}
} catch (e) {
app.preferences.rulerUnits = originalRulerUnits;
app.displayDialogs = originalDialogMode;
return;
}
}
}
// Create a single history step
app.activeDocument.suspendHistory("Watermarker Script", "waterMarker()");
Changelog:
Original "beta" proof of concept script posted 16th Feb 2021
Script updated 17th Feb 2021 - Version 1
Copy link to clipboard
Copied
Hi,
This is very kind and generous of you, the need to have it dynamically size the text would be a real bonus, as I use different camera's of different resolutions and always struggle with adding text to images via actions because of it
Copy link to clipboard
Copied
I have updated yesterday's proof of concept code into a completed v1 script. Please try the updated code in my previous post on different size files in both portrait and landscape orientations.
Please let me know how it goes, like many of my scripts it is a bit of a Frankenstein's monster, a borrowed bit here, an original bit there... I'm not 100% happy with it, however, it appears to get the job done!
P.S. I have just modified the code to include copyright metadata in addition to the watermark.
https://prepression.blogspot.com/2017/11/downloading-and-installing-adobe-scripts.html

Copy link to clipboard
Copied
There are Photoshop Script the around that will add a text layer containing the Image name and date taken if available in the metadata onto the image. However, many web image have no metadata its been striped. You could modify one of these scripts to also include some copyright notice to that text layer them flatten the images so copyright is blended into the images you downloaded.
Copy link to clipboard
Copied
The previous script had the year 2021 hard coded into it and is suitable for recording into an action for batch processing.
The following script uses a GUI prompt allowing one to enter the copyright year, which is not really suitable for batching.
/*

Ultimate Images Watermarker v1 PROMPT.jsx

adding the image no as a copyright in photoshop
https://community.adobe.com/t5/photoshop/adding-the-image-no-as-a-copyright-in-photoshop/td-p/11834851

Original script modified by Stephen Marsh 2021

*/

#target photoshop

function waterMarker() {

    if (documents.length > 0) {

        // save the original dialog display
        var originalDialogMode = app.displayDialogs;
        app.displayDialogs = DialogModes.ERROR;
        // save the original ruler units
        var originalRulerUnits = app.preferences.rulerUnits;
        app.preferences.rulerUnits = Units.PIXELS;

        try {

            // Loop the input prompt until a number is entered
            var origInput;
            while (isNaN(origInput = prompt("Enter a whole number:", "2021")));
            // Test if cancel returns null, then terminate the script
            if (origInput === null) {
                alert('Script cancelled!');
                return
            }
            // Test if an empty string is returned, then terminate the script
            if (origInput === "") {
                alert('A value was not entered, script cancelled!');
                return
            }
            // Convert decimal input to integer
            var copyYear = parseInt(origInput);
            // First four characters only
            var copyYYYY = copyYear.toString().replace(/(^.{4})(.+)/g, '$1');

            //alert(copyYYYY);

            // Add copyright metadata
            app.activeDocument.info.copyrighted = CopyrightedType.COPYRIGHTEDWORK;
            app.activeDocument.info.copyrightNotice = "Copyright \xA9 Ultimate Images " + copyYYYY;

            // add a text layer
            var LayerRef = app.activeDocument.artLayers.add();
            LayerRef.kind = LayerKind.TEXT;
            var textRef = LayerRef.textItem;

            var fileNameNoExtension = app.activeDocument.name;
            fileNameNoExtension = fileNameNoExtension.replace(/\.[^\.]+$/, '');

            // Escaped copyright symbol = \xA9
            textRef.contents = "\xA9 Ultimate Images " + copyYYYY + " \xA9" + "\r" + "Please respect our copyright" + "\r\r" +
                "\xA9 Ultimate Images " + copyYYYY + " \xA9" + "\r" + "Please respect our copyright" + "\r\r" +
                "\xA9 Ultimate Images " + copyYYYY + " \xA9" + "\r" + "Please respect our copyright" + "\r\r" +
                "Code: " + fileNameNoExtension;

            textRef.position = new Array(0, 0);
            app.preferences.rulerUnits = Units.POINTS;
            textRef.size = 30;
            textRef.useAutoLeading = false;
            textRef.leading = 25;
            textRef.font = 'Times-Italic';
            textRef.justification = Justification.CENTER;
            var textColor = new SolidColor;
            textColor.rgb.red = 255;
            textColor.rgb.green = 255;
            textColor.rgb.blue = 255;
            textRef.color = textColor;

            app.preferences.rulerUnits = Units.PIXELS;

            // Blend mode
            app.activeDocument.activeLayer.blendMode = BlendMode.DIFFERENCE;

            // Opacity
            app.activeDocument.activeLayer.opacity = 100.0;

            // Conditional resize layer by portrait or landscape orientation
            if (app.activeDocument.height > app.activeDocument.width) {
                scaleP();
            } else {
                scaleL();
            }

            app.preferences.rulerUnits = originalRulerUnits;
            app.displayDialogs = originalDialogMode;

            function scaleP() {
                var iLayer = app.activeDocument.activeLayer;
                app.activeDocument.activeLayer = iLayer;
                var scale = Math.min(app.activeDocument.width / (iLayer.bounds[2] - iLayer.bounds[0]), app.activeDocument.width / (iLayer.bounds[3] - iLayer.bounds[1])); // Optionally change Math.max to Math.min to fit canvas short side
                // Scale to 90% of canvas
                iLayer.resize(scale * 90, scale * 90);
                // Centre the text layer on canvas
                iLayer.translate(app.activeDocument.width / 2 - (iLayer.bounds[0] + iLayer.bounds[2]) / 2, app.activeDocument.height / 2 - (iLayer.bounds[1] + iLayer.bounds[3]) / 2);
            }

            function scaleL() {
                var iLayer = app.activeDocument.activeLayer;
                app.activeDocument.activeLayer = iLayer;
                var scale = Math.min(app.activeDocument.width / (iLayer.bounds[2] - iLayer.bounds[0]), app.activeDocument.height / (iLayer.bounds[3] - iLayer.bounds[1])); // Optionally change Math.max to Math.min to fit canvas short side
                // Scale to 90% of canvas
                iLayer.resize(scale * 90, scale * 90);
                // Centre the text layer on canvas
                iLayer.translate(app.activeDocument.width / 2 - (iLayer.bounds[0] + iLayer.bounds[2]) / 2, app.activeDocument.height / 2 - (iLayer.bounds[1] + iLayer.bounds[3]) / 2);
            }

        } catch (e) {
            app.preferences.rulerUnits = originalRulerUnits;
            app.displayDialogs = originalDialogMode;
            return;
        }
    }
}

// Create a single history step
app.activeDocument.suspendHistory("Watermarker Script", "waterMarker()");
Copy link to clipboard
Copied
I'm not happy with the resizing code, however, the rest of the script is working close enough... Is there any feedback?
Copy link to clipboard
Copied
Stephen I found it very hard to deals with Font size to add a text layer on images in Actions and Scripts not because of an image being a Portrait or Landscape. It has to do with size and print resolution. Adobe text seems based on point size and that is like 72px. In script knowing this you can calculate what size font to use for any size image to create a text layer appropriate for the current image size. Being that this is not possible in an action I wrote a little utility script to be used in actions twice. More or less a Save and Restore script. The Fist time the action run the script the script saves the document Print Resolution and users ruler units,. The action then change the Document Print size using Image size resample not checked and resizes the Image to print 8" wide. The action them added the copyright text layer using a font size for an 8" wide image and then position the text layer aligned to the bottom right of the image. Then the action ran the script a second time. On the second run script retrieves the saved setting change the document Print resolution and ruler units back thus restoring the document original print size. In Script I do basically the same thing. I save the document Print resolution. Change the print resolution to 72ppi. calculate an appropriate font size to used base on the Canvas size in pixels, the number of character that will be added and that character require 72px text. Add the text layer set the text content , font size and text layers position. Finally I restore the document Print resolution to restore the document print size.
Copy link to clipboard
Copied
Thanks, but I'm just cheating by fitting the layer bounds to canvas, which is why I was concerned with orientation.
Copy link to clipboard
Copied
Just use align layer to a selection select the canvas location you want to align the layer to using the canvas size x y location.
Copy link to clipboard
Copied
It is not about the alignment which will be needed in some shape or form, I know how to do that bit. What I don't know how to do is resizing the layer bounds to the canvas size, ideally about 90% width or height, proportionally without going outside of the canvas. I'm sure that I have hacked at code to do this previously, however, I can't find it now.
Copy link to clipboard
Copied
I did not realize you were resizing text using layer bounds not sizing text using font size. I understand where I went wrong now.

Copy link to clipboard
Copied
One thought, since you don't mention it: be sure you also keep the originals safe and accessible. If one of your photos catches the eye of a commercial buyer, they will not want a watermark...
Copy link to clipboard
Copied
Apologies forthe lack of response to all the sterling efforts. I've been masively sidetracked with another issue that is taking days to resolve.
I'm hoping to be able to get back to this on Monday
Copy link to clipboard
Copied
Hi,
I've run the action as a stand alone process on an open image and it dows exactly what I need it to.
I just need to figure out geting it to run in batch. I've not needed to run batch an action in 10+ years (cs2) so I'm a little rusty...
Copy link to clipboard
Copied
Hi,
I've run the action as a stand alone process on an open image and it dows exactly what I need it to.
I just need to figure out geting it to run in batch. I've not needed to run batch an action in 10+ years (cs2) so I'm a little rusty...
By @pauls64910549
I'm a little confused... Are you referring to the first script (not action) that I posted? Did you record the script into an action for use with batch?
Copy link to clipboard
Copied
suspendHistory() method has been introduced first time to CS3.
Copy link to clipboard
Copied
suspendHistory() method has been introduced first time to CS3.
By @Kukurykus
If one is still using CS2 or earlier, then it may be wise to remove the last line of the script.
Copy link to clipboard
Copied
annoyingly CS2 doesn't run well under win10
Copy link to clipboard
Copied
It's known issue, and it's known Adobe won't fix it 😉
Copy link to clipboard
Copied
I'm planing on running these under CS5, and using the first script with the embedded year. I've looked through the script and can see where the amendment would be needed to reflect the current year
Copy link to clipboard
Copied
OK, then you can either install the script and record it into an action or just record a browse/run into an action. Then use Batch, Image Processor, Image Processor Pro or Picture Processor scripts.
https://prepression.blogspot.com/2017/11/downloading-and-installing-adobe-scripts.html


Copy link to clipboard
Copied
Stephen I tried your script
the script is only good if the image is 72dpi
if the image is at 300dpi is not good
see screenshot.
72dpi

300dpi

-
- 1
- 2

 AdChoices