 Adobe Community
- Home
- Photoshop ecosystem
- Discussions
- Re: colour not matching photoshop to Lightroom
- Re: colour not matching photoshop to Lightroom
colour not matching photoshop to Lightroom
Copy link to clipboard
Copied
Catalina 10.15.6
Photoshop 21.2.2
Lightroom 9.4
ACR 12.4
montor calibrated with preferences calibration
After editing in photoshop and saving when imported to lightroom wild mismatch of colour. only way to correct is to go to ACR in the develop module and change setting. This has only started happening recently.
Explore related tutorials & articles
Copy link to clipboard
Copied
montor calibrated with preferences calibrationIs this something you do in the Mac OS? The proper way to calibrate is by using a hardware calibrator.
only way to correct is to go to ACR in the develop module and change settingWhat setting are you referring to? Do you mean that you edit the image in Lightroom to make it display the same as in Photoshop? ACR is a plugin for Photoshop, but is an integral part of Lightroom.
And are you using Edit in Photoshop from Lightroom, or do you start out editing in Photoshop, and then import to Lightroom?
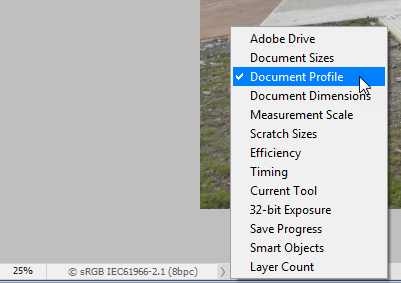
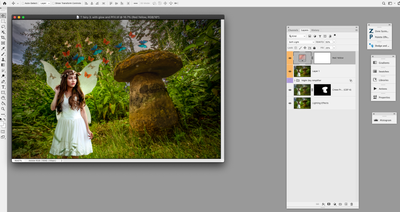
Please post a screenshot of the entire Photoshop window with the image open, and the status bar set to display Document profile.
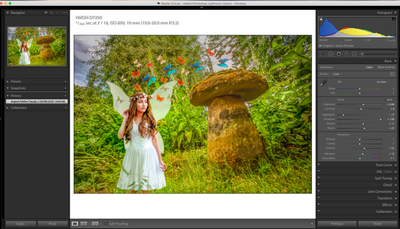
Also post a screenshot of the same image in Lightroom, with the History panel visible and expanded on the left, and the Histogram and Basic panel visible and expanded on the right.
To insert screenshots, use the Insert photos button in the toolbar.
Copy link to clipboard
Copied
Copy link to clipboard
Copied
Hi Per thanks for the reply.
I import the raw image from the camera to lightroom then open in photoshop for editing in ACR and photoshop. This usually saves back to lightroom or if its a bit slow i will press the import but and find.I have two screens on show all the time but only trust the colour on the Mac retina screen. Have switched both aps to Adobe RGB from an internet suggestion as usually screens are calibrated using a 3rd party app. I did recently have to reload from a time machine backup but pretty sure a had to reinstall from Adobe cc cloud.
Regards
Mick Brittain
Copy link to clipboard
Copied
Is that first example a tiff or a raw file?
"I import the raw image from the camera to lightroom then open in photoshop for editing in ACR and photoshop"
If you first do edits on a raw file in Lightroom, and then open the image in ACR, they won't match. Lightroom stores edits in the catalog, which is not accessible to ACR. So the Lightroom edits are not visible in ACR, unless you set the catalog preference to save metadata to files. But this setting is not on by default.
If you "edit in Photoshop" from Lightroom, the Lightroom edits will be baked into the RGB file that opens into Photoshop. In that case you never see the ACR interface (although it is ACR that opens the file silently in the background, with Lr settings applied).
Copy link to clipboard
Copied
They are both tiffs. I rarely use the deleop module (acr) in lightroom all editting is done in photoshop
Copy link to clipboard
Copied
"I rarely use the deleop module (acr) in lightroom"
Let's just be clear on this, since you seem to confuse the two: ACR is not Lightroom Develop module. They are separate and not connected. They just share the same processing engine. But you cannot jump from one to the other. You have to decide which one to use.
As far as displaying TIFFs in Lightroom - you have to make sure that Photoshop is set to "Maximize Compatibility" in Preferences > File Handling. Lightroom does not support layers, and the only way to handle it in Lightroom is with this setting. This embeds a flattened composite layer into the file, and it's this flattened composite that is shown in Lightroom.
Personally I avoid processing RGB files (PSD/TIFF) in Lightroom. They don't really play well together, and any layers in Photoshop will not be honored in Lightroom. There are simply too many potential conflicts and mix-ups, and it's ultimately a very confusing workflow. I keep Lightroom for raw files and Photoshop for RGB files. Makes life much easier.
Copy link to clipboard
Copied
The Maximize Compatibility setting is only for PSD and PSB files, TIFF is not mentioned.
I don't use PSD or PSB, but have been sending Tiff files back and forth between Lightroom and Photoshop for years without any problems.
It is true that Lightroom doesn't support layers, and it will display a flattened version of the file.
But it is still possible to send a layered image back to PS without losing the layers, as long as Edit Original is used. Edits done in Lightroom will not be visible in PS, but they will reappear in LR when the file returns, along with any new edits done in PS.
If you choose Edit a copy with Lightroom adjustments, or Edit a copy, the layers will be lost.
But there is no action in LR that will remove the layers from the original.
I agree that this can be confusing, it certainly was for me in the beginning.
But as long you always use Edit Original, and can live with the fact that edits done in LR will temporarily disappear, I don't see any problems with this workflow.
Copy link to clipboard
Copied
OK, understood 😉
But still - it confirms my point that this requires a very disciplined workflow and a clear understanding of the underlying mechanisms. Failing either, you'll quickly get lost and lose your bearings. I'd still not recommend it...
And even so: if you want to use the Lightroom/ACR adjustments on RGB files, why not just use the ACR filter?
Copy link to clipboard
Copied
First of all, I much prefer working in Lightroom over Bridge/ACR. (or the ACR filter)
And the convenience of having all my master files in the LR catalog more than outweighs the somewhat awkward workflow with layered files.
Most of the work I do nowadays is done on a tripod, using focus stacking. I use Helicon Focus as a Lightroom plugin, which returns a tiff file. So most of my master files are tiffs.
I use quite a few adapted lenses, and some of them need extra sharpening, typically right and left edges are soft at infinity. So these files are sent to PS, where I do additional sharpening with Topaz Sharpen AI on a new layer. Sometimes I create a layer mask to remove sharpening, or to adjust the opacity in some areas.
The file returns to LR, and I can anytime go back to PS to work on the layer mask, or change the layer opacity.
Additionally, I have about 2500 grayscale scans, which also are tiffs. They have been retouched in PS before importing to LR, but I sometimes have to go back to fix dust that appears after sharpening, or do other edits.
Although LR doesn't know about grayscale files, the file will open as grayscale in PS when using Edit original.
Exporting from LR is RGB only, so exported files have to be converted to grayscale, if that's what I want in the end.


