 Adobe Community
- Home
- Photoshop ecosystem
- Discussions
- Re: Duotone Not Working - Grayed Out
- Re: Duotone Not Working - Grayed Out

Copy link to clipboard
Copied
This post is from May 2014.
New posts that are unrelated to the 16-bit CMYK issues have been removed.
Please start a new post so we can better assist.
This thread is now locked.
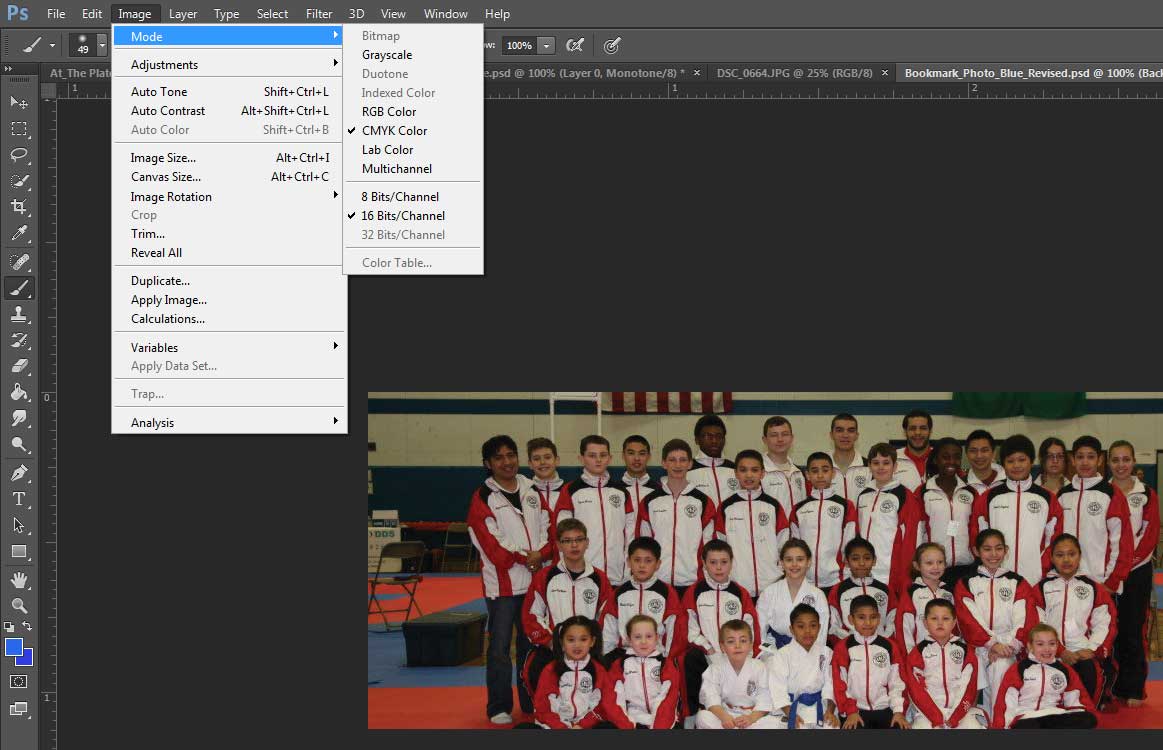
Hi - trying to convert this image to duotone but no option to select that. Any ideas why? Duotone is grayed out.


 1 Correct answer

You need to be in 8 bit/channel grayscale, not 16 bit/channel CMYK.
Explore related tutorials & articles
 8
Replies
8
8
Replies
8

Copy link to clipboard
Copied
You need to have it in 8-bit Grayscale, first, right?
Copy link to clipboard
Copied
Even set at 8-bit duotone still shows grayed out.
Copy link to clipboard
Copied
You need to be in 8 bit/channel grayscale, not 16 bit/channel CMYK.

Copy link to clipboard
Copied
Don't know if this is still relevant, but the image has to be converted to greyscale mode first.

Copy link to clipboard
Copied
In the event that you plan to create a duotone and print the duotone commercially, you may find the following Tech Sheet, which I wrote for my students, helpful.
Duotones for Press
Duotone is a technique that has been applied by letterpress printers and offset lithographers for more than a century and still flourishes today. It is made on press by printing – one over the other – two halftone images of the same original art. So much for absolutes: other characteristics associated with the duotone are present “usually.”
* Usually the original art is monochromatic (a black & white photograph, for example)
* Usually both halftones have the same screen fineness (150 lpi, for example) but that is not a must
* Usually a conventional dot screen is used, but a times a special screen replaces one or both halftone screens to produce a mezzotint or similar pattern.
* Usually the tonal scale of each halftone is different, but that depends on the effect desired.
* Usually each halftone in the pair is printed in a different color, but that, too, depends on the effect desired.
* Usually at least one of the ink colors is black, but it is not mandatory.
It becomes readily apparent that there is no such thing as a duotone but rather an almost infinite variety of duotone renderings. They are more budget-friendly than four-color printing. In addition, because of the limited density of a single layer of ink, this added ink layer often produces a more aesthetically pleasing result than a single color reproduction. When reproducing black & white photographs this enables the lithographer – using either two blacks or a black and a gray – to more closely approximate the density range and contrast of the original print.
The graphic arts camera and halftone screen used for creating duotones are rarely seen these days. They have been replaced by the scanner, Photoshop, and the imagesetter or platesetter.
Photoshop, working with RGB pixels, attempts to approximate the duotone effect and, with a few additional commands, prepare a file with channels containing the tonal range of what will become each printing plate’s image. Moreover, Photoshop offers pre-made duotone options that may be applied to your images. Best of all, Photoshop provides the tools for you to make your own duotones from scratch.
Ink Color Designation: The Pantone Matching System
It is customary when working with duotones to specify ink colors in terms of their Pantone Matching System (PMS) numbers. PMS printed swatch books are readily available. In addition, you may see and designate PMS colors within Photoshop.
To choose a color, double click on the foreground color in the Tools panel and from the menu presented, click on Color Libraries. In the Book field choose Pantone Solid Coated.
If you know the PMS number for the color you intend to use, rapidly type that number even though there is no field to enter it in. The color, surrounded by a black border, will be highlighted in the strip of colors at the left. Click on Picker and you will be returned to your normal Color Picker array of colors. Click OK and the designated PMS color will appear in the Foreground Color box.
The system also works in reverse. With your chosen color appearing as the Foreground Color, double click on the swatch and when the Color Picker appears, click on Color Libraries. With the Book field set to Pantone Solid Color, the Pantone swatch will be highlighted along with and its PMS number.
The following will cover:
How to apply Photoshop pre-made duotone versions.
How to create your own duotone.
How to prepare the Photoshop file for commercial printing.
How to apply Photoshop pre-made duotone versions
1. Convert the image to Grayscale via Image > Mode > Grayscale. You will notice that Duotone is grayed out – not accessible. Once the image is in Grayscale, it will become available.
2. Choose Duotone via Image > Mode > Duotone.
3. In the Type field, choose Duotone. In the Preset field at the top of Duotone Options, click the double arrow and from its drop down menu choose a PMS color from those offered. You may find more than one option for the same PMS designation. That indicates you have a choice in how prominent you want the color to be in the duotone. Go to the top of the list and view all the versions of PMS 144, for example, by clicking on each in turn.
4. You may also alter the tonal curve of a color by clicking on the curve symbol adjacent to one of the colors and bending the curve to change the prominence of the color in the image.
5, Click OK. You will notice that the duotone appears as a single channel in the Channels panel.
Note: The duotone, placed as a layer on an RGB image, is converted to RGB.
How to create your own duotone.
Often, the PMS color or colors you would like to use for a duotone do not appear in the premade duotone list of the Preset field. If so:
1. Choose one of the duotone styles from the list, as described above.
2. Click on the color swatch adjacent to Ink 1 or Ink 2.
3. When the Color Libraries menu appears, key in its PMS number.
4. You may also alter the tonal curve of a color by clicking on the curve symbol adjacent to one of the colors and bend the curve to change the prominence of the color in the image.
5, Click OK. You will notice that the duotone appears as a single channel in the Channels panel.
How to prepare the Photoshop file for commercial printing.
The Channels panel currently shows the duotone in a single channel. The next steps, made by you or your lithographer, will separate the colors. If you prefer to have the lithographer do the job, save the file in Photoshop (psd) format.
Otherwise:
1. Image > Mode > Multichannel (Note the two channels in the Channel panel.)
2. File > Save as… In the Format field choose Photoshop DCS 2.0
A reminder: File resolution in the printing size of the image should be one-and-a-half to two times the intended halftone screen fineness.
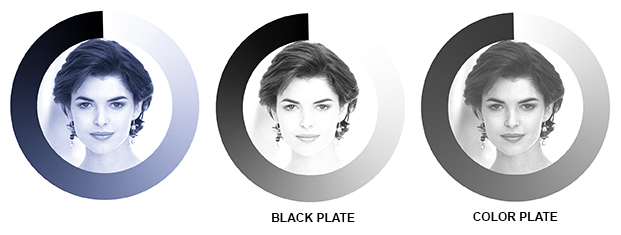
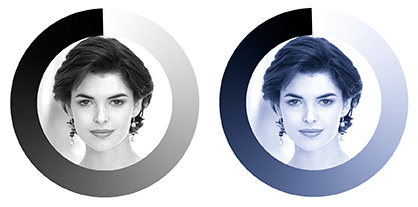
(The gray scale ring is provided as a hint to each channel’s tone curve.)

Copy link to clipboard
Copied
Sorry still greyed out!!
Copy link to clipboard
Copied
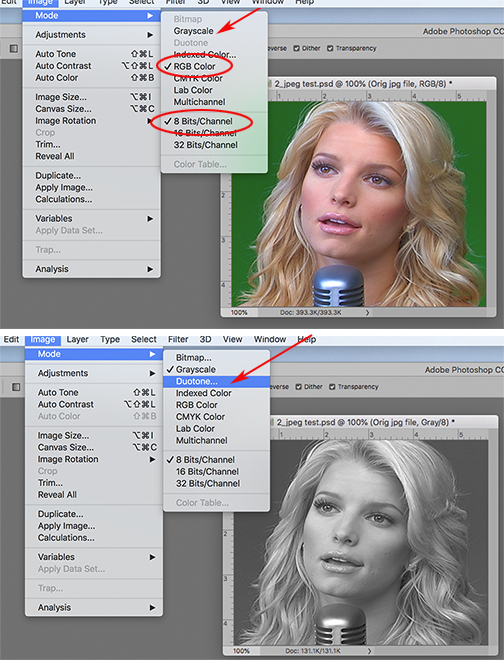
We assume it is a jpg or psd file and the file is sRGB or Adobe RGB. Also, you have tried this with more than one file.
If not, let us know.
With the settings set to the circled items, click on Grayscale
The image should look like the bottom illustration and Duotone should be accessible.
Click on Duotone and follow the instructions provided in my earlier Post.
If. following these instructions, Duotone was not available, reset your Preferences.

Copy link to clipboard
Copied
Hi, I've been using Photoshop and InDesign for years. However, when I make a Duotone in the new version of Photoshop and import it into InDesign, it loses colour. And yes, I went through all the greyscale steps etc, I've been teaching this exercise for years. How come it doesn't work now?

 AdChoices