 Adobe Community
- Home
- Photoshop ecosystem
- Discussions
- Re: Edge shadow on painting from lighting
- Re: Edge shadow on painting from lighting
Edge shadow on painting from lighting

Copy link to clipboard
Copied
I shot a painting, and can't get the shadow from my lighting off of it. There was no way around it on site, just wondering if anyone can help me figure out how to do it in post. No matter how I do it I get a line from the shadow. 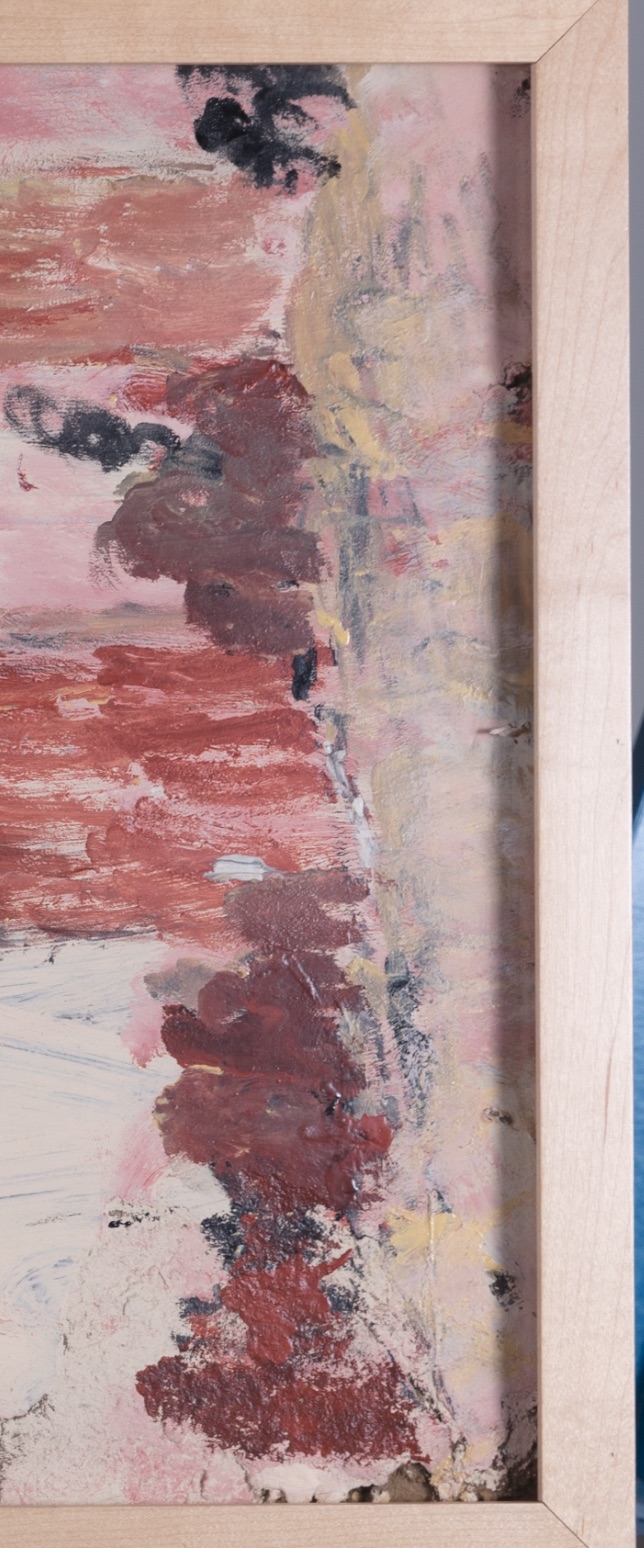


Explore related tutorials & articles
 15
Replies
15
15
Replies
15

Copy link to clipboard
Copied
Next time remove the canvas from it's frame BEFORE you shoot the photograph. There isn't much pixel data left to work with. I would probably crop it.
Alt-Web Design & Publishing ~ Web : Print : Graphics : Media

Copy link to clipboard
Copied
I would agree with Nancy about removing the canvas, or taking several photos and move the lights around, so that you can fill in the dark area and blend the exposures. But if you have to work with this image, you can use curves and very carefully mask in the corrections.

Copy link to clipboard
Copied
This looks pretty good. How did you get curves to get you this? Did you do two separate adjustments?
Copy link to clipboard
Copied
I just used the polygon lasso tool to make a selection down the line, the feathers it. I tried to make the dark area the same as the light area. The transition was an issue, so first tried just to get the areas further from the transition to look close. Then I went back with a soft. Rush and touched up the transition. There was still a grayish line in the transition, so I added the second curves layer to lighten it and add a bit of yellow red to that area, and then painted in the correction on a mask.

Copy link to clipboard
Copied
Yeah, that shadow. I do this for a living, so I run into this a lot.
If you can't take it out of the frame, then Turn the painting and shoot it again. Take a few shots if you have to, but turn the painting, not the lights. Make sure your light is even and unmoved. Once you have your shots you can rotate them , so they're all the same position on screen. Now crop out the shadow areas and use the panorama stitching function to stitch it back together. (file -> Automate -> Photomerge).
Another thing you can do is to crop the image so there's no frame, and then you can put a rectangular marque around the shadow, and then hit the delete key and select content aware. There isn't anything too important in the shadow of this particular piece, so you'll get a natural looking fix.
The most obvious thing is to use the gradient tool to lighten that shadow, but I can assure you it will never work well. Ever. Try the first two things, and one of them should work for you.
Copy link to clipboard
Copied
How would you use the gradient tool to lighten the shadow? I tried using it on a mask but couldn't get it to work.
Copy link to clipboard
Copied
Not only could I not unframe the piece but it was behind glass and hanging from strings. It couldn't be moved except for the gentle sway it had going from hanging.
Trust me, I also do this for a living and I tried everything. I took some shots over exposing the piece and thus exposing the shadows correctly but any time I try to line them, or mask them, or anything I get a line. I'm really stuck. I can't crop the painting.
Chuck how did you get that result with a curve adjustment layer?

Copy link to clipboard
Copied
'Light Science & Magic' by Fil Hunter is the de facto book for this and, pretty much, most other photography lighting situations. It is up to edition 5 now, but earlier editions are available as PDF files. Pages 52 onward covers photographing paintings.
I actually use a slightly different approach I learned from either David Hobby or Jo McNally. I think it was from Joe's first book 'The Moment it Clicks' but whoever I loaned it to forgot to return it. This approach makes use of light fall off with distance and the light's axis, and takes a bit of balancing, but you aim the light's axis at the far side of the canvas, and adjust the distance and angle so the fall off towards the edge of the beam on the closest side of the painting, matches the fall off with distance with the furthest side. You do this with two diffuse light sources, which gives you a lot of lee way so it's not hard to get right.
If your artwork was behind glass, then you have done well to avoid reflections in the glass I'd say, but your light source is way too small judging from the very shallow Shadow Edge Transfer. I'd also hazard a guess that you only used one light?
Anyway, to fix this particular situation, then as Nancy and Chuck have said, sacrifice the shadow area.
There are any number of approaches. Quick and dirty would be to select the good area of the artwork

And stretch it with Free Transform to cover the shadow area

Copy link to clipboard
Copied
I don't know your original equipment set up, but I still hold to my original comment about moving the lights and using lighten blend mode to eliminate the shadow. Especially since the painting was suspended. I used to do this all the time with my work.

Copy link to clipboard
Copied
I assume you have a light on both sides. Take three exposures, one with both lights on, and two with one light turned off. Increase ISO a full stop to compensate. Then it's fairly straightforward to use soft masks and lighten blend mode to lift only the shadow parts, leaving the main area unaffected.
In the pre-digital era you had to use very large soft boxes to soften the shadows. You couldn't get rid of them, but soft shadows are a lot more visually acceptable. This increases the risk of unwanted reflections significantly, so great care is required in positioning the lights. You also had to use polarizing film on the lights, and a polarizer on the lens rotated 90 degrees (cross-polarized light).
If you can't get rid of the shadows, it may sometimes be better to light from above.
Copy link to clipboard
Copied
Could you be more specific on this -- 'Then it's fairly straightforward to use soft masks and lighten blend mode to lift only the shadow parts, leaving the main area unaffected.'
Copy link to clipboard
Copied
I guess I forgot to mention I no longer have access to the painting and my options were very limited in shooting it in situ having to have a black cloth up to block reflections limiting the positioning of both of my lights. Had I the opportunity to shoot it again I would have tried to position my lights to get the same amount of light in the corners despite reflections for some of the exposures and tried to blend them. But even if I could do that I would still have the problem of that line that appears whenever I try to blend them. I guess what I was trying to ask was a more specific way to try and address this line and problems blending in post. Cropping the piece itself was also not an option.
Any thoughts on specifically how to use the lighten blend mode and masks to accomplish brightening this area without getting a line?
Any tutorials out there that might help? I did use a curves adjustment layer on the shadows and that helped. But I found it impossible to blend in the shadow from an overexposed image that had lighter shadows.
Copy link to clipboard
Copied
silvia1169 wrote
I guess I forgot to mention I no longer have access to the painting and my options were very limited in shooting it in situ having to have a black cloth up to block reflections limiting the positioning of both of my lights.
Ahhh... I was thinking you'd done well to keep reflections off the glass.
silvia1169 wrote
Any thoughts on specifically how to use the lighten blend mode and masks to accomplish brightening this area without getting a line?
The approach I take in that sort of situation is to use a hard edged layer mask in a Curves layer.
I then ignore the obvious seam while adjusting the curve, and go just a bit too far.
(If this happening with a raster layer, I unlink the mask so I can move it independently of the layer's contents)
I use Mask Properties to adjust the feather, and move the mask left and right.
And use either the density slider in mask properties, or reduce the layer opacity to lessen the effect (if still talking about a curves layer).
This has the advantage of being non destructive and infinitely adjustable to fine tune
Hard edged mask

Mask feathered and nudged to the left

What I've done here is add a copy merged layer to the top of the stack, and set it to Screen.
Then added a hide all layer mask, and run a soft white brush down the slightly darker bit

I've now lowered the layer opacity
Unlinked and feathered the mask
And nudged it to the right
You can free transform a layer mask independently of the layer contents, which let my widen the mask a touch
Or I could hold down Shift, and run a soft white brush down the mask to slightly widen the reveal area
I can see it is a bit bright towards the bottom of the reveal area. We already have a mask, but if we made the layer a Smart Object we could add a new layer mask, and run a black to transparent gradient up it.


I hope this helps. I've got to go out and I am late, so will check later
Copy link to clipboard
Copied
This is so great of you to help. I have some questions. Your original hard edged mask goes from the frame and just a bit beyond the shadow area, correct?
In order to nudge the mask to the left you have to unlink it, correct?
Then when you say,
What I've done here is add a copy merged layer to the top of the stack, and set it to Screen.
Then added a hide all layer mask, and run a soft white brush down the slightly darker bit
It means you just hit command J from the original layer (named painting area copy in your screen), changed blending mode to screen and hid it behind a black mask?
Also why do you unlink the mask to feather it?
I'm not sure if it's proper to ask this on the same thread but would you use the same method to correct the bright light on this image?
Copy link to clipboard
Copied
In order to nudge the mask to the left you have to unlink it, correct?
We got a bit crossed up there, but entirely my fault because I'd gone into general terms and was talking about raster layers. With adjustment layers, unlinking the mask is not relevant. The thing to do is experiment and try it for yourself.
There is a wee gotcha when nudging Adjustment layer masks. You might be targeting where an inner edge of the mask is affecting the layer(s) below it, but nudging will also move the mask off the side, or top or bottom. You simply have to paint over that exposed strip with black of course.

You can still soften the edge by using Feather in Mask Properties...

And/or give those parts of the mask filled with black, a degree of transparency by using the Density slider

To avoid any more confusion, these is the curves properties of that adjustment layer

silvia1169 wrote
Then when you say,
What I've done here is add a copy merged layer to the top of the stack, and set it to Screen.
Then added a hide all layer mask, and run a soft white brush down the slightly darker bit
It means you just hit command J from the original layer (named painting area copy in your screen), changed blending mode to screen and hid it behind a black mask?
The shortcut for copy merged is Shift Ctrl Alt E or Shift Cmd Opt E. you really need to have the upper most layer selected, and it _must_ be turned on.
The point of this is simply to give us a pixel layer with the cumulative effects of the underlying layers, that we can set to Screen because that will brighten the image, but as it stands, brighten every thing. So we give this layer a mask, and fill it with black so that it is having no effect. We can then gently paint over dark areas with white in the mask. It will be tricky to get this right, so we go back to the tricks we just talked about.
- If we were not completely accurate with our white brush, we can unlink the mask and nudge it. Note that this time we are dealing with a pixel layer, so we 'must' unlink the mask for this to work.
- If our effect is too abrupt, then we can soften the edge by feathering the mask in Mask Properties.
- If the effect is too strong, you can reduce the layer opacity.
The thing to do is experiment. If you are concerned that you might mess up your image, make the first step to Save As to a different file name. If you have a lot of RAM, increase the number of History states in Preferences so you can step back if things go pear shaped. I have 64Gb RAM and set my History States to 200.

 AdChoices