• Global community
    • Language:
      • Deutsch
      • English
      • Español
      • Français
      • Português
  • 日本語コミュニティ
    Dedicated community for Japanese speakers
  • 한국 커뮤니티
    Dedicated community for Korean speakers
Exit
0

Furry looking shape

New Here ,
Feb 02, 2021 Feb 02, 2021

Copy link to clipboard

Copied

Hi, 
In about beginning of summer, in behance photoshop challenges, there was this video that was showing how to make a line with the defult brush looks kinda furry. the person didnt use a photo of a fur and masking. She used some settings under "Filter" section. The end result looked kinda like a furry object and 3D looking.
I know the description of it is not clear. but I cannot find the video or a similar file. I will be really happy if you helo me.

Views

164

Translate

Translate

Report

Report
Community guidelines
Be kind and respectful, give credit to the original source of content, and search for duplicates before posting. Learn more
community guidelines
Adobe
Community Expert ,
Feb 02, 2021 Feb 02, 2021

Copy link to clipboard

Copied

In case you didn't know, there is a huge array of filters under the Filter Gallery option within the Filter menu. What you are looking for may be in there.

Votes

Translate

Translate

Report

Report
Community guidelines
Be kind and respectful, give credit to the original source of content, and search for duplicates before posting. Learn more
community guidelines
Community Expert ,
Feb 02, 2021 Feb 02, 2021

Copy link to clipboard

Copied

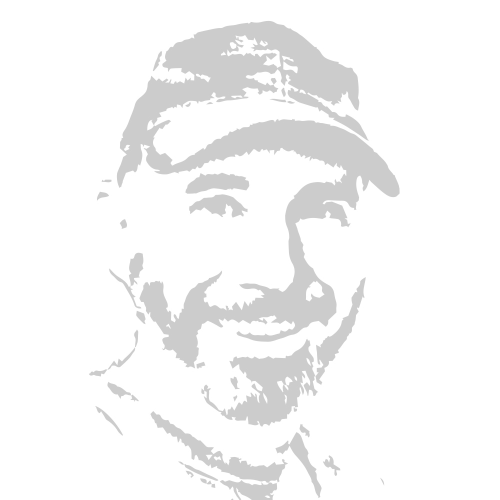
Well it depends on what you have in mind, and how you'd like your fur to look.  What I do if want something like fur, or a beard is lay down some fully hard 'pressure controlls size' lines like this, and define it as a new brush preset

image.png

Then I'd give it little bit of size jitter and 100% angle jitter

Note: when you have applied all the settings, you need to definite again as a new preset.

image.png

Which would give you this effect 

image.png

Taking it a step further I vary the opacity of the stroke in the original preset like this

image.png

And build my fur effect on a light grey background

Or add Foreground background color jitter (all of these jitter settings are with Control set to Off)

Chose appropriate colours, and see what you get.  I actually used Camera > Clarity toincrease contrast below

image.png

The master at this stuff is Aaron Blaise.  I don't have his Fur brush set, but have a few of his brush sets so I'll see how he goes about it.


Votes

Translate

Translate

Report

Report
Community guidelines
Be kind and respectful, give credit to the original source of content, and search for duplicates before posting. Learn more
community guidelines
Community Expert ,
Feb 02, 2021 Feb 02, 2021

Copy link to clipboard

Copied

LATEST

OK this is interesting. Aaron makes his itial preset less random. It follows that with a more controlled stroke direction, he uses no angle jitter, but uses the following settings


Size jitter 70% (set to Pen Pressure)

Scatter jitter set to 40% (both axis)

Count 3, Count jitter 25%

Foreground background jitter 25%

A few other minor setting that you can work out yourself.

image.png

Votes

Translate

Translate

Report

Report
Community guidelines
Be kind and respectful, give credit to the original source of content, and search for duplicates before posting. Learn more
community guidelines