 Adobe Community
- Home
- Photoshop ecosystem
- Discussions
- how do I Edit>Transform>Skew a selection in a Smar...
- how do I Edit>Transform>Skew a selection in a Smar...

Copy link to clipboard
Copied
I have content in a Smart Object layer that I need to skew. I selected the content, then went to Edit>Transform>Skew, which is grayed out. I know you can't perform pixel edits in a Smart Object, but is Skew considered a pixel edit? I am not changing the content, I am just moving it up or down in one direction. It would seem I would need to perform this operation on the Smart Object and not on a new layer above it, since I am selecting actual content which in a blank layer above would be empty. That is consistent with the message I am getting there which is "could not transform the selected pixel because the selected area is empty." So can I skew this selection in this Smart Object, and if so, how? Thank you.


 1 Correct answer

One can transform a Smart Object, including Skew, but one can not transform a part of a Smart Object as you seem to be trying to do because you have an active Selection.
Anyway, please post meaningful screenshots including all pertinent Panels.
Explore related tutorials & articles
 18
Replies
18
18
Replies
18
Copy link to clipboard
Copied
One can transform a Smart Object, including Skew, but one can not transform a part of a Smart Object as you seem to be trying to do because you have an active Selection.
Anyway, please post meaningful screenshots including all pertinent Panels.

Copy link to clipboard
Copied
Double click the smart object layer thumbnail to open it in it's own window. Make the change, save, close and it will be updated in your working file.
Copy link to clipboard
Copied
Thanks. But I need to see not only the Layer I am editing but also the main Layer, as the degree of skew is dependent on the relationship of these Layers to each other. Is there any way to do that?

Copy link to clipboard
Copied
Yes please post meaningful screenshots, you will get much better responses. Difficult for us to know what you are attempting to transform. You can apply transforms to an entire smart object, but not to a selection of marching ants on a smart object.
- Command T to get into transform mode.
- Then right click on a smart object to get contextual menus. Isthat still greyed out?

You. may need to make make a new smart object via copy, and then hide everything you do not want to skew in illustrator (or whatever program this came from as we do not know)
Copy link to clipboard
Copied
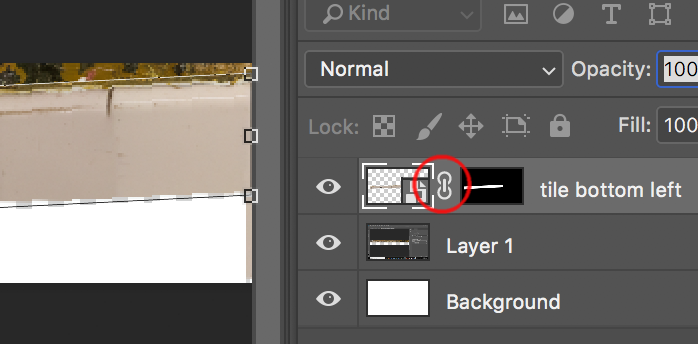
Thank you. A screen shot is below. The Layer entitled "tile left" is comprised of the tile border where the marching ants are shown. The entire "tile left" Layer actually extends further to the right in the image but it's the selection that I want to skew slightly upwards towards the right end of the selection. You can see the white tile that is part of the main image behind and above the "tile left" Layer; I want the "tile left" Layer to move up a bit to cover that main tile. I double clicked on the "tile left" Layer thumbnail as melissapiccone suggested but that opens the "tile left" Layer alone without the visual reference to the main Layer which I need in order to execute the skew. Is this possible? Thank you.

Copy link to clipboard
Copied
Open the smart object, add the reference layer as a new layer to your smart object so you can see what you are doing... either delete the reference layer, or simply turn off the eyeball, save and close.
Copy link to clipboard
Copied
Thank you. I opened the layer, then went to the main document tab and clicked on the main layer which I dragged into the Smart Object Layer contents that I opened. However, the main layer is not aligning in the same way there. The first screen shot below shows the tile layer; the 2nd shows the main layer and tile layer both enabled. The main layer is covering up the tile layer, which it's not doing per the image earlier in this thread. Any idea what I'm doing wrong? Thank you.


Copy link to clipboard
Copied
I exited the document without saving the change to the tile left layer (bringing in the main layer as a reference file) so I could start from scratch, and do it correctly. First, can I bring in the reference layer not as a Smart Object, or since it is one, do I have to bring it in as one? It takes so long to process. Second, is the method I described for bringing it in correct: while in my tile edit layer (in the contents of the opened Smart Object), click on the main layer and drag it into the Layer I'm working on? Thank you.
Copy link to clipboard
Copied
Okay, I started again. I opened the Smart Object layer. I added in the main image as a reference as you suggested. I figured out why it was hiding the tile - wrong stacking order - so now main is on bottom and tile left layer is above it. I moved the main image into place. But ... the Skew isn't working. As can be seen in the screen shot below, Skew is not moving the entire contents of the tile higher on the right side. I have deliberately exaggerated the amount of Skew I want but normally Skew would move the entire marching ants selection which can be seen in the 2nd screen shot. Why is the top portion of the tile left Layer being hidden/not displaying when trying to Skew?


Copy link to clipboard
Copied
Before you hit enter to commit to the transform you art & mask show looks skewed like this. What you are describing is as if the chain link between layer & mask was off, but your screenshot confirms that is is correctly enabled
so not 100% I can follow what the exact construction of file is and commands you are doing.
I took you your screenshot and made a similar file then
- With no marching ants, Comamnd t to enter transform
- right click and choose skew
- skew your item
People often overuse smart objects, not understanding when best to utilize them, and paint themselves into a corner. Not sure your reason for smart objects, but good you are posting here as you will benefit from leaning more about them more before using them so much.
feel free to post a lower res version of your file using dropbox google drive or similar
Copy link to clipboard
Copied
Mike, thanks for this. I did as you said, and you're right, by not selecting a portion of the layer, and instead applying the transform to the entire layer, it does skew. But what if you just wanted to skew a selection, as I initially did? If you look at the image, you can see the white tile that is part of the main file showing a bit over a portion of the active layer - the "tile left" layer. I only want to skew the part of the "tile left" layer to cover that white tile behind it - if I skew the entire layer, then it's riding up the right edge too high (see screen shot below) - and it will not meet the "tile right" layer. So is there a way to just skew a selection of the layer? I realize I probable "overused" Smart Objects here and maybe should have accomplished this without them - but I'm learning a lot in the process.

Copy link to clipboard
Copied
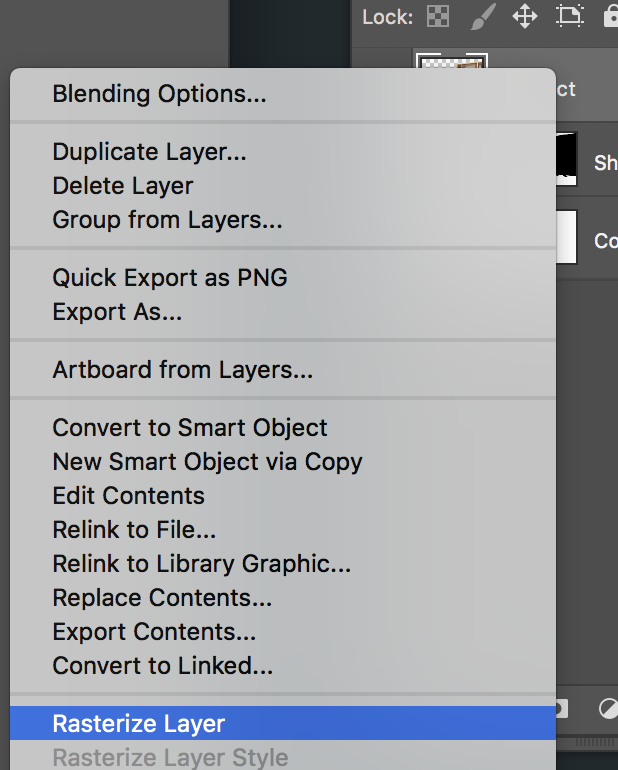
As I mentioned earlier you cannot skew a partial selection of a smart object, you would have to rasterize the layer (right click on the layer name or empty space to right)
How you were able to skew a partial selection fo a smart object I do not know, is there some extra step you did? The finer details of these posts can sometimes be hard to follow the file in front of you and knowing the exact step by step, so sorry for what I am missing.
Copy link to clipboard
Copied
No, I wasn't able to skew a part of a Smart Object - I was asking how I could. But it seems from the multiple similar responses in this thread that that isn't possible. I am new to using Smart Objects and I may should have not turned my "tile left" layer into a SO, given what I wanted to do with it. Part of what I wanted to do was use Camera Raw as a Filter to modify exposure, but that could have been achieved in other ways. Given what I wanted to accomplish, I should have probably left it as a regular layer.
Copy link to clipboard
Copied
OK thankyou for clarifying, that makes sense as your screenshot for post 13 appears to show skewing a partial selection of a smart object which is not possible. You can only apply transforms the entire smart object. No marching ants.
I do see some great things with smart objects along with some overusage (as at my previous job). Though that nearly brought me to tears at times having to stay late to fix others work, the overtime pay was appreciated.
In closing I recommend avoid nesting of smart objects until you feel to be an expert with them. The nesting can be super powerful when used correctly (eg: packaging design renderings) , and super bad when done wrong.
Copy link to clipboard
Copied
Agreed, thanks again.
Copy link to clipboard
Copied
- Duplicate your tile left layer
- skew layer as needed
- paint with black in masks to hide parts you do not need

Copy link to clipboard
Copied
You can try to Convert your Layer into Smart Object again.
Just Smart Object inside Smatr object
It should helps
pawel

Copy link to clipboard
Copied
OK, here's how I would have done it! I start with the object I intend to place being saved in the PSB file format (Large File Format). At this point, smart objects are not involved. I place it in Photoshop using the path: topmenubar-file-placelinked. Photoshop converts it into a smart object inside the file you are placing it in as you do this. The original file remains on disk as a PSB, it does not become a smart object itself. When I want to alter its appearance in my final file, I double click its icon in the layers palette and the PSB opens up, where I can edit it to my hearts delight. In the case of bartonlews file, I would have duplicated the main layer in the (now saved as a) PSB file with NO smart objects within it, then on that new layer I would select and mask to reveal only the tiles area he wants to adjust. Then I would delete the mask, or confirm that the mask is locked to to that image on that layer, and then transform this new tiles layer (I would probably use distort, so I could raise the left corner only) and then save and close. If my layer includes transparency and the sub layers are showing behind, I turn off visibility of the sub layers, then save. The smart object should auto update in the file where you started, but if it doesn't, you can force it to update using the properties panel. Most of my placed linked SO PSB objects contain multiple layers, masks, and separate versions on their own layers. I disagree with a previous commenter who said you can't use smart objects with transform-again, and that you have to rasterize the layer before it would work (paraphrased). Rather I contend that making transform-again work is a tricky process, and you have to follow a very specific set of steps to engage it, and I still don't have it totally wired! I have managed to make it work intermittently, but somehow, not consistently. Various web tutorials on this (and there don't seem to be many) offer different keyboard combos to invoke it, so it is a bit confusing. I haven't found anything of note at Adobe's site either. When I feel rock solid on it, I'll post an update on what is working for me. The jpg below shows both versions (layers) of a single PSB file, and the final PSD files they were placed in. I would NEVER have attempted to build these files WITHOUT transform-again, it would have been painfully slow and tedious. The beauty of using smart objects in this way is that when I wish to change the appearance of the object inside my final PSD file, I can double click on the SO icon in ANY ONE of the layers it exists on (when using transform-again, each placed iteration lands on it's own layer) and when the PSB opens, I alter it, and save it, and when I return to my original file, every iteration updates automatically, nearly before you can switch tabs to go back to it! I know this because I was watching, hoping to see the update take place and missed it! Each iteration can be transformed differently than the others within your final file if you wish, i.e. warped, scaled, rotated, skewed, etc. Regardless of those differently appearing iterations, when you update the PSB file, all the interior contents of the iterations update, while maintaining their own unique transformations. Additionally, you can relink some of the iterations to a DIFFERENT PSB file if you want to. There are a total of three images used in my samples, one is the pen nib shown in the jpg image, the second is a colorized shere, and kudos to anyone who can figure out what the third image is!

 AdChoices