 Adobe Community
- Home
- Photoshop ecosystem
- Discussions
- How to correctly save an image after using levels ...
- How to correctly save an image after using levels ...
Copy link to clipboard
Copied
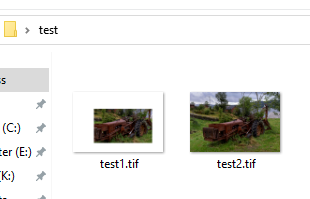
I wanted to change the levels of an image, but not from a specific part of it. So, I selected this part, than selected inverse. Applied Levels Adjustments. It works perfectly when I see it on my screen with Photoshop open. But when I save it to TIFF, the final result is a complete white color on the space where I firstly selected.
Please, see on the picture attached in case what I said was not clear.
What I need is to save the image without that white part, but with the modifications done, as I see it when my Photoshop is open.
 1 Correct answer
Dear all,
thanks for your replies. I am far from being an expert on photoshop, therefore, I struggle with concepts of masks, and alpha channels, and so on. But your comments gave me some ideas, specially about the viewer not being able to show alpha channels correctly.
Therefore, I went to see channels and noticed that there were 2 layers for the marked area. On this specific project, I saved the selection as it was time consuming for me to do it. So this is why 2 layers of the same marked area
...Explore related tutorials & articles
Copy link to clipboard
Copied
Is that problem only on thumbnail view or you have real problem with image when you open that tiff file in Photoshop, for example?
Copy link to clipboard
Copied
When I open on Photoshop, it looks normal. But If I open it on an image viewer, it is with that white part covering a selected area of the image. What I want is to export as a TIFF file, but looking normal, without the white cover, and with the rest of the levels filter applied.
Copy link to clipboard
Copied
Which image viewer in particular? If things looks normal in Photoshop ten look for another viewer because tiff file is not designed specially for Photoshop.
Copy link to clipboard
Copied
Windows Explorer/desktop displays TIFFs with an alpha channel this way. The area outside the selection (the "black" in the alpha channel) displays as transparent.
No idea why, you'll have to ask in a Windows forum.
This is a simple marquee saved as an alpha channel, vs a layer mask but no alpha channel.
Copy link to clipboard
Copied
Dear all,
thanks for your replies. I am far from being an expert on photoshop, therefore, I struggle with concepts of masks, and alpha channels, and so on. But your comments gave me some ideas, specially about the viewer not being able to show alpha channels correctly.
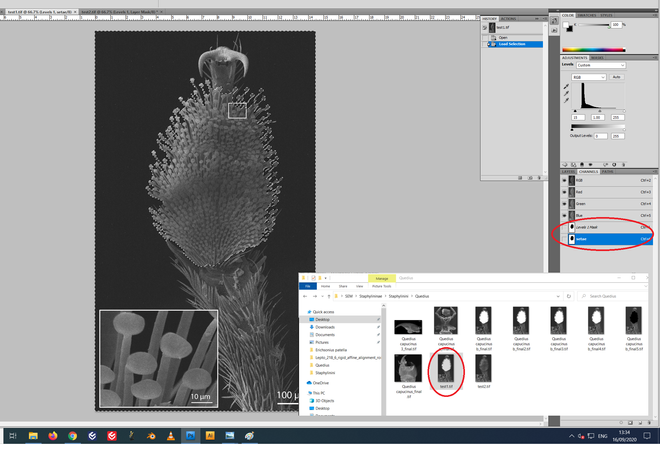
Therefore, I went to see channels and noticed that there were 2 layers for the marked area. On this specific project, I saved the selection as it was time consuming for me to do it. So this is why 2 layers of the same marked area showed up. And for some reason, the layer that was created after the selected area, created this white mark on my final image.
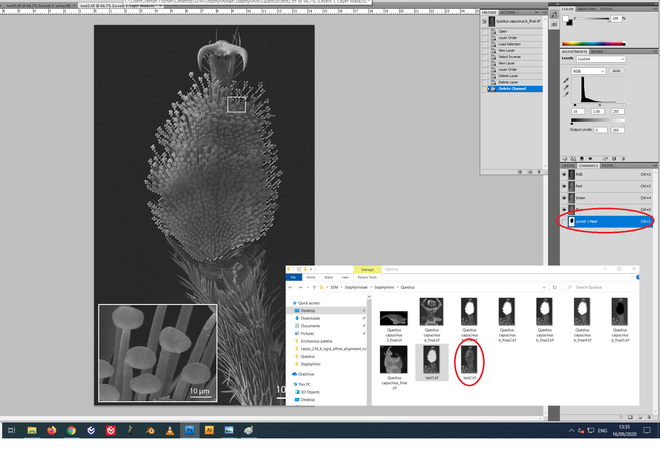
To get rid of the white area, I simply deleted the saved selection that I previously created (named "setae" on the image). After deleting that, the layer Leve 1 Mask (created automatically when I applied Levels adjustment), still beard the same selection and my desired modification. So with just this one layer, windows properly shows the image how I intended.
Thanks a lot guy
1st case, with both layers, white mark showing up on selected area:
2nd case, with only the layer created by the Levels adjustment, white mark not showing up anymore!:
I hope this can also help people facing the same problem that I had.
Copy link to clipboard
Copied
Yes, the channel highlighted in blue in the first screenshot is an alpha channel. When you save a selection, it is saved as an alpha channel.


