 Adobe Community
- Home
- Photoshop ecosystem
- Discussions
- Re: How to use the paint bucket without getting wh...
- Re: How to use the paint bucket without getting wh...
How to use the paint bucket without getting white edges around the paint?

Copy link to clipboard
Copied
Hello everyone.
This is my first post on the forum, Photoshop-wise I'm still a beginner.
I have a question:
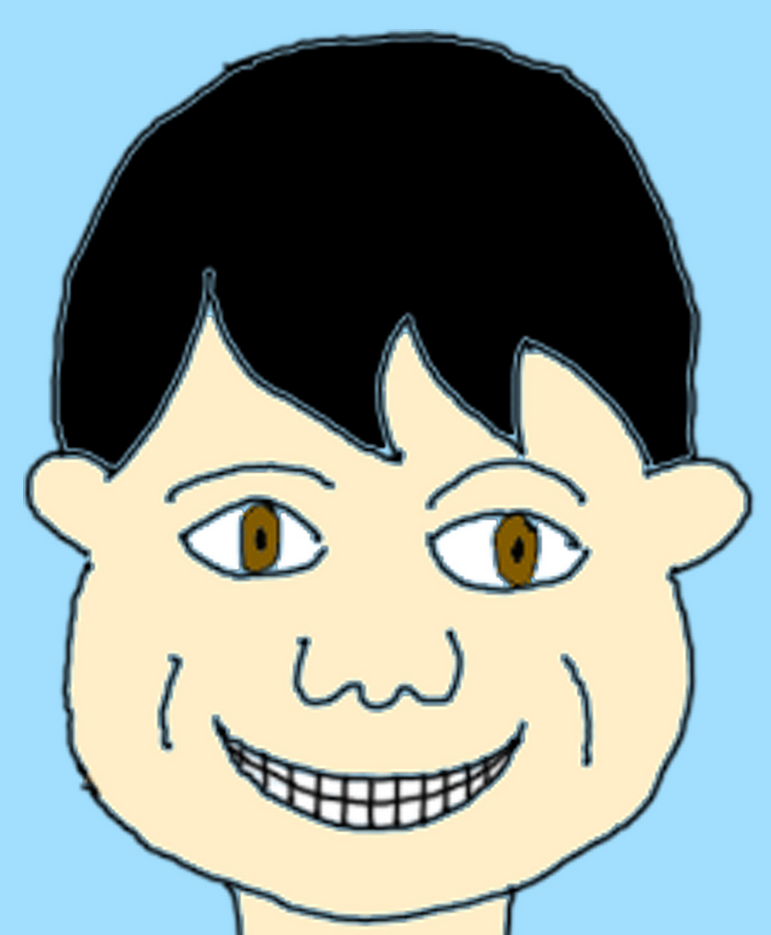
When I use the paint bucket to color something, white edges appear between the outline and the colored area.
Example:
https://s6.postimg.io/af4fxj6e7/jongen_hoofd_blij_achtergrond.jpg
(As you see, the problem is especially visible in the black hair of the boy).
[Cropped image added by mod]
How can I fix this?
Thanks in advance!
Jessica


Explore related tutorials & articles
 18
Replies
18
18
Replies
18

Copy link to clipboard
Copied
Welcome to the forum Jessica
Increase the tolerance value on the paint bucket options bar.

Dave

Copy link to clipboard
Copied
Photoshop’s Paint Bucket Tool is generally best avoided completely in my opinion.
Using Selections (created with the appropriate Tools, Magic Wand Tool for example) as the basis for Layer Masks might make more sense with regard to continued editability.
What is the Layer structure of the image?
Copy link to clipboard
Copied
"Using Selections (created with the appropriate Tools, Magic Wand Tool for example) as the basis for Layer Masks might make more sense with regard to continued editability."
How do you mean? Do you have an example screenshot of that?
There is no layer structure in my image: I drew the black outline of the boy and then painted the image in and outside that outline with the paint bucket tool, all in the same layer.

Copy link to clipboard
Copied
Using multiple layers will allow you to build an images in a way that will be much easier to edit if (when?) you need to make changes down the road. When you get a chance, here are some good tutorials: Photoshop Layers Tutorials
Copy link to clipboard
Copied
If you build up your image in layers - and use masks to hide parts of those layers then it enables you to alter your image fairly easily in the future. The magic Wand tool enables you to quickly select parts of your image and this selection can be used to create masks or even directly fill an area with a colour.
It is definitely worth learning how layers, selections and masks work.
In the meantime - changing the tolerance on the paint bucket tool should resolve your immediate problem
Dave

Copy link to clipboard
Copied
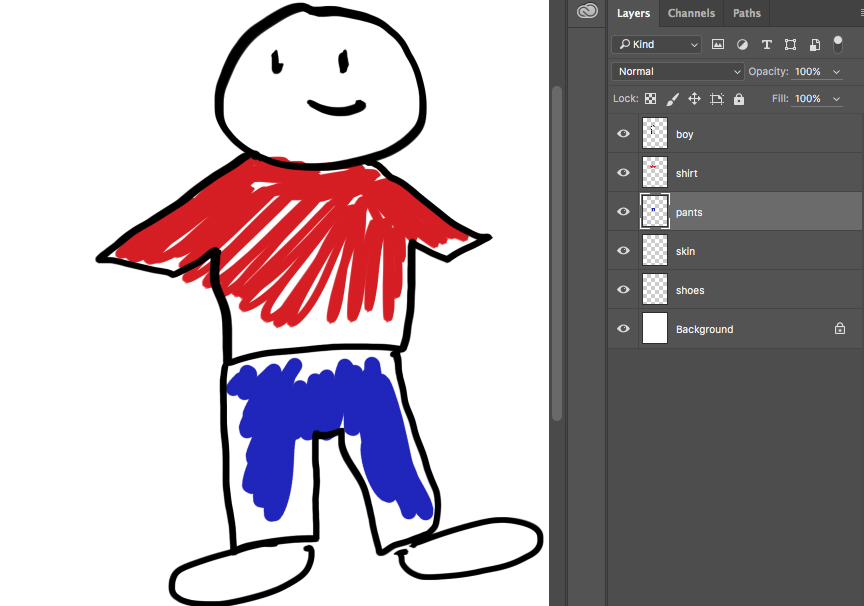
Use layers. You have your drawing of your boy on one layer and color his parts in on different layers - one layer for skin, one layer for shirt, one for pants, etc. The drawing layer is your top layer, the others go underneath. Eventually you want to learn layer masks - this will get you started for now.
Copy link to clipboard
Copied
But in that case, I think you have to brush the colors of every part (pants etc.) between the lines with your hand manually instead of using one single layer in which you use the paint bucket and color every part in the lines with one click (which would be way quicker)? Or am I wrong?
How does using masks make it quicker?
Copy link to clipboard
Copied
Or am I wrong?
Masks are awesome, but I'm suggesting that you simply start learning layers.
Select a section of your outline—let's say the hair on the lowest layer—then fill (with the Paint Bucket or another tool) on a layer called Hair. Return to the boy layer, select his face, fill on the Face layer. Repeat. Selections can take place on one layer, the fill can be on another. It's a few more steps, but then you have the ability to edit. Working on a single layer might seem easy, but it's very limiting.
Again... watch the videos I gave you links to when you have time to learn.
Copy link to clipboard
Copied
One thing to add:
If you do draw on one layer and use the Paint Bucket to fill on another layer, make sure you have "All layers " checked in the paintbucket options bar, otherwise the whole empty layer will fill.

Dave
Copy link to clipboard
Copied
Return to the Boy layer, select his face, fill on the Face layer.
Unless you have the selection loaded...

Copy link to clipboard
Copied
I am not sure if you have solved your problem. I had the same one but here is a fix. You select areas with your magic wand, hit the new layer feature next to the trash can and voila, a new layer without lines, just the positive shape contained within the line. When you see the marching ants on the transparent layer, do your color fills. Keep your lines on your background art only. Go ahead and name your separate layers as someone else said. Perhaps a color for each part of the boy. If you make layers from your line work, you will get that halo coming through when you fill. You can also hit the area twice with color if you do keep your lines on layers but this other way is much cleaner. Veronica
Copy link to clipboard
Copied
Thanks for all the help everyone! I'm currenly busy with the Photoshop Layers Tutorials. When I've finished them I'll make an attempt to draw the boy in the 'good' way and post it here to make sure whether I did it the right way.

Copy link to clipboard
Copied
I have not noticed any mention of anti aliasing in this thread, so you might like to think about line density. This illustrates it. The fully hard retaining line on the left, fills much better than the fully soft on the right. I actually tried this with Tolerance settings of 1 and 200, and it made hardly any difference.

If you are looking at a comic book effect, then using filled selections is not going to work for you. I was going to use the old 'What the Duck' strip as an example of loose edge fidelity, but it is looking a lot tighter than I remembered it.


Copy link to clipboard
Copied
I agree with everyone else about using layers and the magic wand tool. I would use the magic wand tool, then use Selection>Modify>Grow, to expand your selection. Then. Rate a new layer behind your line layer. Then fill the selection. This will make the fill slightly larger than the line and then since the line is above the fill layer it will block the oversized portions, and there won't be any white lines.
You can create an action for most of this, so it would make it faster, with less key clicks.

Copy link to clipboard
Copied
Thank you, this is what I was looking for!
Copy link to clipboard
Copied
try this method:
- make sure you have a background layer
- use the magic wand tool, set to: 100 tolerance, make a selection
- create a solid layer
- place it before the stroke layer in the layer stack
now you have perfect selection and flexibility in the color
like this:

Copy link to clipboard
Copied
This is the answer I was looking for. Thank you!!!

Copy link to clipboard
Copied
Hiya! I've found that using the pencil tool (right click the brush tool) fixes this issue immediately! I suffered from this ages ago until I found a tutorial on how to do pixel art in Photoshop. I saw that when you fill in an area outlined with the pencil tool, it gives you a nice, clean fill!
Or, if you prefer the brush tool, you can use the bucket tool on the outline first and then fill in the area. If you have any questions, you can just reply with them 👍

 AdChoices