 Adobe Community
- Home
- Photoshop ecosystem
- Discussions
- How to wrap a text/image around a bottle/cylinder/...
- How to wrap a text/image around a bottle/cylinder/...

Copy link to clipboard
Copied
Hi everyone!
I'm the lucky owner of Photoshop CS6 - love all the new features and design - but I've never worked with 3D effect before (not even in the earlier versions), until now when I finally need it. I've therefore searched the Internet and the Adobe Forums in order to get to know how to wrap a text/image around a glass bottle in Photoshop CS6. I've found several answers and tutorials, but none of them regards CS6 or they are simply too primitive, whereby the effect is too fake. But when I try follow the instructions in the explanations/tutorials I've found so far for earlier versions of Photoshop (especially regarding 3D effects), I can't find the right buttons, commands, etc. - I can't make it work.
Therefore, someone who will help me explain how to do wrap a text/image around a bottle/cylinder/object in Photoshop CS6?
Best, Marie W.
visual photographic artist
editor of Toxique Magazine


 1 Correct answer

Hi,
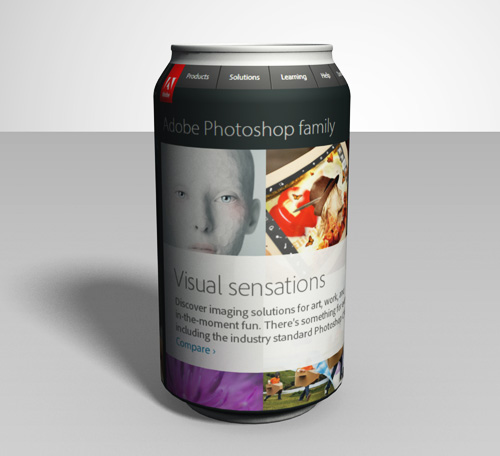
What version of Photoshop are you using? Did you not want to display the 3D can as Noel has done above, and just want to warp text so that it distorts around the surface?
Something along these lines but without the transparency of the glass?
regards,
steve
Explore related tutorials & articles
 17
Replies
17
17
Replies
17

Copy link to clipboard
Copied
Hi! I suggest to follow Daniel Presedo's videos: http://www.youtube.com/user/dramenon?feature=watch
He is one of the Photoshop engineers, and plays a lot with the features he helps shape up.
This one might answer your question: http://www.youtube.com/watch?v=LhZQyXNza9E&list=UUZUppPJ_aMM6cna7PGnNQrw&index=37&feature=plcp
Copy link to clipboard
Copied
It's pretty easy, and Pierre is right - those tutorials are fun.
I think putting things on soft drink cans is fun...
-Noel

Copy link to clipboard
Copied
how do I wrap text aroung an "object"? I have a picture of can, and I want to make it look like the text is on the can. How do I do that?
Copy link to clipboard
Copied
Hi,
What version of Photoshop are you using? Did you not want to display the 3D can as Noel has done above, and just want to warp text so that it distorts around the surface?
Something along these lines but without the transparency of the glass?


regards,
steve
Copy link to clipboard
Copied
Steve,
could you explain how to do this "twisty" thing in Photoshop CC? I can't find any options which would let me to wrap text around a cylinder.
Thanks man!
K.
Copy link to clipboard
Copied
Hi K,
Try these steps out and let me know if you need more details or have questions.
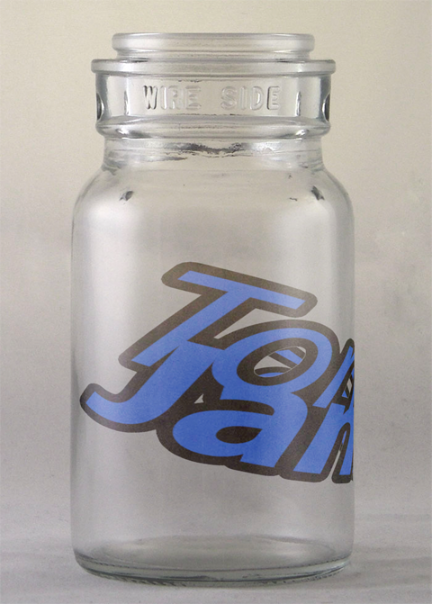
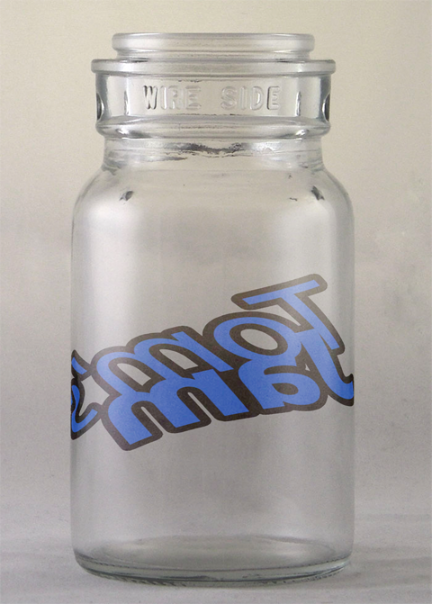
Outline for this exercise is to generate a 3D cylinder, create artwork you want to wrap around the cylinder, duplicate and modify that artwork to be used in an opacity map, and then arrange the 3D element on an image to composite together.
So the basic steps I used to do this:
1) New 1024px x 512px, RGB doc w/White background.
2) 3D> New Mesh from Layer> Depth Map to> Cylinder.
3) Change the workspace to '3D'
4) In the 3D panel, select the material 'Background'.
5) In the Properties panel, select the Opacity texture pop-up and choose 'Remove Texture' (you will be adding one back in step 10).
6) In the Properties panel, select the Diffuse texture pop-up and choose 'Edit Texture...'
7) Here's where you add the label graphics that you want bending around the cylinder. I used a text layer w/stroke layer style for the jar example. You'll also want to scale the width down around 60% to account for the stretched UV mapping on the cylinder. (the scale factor changes if you use gray values instrad of white in step 1)
8) When you have the artwork as you want it, Layer> Duplicate Layer... to a new file. This new file will be used for the Opacity texture which masks off the area of the label you want, while removing the unwanted cylinder (ie. die-cut label).
9) Select all the layer pixels and change them to white, then on a new layer below fill it black. This is your new Opacity map. Save it to a working directory for use in the next step, and close the file. Also save and close the artwork file from step 6 & 7 (it is stored as a smart object in the original file from step 1)
10) Back with the original file from step 1 (with the 3D layer selected) select the Background material again in the 3D panel. Now in the Properties panel, select the Opacity texture pop-up and choose 'Load Texture...'. Browse to the opacity texture from step 9 and choose 'Open'.
11) You should now see just your label artwork wrapping in a cylindrical shape. You can use the 3D Camera Rotate tool to view the various angles.
12) Now, bring in your jar image for compositing. This is where manipulating the 3D layer to align the scale and perspective can get tricky. I try to just use the 3D camera tools for this work (with global object scaling an exception). I also use the 'Shaded Illustration' Rendering preset to help visualize.
Hopefully this helps out. I left out details around interacting with the 3D layers, but ask questions if you get stuck.
regards,
steve

Copy link to clipboard
Copied
This sort of effect always makes me think of when Donnie Hoyle first appeard telling us that we all sucked at Photoshop back in 2007. It still makes me smile just thinking about it.

Copy link to clipboard
Copied
I've been looking for such a simple breakdown or how to do this.Thanks! 

Copy link to clipboard
Copied
I do not understand step 9. What do you mean by "select all the layer pixels"? When I duplicated this layer to a new document it's still in the 3D workspace, so... I'm not seeing anything to select other than the entire canvas. Do I need to convert the layer to a smart object, then rasterize it or something?
Copy link to clipboard
Copied
Hi,
The document that you duplicate should be the Diffuse texture artwork from 6) & 7), which isn't the 3D layer. By "select all the layer pixels", I ctrl/cmd + click on the layer thumbnail and see the marching ants around the artwork.
Hope that helps to clarify. If you still have question, ask. 🙂
regards,
steve
Copy link to clipboard
Copied
Got it! Thank you! This technique didn't end up working for my project but it was a great learning experience!
Copy link to clipboard
Copied
Hi,
Sorry it didn't fit your project. Have you been using 3D layers lately, or was this an early dive into that feature set? Curious if there's barriers that you ran into which we can investigate removing.
I'm assuming you are using Ps CS6 too,which may be a poor assumption.
regards,
steve
Copy link to clipboard
Copied
Oh! No worries. I've used the 3D "Postcard" function A LOT-- but I haven't used the 3D Extrusion features much. This is mostly because I haven't had the need until today. Even then I was sort of just experimenting.
I was creating a "3D" mock of our latest product packaging which involved wrapping a label around a big ole, plastic bottle. When I stuck my smart objects into the Diffuse Texture thingie (step 7) it distorted the colors. Since the colors are kinda important to our branding I couldn't use that render. Also, my smart objects contained mostly text and the render blurred the copy a little, which was also unacceptable. Lastly, the overall shape of the cylinder didn't quite fit my bottle, but that's just because I ran out of time.
I ended up just manually transforming the objects, which gave me the result I desired, and, honestly, took a lot less time.
I'm using Creative Cloud. 

Copy link to clipboard
Copied
I am very confused by Sept 9.
How do I change the pixel color? Am I creating another layer? This step is not very clear. I'm Stuck after selecting the pixels...
Copy link to clipboard
Copied
Fill the selected pixels with white. Imagine the layer is a ball, select and fill. Now you have a white circle. Now make a solid black lette below and save that image separately to use as a mask

Copy link to clipboard
Copied
Which video did you watch to get the image on the can?
Copy link to clipboard
Copied
Hey. It's been waaaay too long since I posted my reply. If you have access to Adobe Dimension I'd use that instead as it's much easier and made for this exact thing.

 AdChoices