 Adobe Community
- Home
- Photoshop ecosystem
- Discussions
- Layer mask not working (weaving text)
- Layer mask not working (weaving text)
Copy link to clipboard
Copied
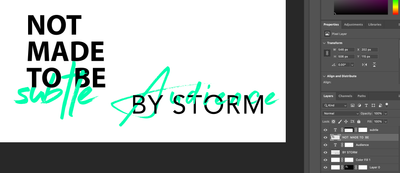
After learning about layer masks and the cool feature of weaving cursive font around block fonts, I started working on a couple practice images (shown below).
I was able to do it twice, and then suddenly my layer masks stopped working as they should.
I followed the same tutorials, did the same steps, but am NOT getting the same results.
Now it's just painting black or white, instead of removing or revealing parts of the image below the layer mask. At some times, the pain brush does nothing. (Note the "N" below)
I have spent 2 hours trouble shooting with different Youtube videos, and am completely stumped.
What I have tried:
- Reseting tools/preferences
- Quitting + Restarting Photoshop + my computer
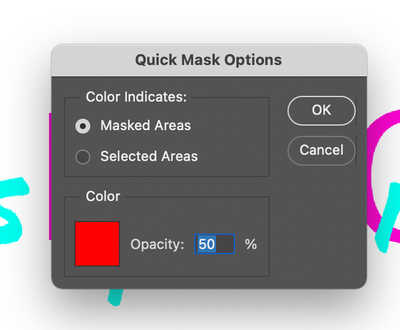
- Double clicking "quick mask" areas an ensuring "masked areas" is selected
Ironically, this is only my second day of owning photoshop, so I wonder if there is a very obvious user error that I am unaware of.
 1 Correct answer
Look at the highlighted icon in the layers panel of your screenshot for the layer labelled "storm". The highlighting around the rectangle icons shows you have the layer istelf selected (the left rectangle) rather than the layer mask (the right rectangle). So you are painting on the image itself rather than the mask.
Just click on the right rectangle to select the mask and then brush on the image with black to hide and white to reveal.
Dave
Explore related tutorials & articles
Copy link to clipboard
Copied
Look at the highlighted icon in the layers panel of your screenshot for the layer labelled "storm". The highlighting around the rectangle icons shows you have the layer istelf selected (the left rectangle) rather than the layer mask (the right rectangle). So you are painting on the image itself rather than the mask.
Just click on the right rectangle to select the mask and then brush on the image with black to hide and white to reveal.
Dave
Copy link to clipboard
Copied
Ohhhh jeeze - it's that easy, huh? Yep, a rookie error!
Thanks so much for your help.


