Copy link to clipboard
Copied
This is not an issue of the photos having that slightly washed out look that you get with raw files, Camera Raw seems to actually be changing the some of the colors of my pictures when I open them in it. It is changing the reds to a very noticeable pink-ish tone, which stretches into orange colors. I've never had this issue before and I'm not sure when it started, so I don't know if this is the result of some kind of update. I do automotive photography and I guess it has just been a while since I edited a picture of a red car. It completely ruins the reds and renders pictures with lots of reds and oranges unusable.
I'm fairly confident that it is not my computer, nor my camera. As when I open the pictures just on my computer, the look fine. Any help would be greatly appreciated, as I have not been able to find any pages or forums that show people having had a similar problem.
I know I could just use Lightroom, but Camera Raw is just my personal preference.
Here's what I'm talking about:
In my photo viewer it's fine (other than it's a bit washed out, as raw files do)
Here it is in Camera Raw
In my photo viewer it's fine
Most likely, the viewer you are using (exactly which one is it?) does not render the raw file, but displays the jpg that's embedded in the raw file.
Any settings from the camera (like Picture styles, saturation adjustments, etc.) are only applied to the jpg. Camera Raw ignores these proprietary, in-camera settings. So if you have used any settings in the camera, that could explain the difference.
Another possibility is that you have a wide gamut monitor, and are viewing
...Copy link to clipboard
Copied
Me too.
I also have difficulty working with the same symptoms.
My working status is following>
CPU - Intel core i5 6600 3.3GHz - 6th gen
mainboard - ASrock B150M pro4
VGA - NVIDIA Geforce GTX760
Copy link to clipboard
Copied
In my photo viewer it's fine
Most likely, the viewer you are using (exactly which one is it?) does not render the raw file, but displays the jpg that's embedded in the raw file.
Any settings from the camera (like Picture styles, saturation adjustments, etc.) are only applied to the jpg. Camera Raw ignores these proprietary, in-camera settings. So if you have used any settings in the camera, that could explain the difference.
Another possibility is that you have a wide gamut monitor, and are viewing the image in a non-color managed application, in which case it will appear over saturated. On a wide gamut monitor you must use color managed applications only to view your work.
The Windows Photo Viewer is color managed, the Photos App is not.
A third possibility is that you have a defective monitor profile, or that the GPU has problems with it.
Try disabling the GPU in Camera Raw. Press Ctrl+K while in Camera Raw, then uncheck Use graphics processor at the bottom.
If that doesn't help, try setting the monitor profile to sRGB (Adobe RGB if you have a wide gamut monitor).
If this fixes the problem, calibrate your monitor with a hardware calibrator as soon as possible.
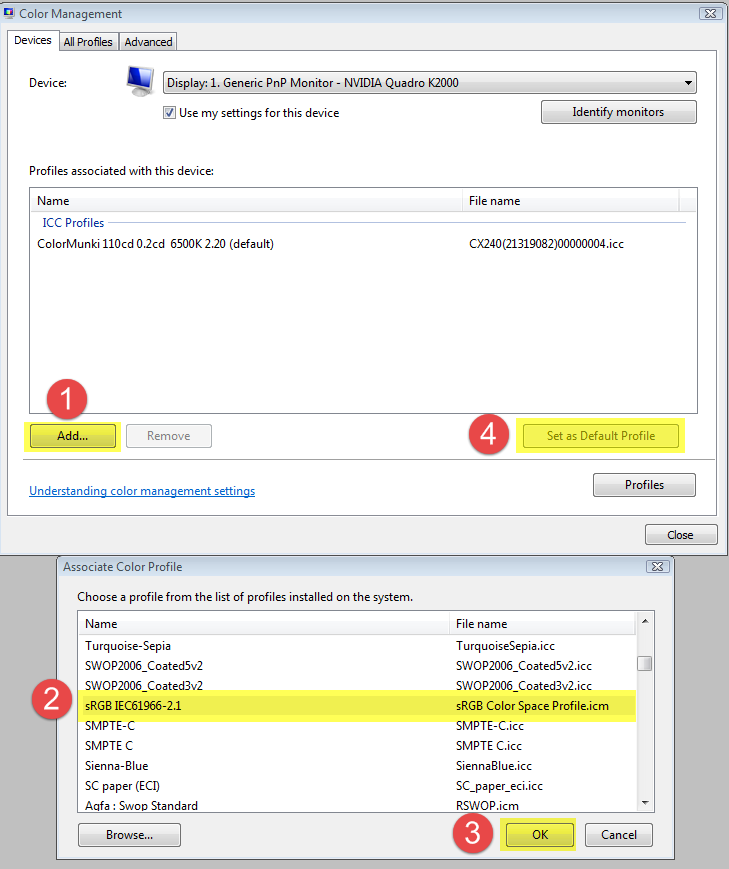
Press the Windows key+R, type colorcpl, and hit Enter.
Add the sRGB profile (or Adobe RGB for a wide gamut monitor), then set it as Default profile. See screenshot (from Windows 7) below.
Copy link to clipboard
Copied
I have adjusted as described above. But there is no change. The old Camera RAW editing screen reproduces the color of the original image, but, after this update I have a color difference issue like above.
Copy link to clipboard
Copied
Many thanks. It was simply just an issue of unchecking the GPU, as you recommended. I also appreciate you taking the extra time to provide the instructions you did for changing the monitor profile. I thought I had tried the GPU option, but I clearly did not. Thanks again. It was a pain to edit reds displayed pink.
Copy link to clipboard
Copied
Photo Viewer is not color managed and Camera Raw is. You can't trust what you see with Photo Viewer.
Copy link to clipboard
Copied
Go to "Camera Calibration" which is located in the "Camera Raw" panel within Photoshop.
Then change the Adobe Standard setting which is located under "Camera Profile" in there choose Camera Standard.