• Global community
    • Language:
      • Deutsch
      • English
      • Español
      • Français
      • Português
  • 日本語コミュニティ
    Dedicated community for Japanese speakers
  • 한국 커뮤니티
    Dedicated community for Korean speakers
Exit
0

Selecting Pixels less than 100% Opaque

Community Beginner ,
Oct 18, 2010 Oct 18, 2010

Copy link to clipboard

Copied

Hello,

In my business, semi-transparent pixels (defined as any pixel with an opacity less than 100%) can cause issues.

Does anyone know how to select all pixels that are not 100% opaque?  In other words, I'd like to select all pixels with a transparency level greater than 0%.

Thanks!

-David

TOPICS
Actions and scripting

Views

44.2K

Translate

Translate

Report

Report
Community guidelines
Be kind and respectful, give credit to the original source of content, and search for duplicates before posting. Learn more
community guidelines
Adobe
Guest
Oct 18, 2010 Oct 18, 2010

Copy link to clipboard

Copied

Hi David

Others may have some script answers to this question.  At it turns out this can be done with an action though I have not see this posted. Here are the steps

1) Load Transparency Mask as Selection

2) Create Layer Mask from the Selection using Reveal Selection

3) Display B&W Layer Mask  (Opt click on Layer Mask Icon  (Alt click on Layer Mask Icon for PC)

4) Image > Adjustments > Threshold  with Threshold set to 255

The above creates a Layer mask where the pure white pixels are the only pixels with 100% opacity.  All other pixels will be pure Black and will have some level of transparency that is less that 100%


Note:  One other option that some folks want is to identiy only the pixels that are exactly 0% opacity (or exactly 100% Transparency).   You use the same procedure as above except set the Threshold to "1".    The only pixels that are 0% opaque are just the pure black pixels in the Layer Mask.


With the Layer Mask available that is just 255 or 0 values, you can Apply the mask back into the image (or create a new image with that mask) and you can use that to process as you see fit with or without scripts.  If you need more help just let me know.

Hope that helps

John Wheeler

Votes

Translate

Translate

Report

Report
Community guidelines
Be kind and respectful, give credit to the original source of content, and search for duplicates before posting. Learn more
community guidelines
Community Beginner ,
Oct 19, 2010 Oct 19, 2010

Copy link to clipboard

Copied

John,

Thank you very much for your quick reply.  I'm not sure I understand your instructions, though.

You have indicated the following:

1) Load Transparency Mask as Selection

2) Create Layer Mask from the Selection using Reveal Selection

3) Display B&W Layer Mask  (Opt click on Layer Mask Icon  (Alt click on Layer Mask Icon for PC)

4) Image > Adjustments > Threshold  with Threshold set to 255

Would it be possible for you to describe the steps as you partially did with step 4?  I couldn't find "Load Transparency Mask" and the other functions, so I'm just not clear how to execute these steps using the menu structure, etc.

Thank you SO much in advance.

Cheers.

Votes

Translate

Translate

Report

Report
Community guidelines
Be kind and respectful, give credit to the original source of content, and search for duplicates before posting. Learn more
community guidelines
Guest
Oct 19, 2010 Oct 19, 2010

Copy link to clipboard

Copied

Sure David

Not all steps are from the keyboard or menu structure that I will give you.  Some involve the mouse pointer.  So in my description when I say "click on" what that refers to is move the mouse pointer over the object I indicate and left click on the mouse (or equivalent if you use another device such as trackpad).  My instructions refer only to the single image layer of which you want to select the transparency.  These instructions also assume you do not have a layer mask already in existence for this layer.

1) Load Transparency Mask as Selection  (While pressing the Cmd key {Ctrl Key on PC} "click on" the image icon for this Layer in the Layers Panel

2) Create Layer Mask from the Selection using Reveal Selection (Layer > Layer Mask > Reveal Selection)

3) Display B&W Layer Mask  (While pressing the Option Key {Alt Key on PC} "click on" the layer mask icon for this Layer in the Layers Panel)

4) Image > Adjustments > Threshold  with Threshold set to 255

Just so I am not making an assumption, you open up the Layers Panel via   Window > Layers

The above creates a Layer mask where the pure white pixels are the only pixels with 100% opacity.  All other pixels will be pure Black and will have some level of transparency that is less that 100%

Note:  One other option that some folks want is to identiy only the pixels that are exactly 0% opacity (or exactly 100% Transparency).   You use the same procedure as above except set the Threshold to "1".    The only pixels that are 0% opaque are just the pure black pixels in the Layer Mask.

With the Layer Mask available that is just 255 or 0 values, you can Apply the mask back into the image (or create a new image with that mask) and you can use that to process as you see fit with or without scripts.  If you need more help just let me know.

-----------------------------------------------------

Now, the thought occured to me that the above only helps in the process of identifying the semitransparent pixels yet does not solve the basic issue.  That issue, which you did not ask directly is, how to I eliminate the transparency from the paritally transparent pixels.

That is a different process which I give you here (and easier).  If all you want to do is have the partially transparent pixels become fully opaque and maintain the exact existing color in the pixel here is what you do starting with just the image (no masks):

The steps  basically involve just duplicating this layer and merging it back down  on itself 11 times for 8 bit images (22 times for 16 bit images).   Here are the steps

A) With the image layer active (highlighted) make a duplicate  layer. Keyboard shortcut for this is CMD + J  (Ctrl + J on PC)
B) Merge the new copy back down into the original. Keyboard shortcut CMD + E (Ctrl + E on PC)

You repeat this 11 times for 8 bit images and 22 times for 16 bit images. I have verified that this recovers the image pixel with no degradation of the original color values. This is easily put in an Action to be automated.

Now what most people don't realize is that if you are using semi transparency on the edges of images (feathering) and you take out all of the transparency, you end up with pretty harsh edges that do not always look very pleasing.

Hope this helps

John Wheeler

Votes

Translate

Translate

Report

Report
Community guidelines
Be kind and respectful, give credit to the original source of content, and search for duplicates before posting. Learn more
community guidelines
Community Beginner ,
Nov 03, 2010 Nov 03, 2010

Copy link to clipboard

Copied

It took some work, but holy cow, I think it works (and I created an action to leave only those pixels).  The problem is that it's extremely difficult (impossible) to validate that it catches all the <100% opaque pixels, but you sound confident, and I'm good with that.  I think when you set the threshold to 255 it guarantees it, but i'm not 100% sure.

Do you think this will work on RGB and CMYK templates?

Thanks SO much.  This is already a huge help!

Votes

Translate

Translate

Report

Report
Community guidelines
Be kind and respectful, give credit to the original source of content, and search for duplicates before posting. Learn more
community guidelines
Guest
Nov 03, 2010 Nov 03, 2010

Copy link to clipboard

Copied

Hi David

Good question on verification.  More on that later in the post.   I will also answer the CMYK issue later on.

In general, I am pretty confident in my approach as long as you are doing "Mask math"  with selections.  The biggest error could come up if you Apply the mask to an image that already has embedded transparency.

Here is an approach that I would use to isolate the pixels between and not including 0% and 100% opacity.  This follows the technique from my previous post.

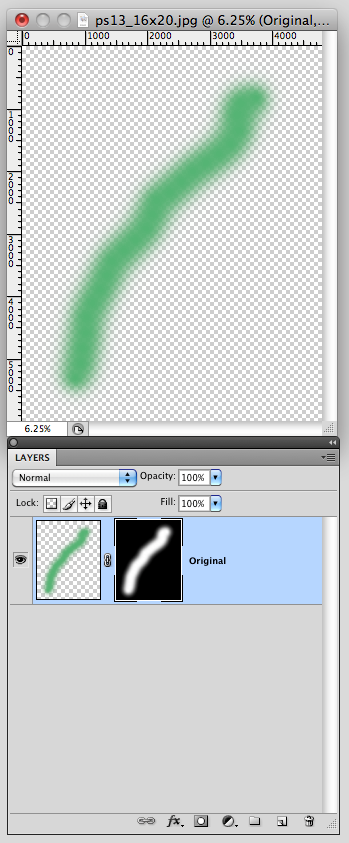
- Create selection from Transparency

- Create layer mask from Selection

See first picture here:

http://i774.photobucket.com/albums/yy26/thebestcpu/NAPP%20General/Screenshot2010-11-03at43241PM.png

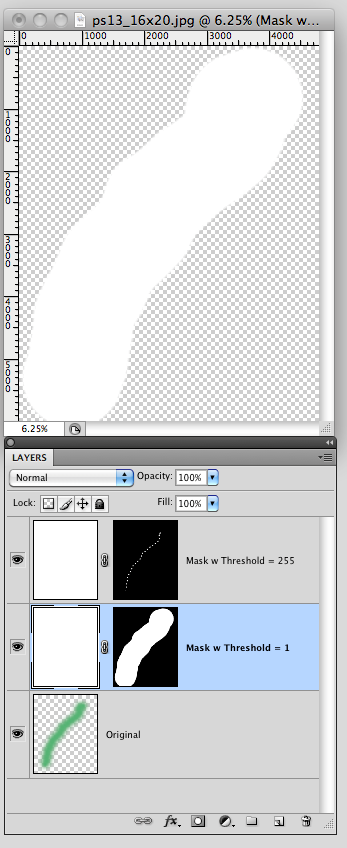
- Create two solid color layers above the original (I used white but it does not matter - just no transparency)

- Move the Original Layer mask to one of these layers

- Duplicate the mask to the other solid color layer

- One the first layer above the Original, open the B&W image and use the Threshold image adjustment to value of 1 (Name "Mask w Threshold = 1)

- On the top layer, open the B&W image and use the Threshold image adjustment to value of 255 (Name "Mask w Threshold = 255)

Here is what you should see at this point:

http://i774.photobucket.com/albums/yy26/thebestcpu/NAPP%20General/Screenshot2010-11-03at43122PM.png

- Now with Layer "Mask w Threshold = 1" selected, right click that Layer Mask and use "Add Mask to Selection"

- Now with Layer "Mask w Threshold = 255" selected, right click on that Layer Mask and use "Subtract Mask from Selection"

Here is what you should see now:

http://i774.photobucket.com/albums/yy26/thebestcpu/NAPP%20General/Screenshot2010-11-03at43206PM.png


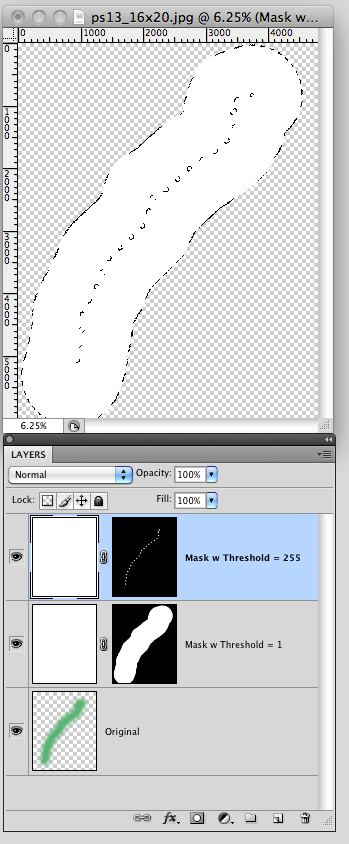
The selection identifies only the pixels above 0% and below 100% opacity/transparency.

Not sure what you want to do at this point with the pixels fully identified by the selection.  You could fill a solid color on any of the image layers or totally clear those pixels to become fully transparent.   Depending on what you do at this point with the selection you could loose the information.  I don't have visibility to your specific action so cannot advise.

Within RGB, here is a hint on how to independently identify if you have all the semi transparent pixels.


1) Any pixel that is semitransparent will pick up some of the pixel color from below.

2) Put a white layer underneath the original and create a new stamped layer

3) Put a black layer underneath the original and create another stamped layer

4) Compare the two new stamped layer with the difference blend mode.

Any pixel at 255 was where there was 0% opacity

Any pixel at 0 is where there was 100% opacity

Any pixel with values 1 to 254 were semitransparent because they changed in color slightly (and if they did not change in value they were not transparent)

Here is another method.  Duplicate the original and use the Image > Apply Image command.  Use as source the present duplicate layer  and for the channel use transparecy (right under RBG, Red, Green, Blue channels).  This will create a grayscale image of the transparency.  For RGB mode all values between 1 and 254 are the partially transparent pixels.  This is another path to identity the semitransparent pixels yet can also be used for verification.

So what about CMYK.  The answer is yes, if you use the techniques I mentioned as the first approach, then this should work for CMYK.  Where you get into trouble is if you are using determination via image pixels (as with the Apply Image command) or use of blend modes.   How image pixels are modified are not straightforward and as I understand it are also a function of the CMYK target space.  If you stick with the mask manipulation approach and use  selections, then I believe you are safe.  Alternately, you could covert to RGB, determine the semi-transparent pixels and process as desired, then convert back to CMYK

Hope that helps.

John Wheeler

Votes

Translate

Translate

Report

Report
Community guidelines
Be kind and respectful, give credit to the original source of content, and search for duplicates before posting. Learn more
community guidelines
Community Beginner ,
Dec 13, 2010 Dec 13, 2010

Copy link to clipboard

Copied

LATEST

I finally figured it all out.  I could not have done it without you.  Thanks SO much! 

With your information, I was able to create an action that finds and removes all semi-transparent pixels!  Cheers!

Votes

Translate

Translate

Report

Report
Community guidelines
Be kind and respectful, give credit to the original source of content, and search for duplicates before posting. Learn more
community guidelines