• Global community
    • Language:
      • Deutsch
      • English
      • Español
      • Français
      • Português
  • 日本語コミュニティ
    Dedicated community for Japanese speakers
  • 한국 커뮤니티
    Dedicated community for Korean speakers
Exit
0

Smoother Brush Transitions

Contributor ,
Jan 18, 2018 Jan 18, 2018

Copy link to clipboard

Copied

So I'm working in a Photoshop Digital Painting class, and we worked on getting our brushes to have a nice and smooth transition between the various brush strokes, as in, from a very faint color all the way to the full color with as few of obvious lines as possible. Here's as close as I've gotten so far.

Photoshop Help.JPGPhotoshop Help02.JPGPhotoshop Help03.JPGPhotoshop Help04.JPG

Smoothing is set to 0%, as was the instructor's suggestion. He has amazing artwork made from brushes just by modifying these settings, and I'd like to get mine working with me too.

I'm on a really cheap Intuos, which is pretty terrible, but it's what I have to bring to class. 😕

Views

1.0K

Translate

Translate

Report

Report
Community guidelines
Be kind and respectful, give credit to the original source of content, and search for duplicates before posting. Learn more
community guidelines
Adobe
Community Expert ,
Jan 18, 2018 Jan 18, 2018

Copy link to clipboard

Copied

ethandale  wrote

I'm on a really cheap Intuos, which is pretty terrible, but it's what I have to bring to class. 😕

But it is an Intuos?  Which one specifically?   The best tablets have 2000 pressure levels, which is meaningless as NO ONE has that sort of control.  Cheaper Intuos tablets might only have 1000 pressure levels, but that is more than enough.  Way more than enough.

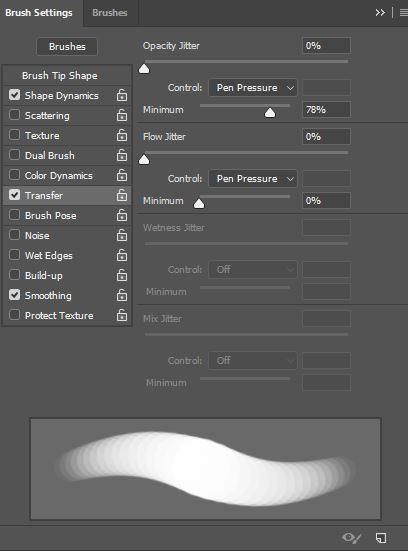
What operating system are you using?  If Windows, think about investing thirty bucks in Lazy Nezumpi Pro, which supercharges your tablet turning it into a magic device, and you into a digital artist with skills your teacher will be envious of. Among countless other functions, LNP lets you adjust the pressure curve of your tablet making it perfect for the way _you_ use it.

But what really makes a difference, is practice.  If I don't have a project on, I sometimes spend hours practicing brush strokes, and experimenting with the brush engine

https://lazynezumi.com/

Votes

Translate

Translate

Report

Report
Community guidelines
Be kind and respectful, give credit to the original source of content, and search for duplicates before posting. Learn more
community guidelines
Contributor ,
Jan 18, 2018 Jan 18, 2018

Copy link to clipboard

Copied

When I say it's cheap, I already have to push decently hard just to get Photoshop to recognize my pen. On my Canvas, I can lightly drag the pen across the screen and it picks it up, but with the Intuos, it does not. I have the Intuos Draw, I believe, just the white one with the four buttons, around $80. I'll look into that software though, that sounds very worth it!

Votes

Translate

Translate

Report

Report
Community guidelines
Be kind and respectful, give credit to the original source of content, and search for duplicates before posting. Learn more
community guidelines
Community Expert ,
Jan 18, 2018 Jan 18, 2018

Copy link to clipboard

Copied

I suggest to go to the preferences and see the Intuos preferences and tweak it to make sure the pressure is to your liking.

Play with the preferences and than continue to explore the bush settings to get the result. There are no recipes for it - practice and painting with the correct pressure will do.

Check out:Adobe Photoshop CC | Download exclusive brushes from Kyle T. Webster

Download samples and play with it.

Browse Photoshop Brushes | Resources & Stock Images | DeviantArt

Votes

Translate

Translate

Report

Report
Community guidelines
Be kind and respectful, give credit to the original source of content, and search for duplicates before posting. Learn more
community guidelines
Community Expert ,
Jan 18, 2018 Jan 18, 2018

Copy link to clipboard

Copied

Yes, good point.  If that tablet uses the same driver as other Intuos and Citiq devices, you can adjust pen pressure in Preferences.

Votes

Translate

Translate

Report

Report
Community guidelines
Be kind and respectful, give credit to the original source of content, and search for duplicates before posting. Learn more
community guidelines
Contributor ,
Jan 18, 2018 Jan 18, 2018

Copy link to clipboard

Copied

That's not the issue, it's that by the time the pen realizes it's being pressed down, it's instantly darker, even set at the firmest setting. I'll keep playing with the sensitivity though to see if I can get it to function any better.

I looked a bit more into Nezumi, and it looks like an incredible piece of software, but it looks like it smooths out transitions between thick and thin...something that I can already do with Photoshop's new "Smoothing" slider...I don't know if it would really help me smooth out that gradient that I'm working on.

Votes

Translate

Translate

Report

Report
Community guidelines
Be kind and respectful, give credit to the original source of content, and search for duplicates before posting. Learn more
community guidelines
Community Expert ,
Jan 19, 2018 Jan 19, 2018

Copy link to clipboard

Copied

It is all in the properties and the tablet. I use an art pen as well and together I get the right brushes!

Playing with it like you are painting on a canvas!

Painting with Adobe Photoshop Brushes

Votes

Translate

Translate

Report

Report
Community guidelines
Be kind and respectful, give credit to the original source of content, and search for duplicates before posting. Learn more
community guidelines
New Here ,
Dec 29, 2020 Dec 29, 2020

Copy link to clipboard

Copied

LATEST

Hello, I bet you have solution it by now! Have you tried with an air brush tool? That will not add the increase of tone when overlapping the strokes...All what is been said about setting is right.

Votes

Translate

Translate

Report

Report
Community guidelines
Be kind and respectful, give credit to the original source of content, and search for duplicates before posting. Learn more
community guidelines