 Adobe Community
- Home
- Photoshop ecosystem
- Discussions
- Technique: Reflective CDs (How to)
- Technique: Reflective CDs (How to)
Technique: Reflective CDs (How to)

Copy link to clipboard
Copied
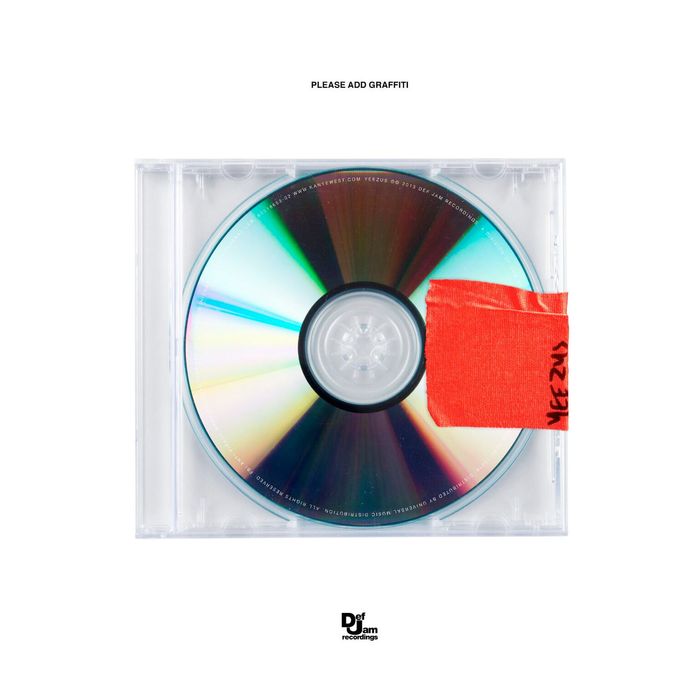
Hello Photoshop Community,
I was wondering about the technique used to make two album covers I'm fascinated by. I have tried my hand at replicating one of them by overlapping one color gradient and a grey metallic looking one but it doesn't look remotely close. I also tried all blend modes but nothing seems to create a similar effect.
I would be very grateful if someone could show me how to make something similar.
Any input on how the casings might have been made are also very welcome.
Here are the album covers and the result of my attempt:


Explore related tutorials & articles
 9
Replies
9
9
Replies
9

Copy link to clipboard
Copied
What is the problem exactly?
You know you can pick Color Stops from the images?
The casings are likely photographs (the whole things maybe).
Copy link to clipboard
Copied
I did not realize you can pick color stops from the images. I'll try that as well.
Further, to me it looks like there is a certain glare those images have that mine just doesn't and as a result makes it look kinda flat. This might suggest they're pictures but nonetheless, do you know how I might achieve that effect?
Copy link to clipboard
Copied
I am not sure I understand; do you mean the »grooves«?
Thos could be emulated with Displace and Motion Blur.

Copy link to clipboard
Copied
The Filter Polar Coordinates can be used to warp a Smart Object containing a linear Gradient into a circular shape.

Copy link to clipboard
Copied
That looks great! I'll try displace and motion blur next.
I hadn't heard of the Polar Coordinates filter, what are the advantages of this method over simply using the angle gradient overlay? Is it necessary to have a smart object wrap around so as to use displace and motion blur perhaps?
Thank you for your input.
Copy link to clipboard
Copied
To create »streaks« it is pretty easy to use a Displacement Map with horizontal lines on a horizontal gradient, for an angular gradient that would be inconvenient.


»Is it necessary to have a smart object wrap around so as to use displace and motion blur perhaps?«
My advice for Photoshop users:
• Smart Objects
• Smart Objects
• Smart Objects
In this case the Smart Objects (within Smart Objects etc.) allow to make edits to the gradient or the Displace Filter later on without having to »retrace« the steps.
For example a stronger Displace:

Copy link to clipboard
Copied
By the way, this is what the Displacement Map I used for this looks like:

Copy link to clipboard
Copied
Thank you so much for your reply! This is very helpful. I will look more closely into smart objects.
Would you mind sharing your psd? I am still very new to this and I might not understand everything you've done but it might be helpful to be able to look through your project to better understand how all these filters work.
Thank you once again.
Copy link to clipboard
Copied
Have you made headway with the task?

 AdChoices