 Adobe Community
- Home
- Premiere Pro (Beta)
- Discussions
- DISCUSS: Log color spaces now available in interpr...
- DISCUSS: Log color spaces now available in interpr...
DISCUSS: Log color spaces now available in interpret footage
Copy link to clipboard
Copied
Color management is now available for log-based media. This allows for simpler, LUT-free workflows when working with log footage from popular camera makers like Sony, Panasonic, and Canon. Set the log color space correctly in Modify > Interpret Footage, then place the media on a Rec709 or HDR timeline and Premiere Pro will automatically apply the correct color conversions. Any camera that shoots log can now be used in HDR production easily.
This method transforms log footage to the color space of the sequence in a non-destructive, real-time workflow, rather than the common use of Log>Rec709 LUTs that can clip highlights, shadows and color information.
How It Works:
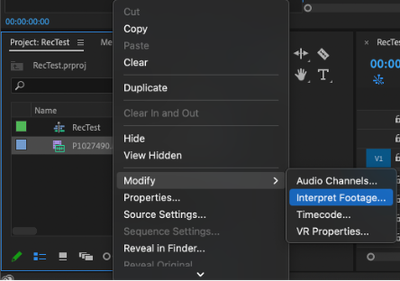
- Right-click on a video clip in the Project Window and select Modify > Interpret Footage.
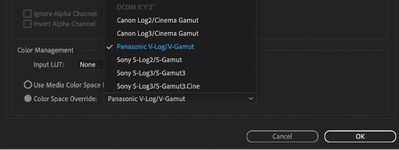
- In the Interpret Footage Window, scroll down to “Color Management” at the bottom of the panel. Click “Color Space Override” then use the pull-down menu to assign the format of the selected clip. This should match the color space that you shot in the camera – V-Log, S-Log, Canon Log.
- Place the media on a Rec709 sequence if working in standard dynamic range. You can also choose to put it on a PQ or HLG timeline to work in HDR. Premiere Pro reads the media color space and does the appropriate conversion from source media color space to the Premiere Pro sequence color space. When you change the working color space in Sequence Settings, Premiere executes the color space transformation, no need to add a different Log > Color Space conversion LUT.
This new color managed workflow is also useful for moving projects out of Premiere and maintaining the wide gamut and luminance of HDR video.
To export in HLG or PQ, choose format H264 or HEVC, select the Main10 or High10 MPEG profile under Encoding Settings, then choose Rec.2100 HLG or Rec.2100 PQ as export color space.
Make sure that the check boxes on the right of Profile and Level are NOT checked, and select Main10 if you are exporting in and HDR format. Then set the Export Color Space to one of the three HDR color spaces.
Beta testers should note that there is a significant difference between clips that are color managed from log to Rec 709, vs clips that use a LUT to convert.
LUTs can include tone mapping, knee and highlight roll off values that yield which yield a good looking image with little fuss but often clip highlights and shadows and that detail in unrecoverable. The LUT processing is destructive. With color managed workflows, none of the color information is lost. But significant tone mapping is required to fit the enormous dynamic range of log (~14 stops) into the very narrow range of Rec709 (~6 stops).
We are still working on a tone mapping approach. You are likely to see results that look a bit blown out in Rec709 sequences. Log to HDR sequences look fantastic, however.
The Waveform above is from a Color Managed clip, none of the highlight or shadowed values have been clipped or lost, you can see them extending way above 100 IRE and dipping below 0.
The Waveform above is from a LUT converted clip, all highlight values have been remapped or clipped to values below 100 IRE, and shadow values are either remapped or crushed to values greater than 0 IRE.
We want to know what you think. Please join the conversation below.
Copy link to clipboard
Copied
I do appreciate you taking the time to talk this through though, thank you very much.
Copy link to clipboard
Copied
For something like this, I'd probably try to make a few presets of Lumetri that would bring the total exposure down with sat changes that you wanted, as you can drag/drop those over multiple clips in a bin and be done bango.
Of course, another option is to create a LUT to normalize yet keep the whites and blacks within bounds. Apply that in the Creative tab slot, again save as a preset, and then simply apply this to all clips needing it.
It has these benefits ... you can adjust the 'strength' of the LUT in the Creative tab to adjust the final result, and most importantly, you can quickly go into the Basic tab controls (which are processed before the Creative tab) to 'trim' the clip to fit that LUT.
Need to lift whites? Basic tab Whites or Exposure slider. Need a bit more contrast both directions? Contrast contro. This is the colorist way of working with tech LUTs like that ... create the LUT with the general shape you need, trim all clips through the LUT with controls processed before it.
No clipping, no crushing, very, very fast. And as the only thing the user needs to really pay attention to at this stage is the scopes, making sure nothing is clipped or crushed, it's very easy for junior colorists or editor's assistants to be trained to trim clips.
Neil
Copy link to clipboard
Copied
hi.
I've already pointed this out and informed the Adobe color developer. Now, it is impossible to influence a certain color area of the image for fine-tuning, because the Color tools in Premiere do not behave correctly. Separate wheels are needed to affect ONLY the LIGHT ONES, ONLY THE MEDIUM ONES AND ONLY THE DARK ONES. Ideally, still make OFFSET. Now working with color in Pr. terrible. It is wrong and cropped. When developers stop paying attention to various new buttons for removing the selection and text strokes, and will deal with the real problems that everyone is waiting for.
When will we see a full-fledged professional color tool in Premiere?
Copy link to clipboard
Copied
Hello!
Davinci's Color Space Transform has a built in Tonemapper. It is mapping the clip's higher dynamic range to a limited one in 709. When you use a HDR clip in 709 sequence in Premiere Pro, this tonemapping is not happening which is why the highlights look clipped/ footage looks overbright in highlights. We are working on our tonemapper, so that using HDR clips in 709 sequences will be easy, and you wont have to use Lumetri's whites slider for this. Meanwhile, you can use Color Space Override to Rec.709, in your Interpret Footage for the clip for a workflow like this.
Smit
Copy link to clipboard
Copied
Thank you for the response! I look forward to having tone mapping included with the color space override, that will make SLOG3 footage so much easier to work with. This really is a great feature and something I've been waiting for in Premiere for quite some time.
Copy link to clipboard
Copied
Something else that I noticed: I wanted to test if I could use Davinci's color space transform with tone mapping as a lut in Premiere, I exported an Slog3 Sgamut3 to rec709 transform as a LUT from Resolve and imported that lut into premiere but I do not get the same look at all. 65 point, premiere set to Tetrahedral.
Re applying the lut to the same footage in Davinci yields exactly the same result as the color space transform.
Copy link to clipboard
Copied
I'm wondering if that was exported from Resolve as a 'shaper LUT', I think they're called. Resolve does export quite a few LUTs with a 1D/3D "shaper LUT" pairing, so there's actually two LUTs inside. A 1D LUT, and a 3D LUT also. And Premiere doesn't work well with those.
Neil
Copy link to clipboard
Copied
What seems to have caused the change was display color management in premiere. Turning that off yielded the same result as resolve.
So a trasnform lut created in resolve can be used in premiere to take advantage of tone mapping, but it then obviously grades like footage using a lut and not properly color managed footage, which is to say if you then push the image in any way it doesn't look as good as if premiere was transforming the color space itself.
I look forward to the inclusion of tone mapping in color space override.
Copy link to clipboard
Copied
What were your CM options in Resolve? What's the monitor, how is it calibrated and such, to what?
Pr's Display Color Management option simply looks at the monitor's ICC profile (icm file) and remaps the image to be closer to Rec.709 standards. Without that option, Premiere "assumes" the user knows what they're doing and doesn't mod the image. Expecting the user has a full-on Rec.709 monitor setup going.
Neil
Copy link to clipboard
Copied
To follow up on this comment from Smit-Shah, Tonemapping has now been developed for premiere pro beta 23.1. I'm late by a few months since this feature came out in June, but now HDR footage is correctly tonemapped when dropped on an SDR timeline so long as the correct input color space is selected under the "interpret footage" menu.
Copy link to clipboard
Copied
Copy link to clipboard
Copied
Copy link to clipboard
Copied
Since we are talking about such a wonderful function as the correct interpretation of the material, without loss of image quality in light and dark areas, then add profiles of the manifestation of materials with a list of different color spaces that are used in cameras. Not two or three, namely, those that are used in cameras so that the creators choose their appropriate profile and take advantage of your wonderful function. And so this is profanity, as you have indicated several pieces of profiles.
Do the rest have to pray to their cameras?
Take DaVinci as an example. There is any profile and color space available.
Copy link to clipboard
Copied
Baffy,
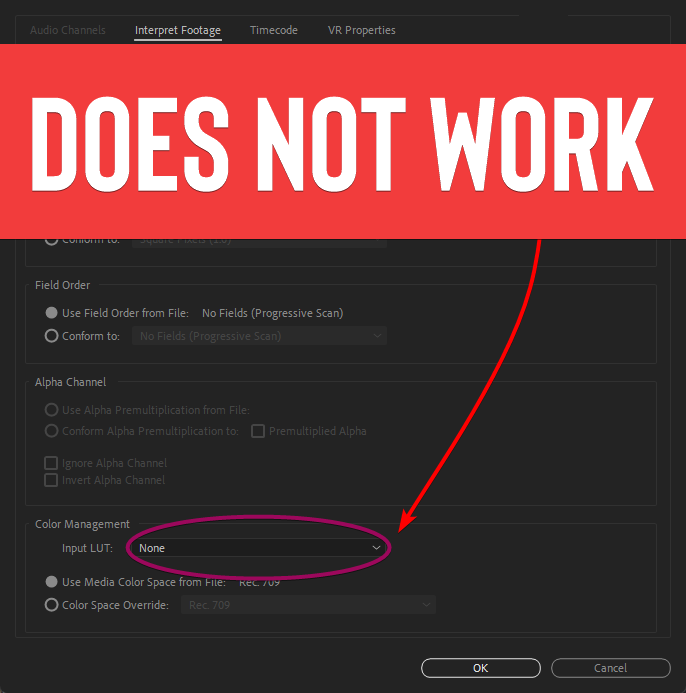
I'm as intrigued as puzzled by your last three posts here. The first one, the simple graphic with a caption ... I'm not sure what you mean there. Have you tried to apply a LUT there, and it didn't work? What?
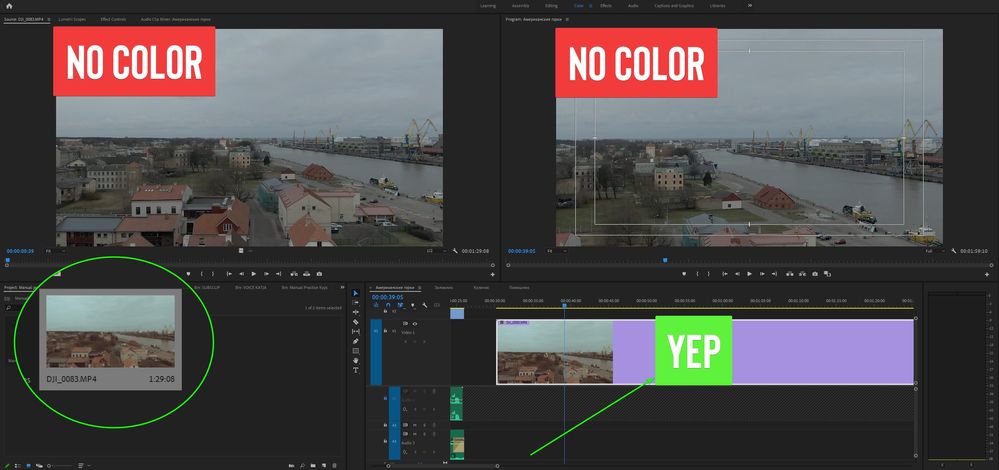
The next post, with the image with the big no color graphics ... I have no clue what I'm supposed to be seeing there. A bit of explanation as to what you mean us to understand would be so useful.
Your last post seems to be about Premiere not having a list of every camera possible with profiles for their different outputs or something? That will be nice as they add some in, and they have already added a number via the Override option as Francis notes in the first post of this thread. And more will be coming.
Personally, I compare Lumetri more to what we had in SpeedGrade, but to each their own. 😉
Resolve started as a full-on grading app, and a deep one at that. Just for grading, it used to be many thousands of dollars to buy a turn-key Davinci computer system with Resolve installed. Then it got bought out by BlackMagic, who makes their profit by providing software free or cheap in order to get us to buy their hardware. Like the $30,000 "Advanced" control panel. And it is still the most widely used grading app out there. So yea, Resolve will have more options for tools than any other app except for a couple of the still-turnkey options like Baselight.
There's no way a primarily editing app like Premiere will ever match Resolve for total color tools. Not that I wouldn't love it to, but ... it isn't the main emphasis of the app. And Resolve's color tools existed long before anyone added editing ability to it.
Neil
Copy link to clipboard
Copied
I'm as intrigued as puzzled by your last three posts here. The first one, the simple graphic with a caption ... I'm not sure what you mean there. Have you tried to apply a LUT there, and it didn't work? What?
Neil
The second picture complements the first one. In the first picture, I applied the LUT that I showed in the second picture. Now we look at the second picture and we see that the LUT has been applied to the clip in the basket and on the timeline. BUT, it is not displayed in the viewer software. Do you see the difference in color? There is a grade in the basket and on the timeline. It is not displayed in the source and program view window.
Copy link to clipboard
Copied
Your last post seems to be about Premiere not having a list of every camera possible with profiles for their different outputs or something? That will be nice as they add some in, and they have already added a number via the Override option as Francis notes in the first post of this thread. And more will be coming.
Neil
Yes, exactly. I want, like others, to see a large number of profiles of various cameras. What is above in the picture of the author of the article, there are only a few of them and there are few profiles themselves. Now the new Sony, Panasonic, Canon, Fuji, Nikon cameras have more profiles. Let them all be. I would also like to see the profiles of Blackmagic cameras. Why aren't there any? Nowadays, many of my friends use these cameras. They give an amazing picture of colors in their own way. This way we will provide more opportunities for content creators and professionals to use their preferred cameras for every taste. Make way for lots of camera supports and all their profiles. It is very important. Thanks
Copy link to clipboard
Copied
Yea, I've been wanting camera profiles for some time myself. My main rig is a BMPCC4K when I shoot stuff, with some Panny & Nikon extra-cams. And for what I arrange, there's Red, A7S3, drones, a few other things. So would be handy to have those have decent profiles also.
That said, I don't think it's realistic that they'll have the extensive list of Resolve at any time, again because that app is SO heavily tilted towards pro colorist use, and ... Premiere ain't. Though with Resolve having added so much to become the Adobe "we do everything for everyone" counterpart, it's something that I'm sure is adding some oomph to getting more color stuff in Premiere.
Now, not to beat the same dead horse for the 1500th time, as I'm sure it's only about 1300 times now ... if they'd rebuilt SpeedGrade rather than killing it ... oh my. Sigh.
Neil
Copy link to clipboard
Copied
We are waiting for Adobe's decision on the implementation of profiles and their correct operation.
Neil, I wanted to know if there are prospects for rebalancing the Lumetri panel. I mean consolidating all the tools and color profiles, color space in one place (on one panel)?
Copy link to clipboard
Copied
I certainly hope so! I've been arguing for some time that they needed to give us one over-all color management controls panel, rather than this CM control is here, that one there, another one hidden in a right-click "context" menu somewhere.
One panel to rule them all! I'm including my Uservoice link for that request, welcoming everyone to go vote it up. Vote early, vote often!
Neil
Copy link to clipboard
Copied
Neil, my community requests are coming true. Therefore, do not hesitate, make all possible camera profiles that are used both semi-professionally and in production. I'm not kidding )
Copy link to clipboard
Copied
Hey, if I was a staffer on the team, I'd sure be pushing for them!
But as I'm just a user up in Oregon, well ... there are limits. I do know a number of the staff from NAB and MAX, and they certainly know my opinions rather in detail ... ahem. 😉
In fact, I'd recommend any user think of attending something like NAB/Vegas (or even the smaller show in New York) or IBC in Amsterdam, places where the Premiere/AfterEffects/Audition/Animator teams will be holding down a large booth in person. Interesting experience, and you get to meet some amazing people.
Neil
Copy link to clipboard
Copied
I hope this comment is not to take the piss out of me 😄
Would be out of place, because zcam has nothing semi-professional about it, and neither does the community that uses them. I am one of the few survivors who still hopes to be able to do a decent color grading with Premiere,
Copy link to clipboard
Copied
And no one is laughing. I'm talking about things that should be in Premiere. Since the topic was voiced by an Adobe employee as the best process of developing the material without loss of quality in detail, it means that every creator should be able to create, and not experience difficulties. Of course, I'm in favor of a variety of profiles in Premiere, period.
Copy link to clipboard
Copied
I'm writing you now that I'm working with the latest beta version and it confirms that it's much, much better. I add that it goes smooth, very smooth in full playback quality even with warpstabilizer type effects. Thank God because I have a lot of works to edit still with the old xt3 that was used as a b cam. But I must say that I'm editing with a pretty powerful configuration, m1 max 32 core 64 gb of ram the scratch disk folder is in the internal ssd of the mac that is very fast and the footage with the project in an owc express 4m2 with 4ssd nvme in raid 0 that reaches more than 2800mb of speed.
Copy link to clipboard
Copied
I would like to see this in the release. However, this is not always the case. Recently, everything is good in the test assembly, and when the official assembly is released, everything is not smooth there. I don't know how this is achieved, but, everyone is already tired of performance


