- Home
- Premiere Pro (Beta)
- Discussions
- Re: DISCUSS: Rec. 2100 HLG HDR workflow
- Re: DISCUSS: Rec. 2100 HLG HDR workflow
DISCUSS: Rec. 2100 HLG HDR workflow
Copy link to clipboard
Copied
Updated 19 August 2020
Exciting HDR news!
We are proud to announce that we are testing an HLG HDR workflow in Premiere Pro. Work natively in Rec. 2100 HLG with the added sequence working color space option. Apple ProRes and Sony XAVC Intra are both fully color managed and GPU accelerated throughout the HDR pipeline. This is not just one feature; this is a set of features that will allow you to import, edit, and export HLG content in Premiere Pro. HDR is a complex area and this is a work in progress so we would appreciate your feedback. Below are some quickstart instructions to get you up and running quickly. Read on for even more detail.
Quickstart
- Add some HLG media to your project. Currently, we support ProRes or XAVC-Intra formats. You may download this sample project here HLG Sample Project
- Drag an HLG clip into the sequence panel to create a new sequence
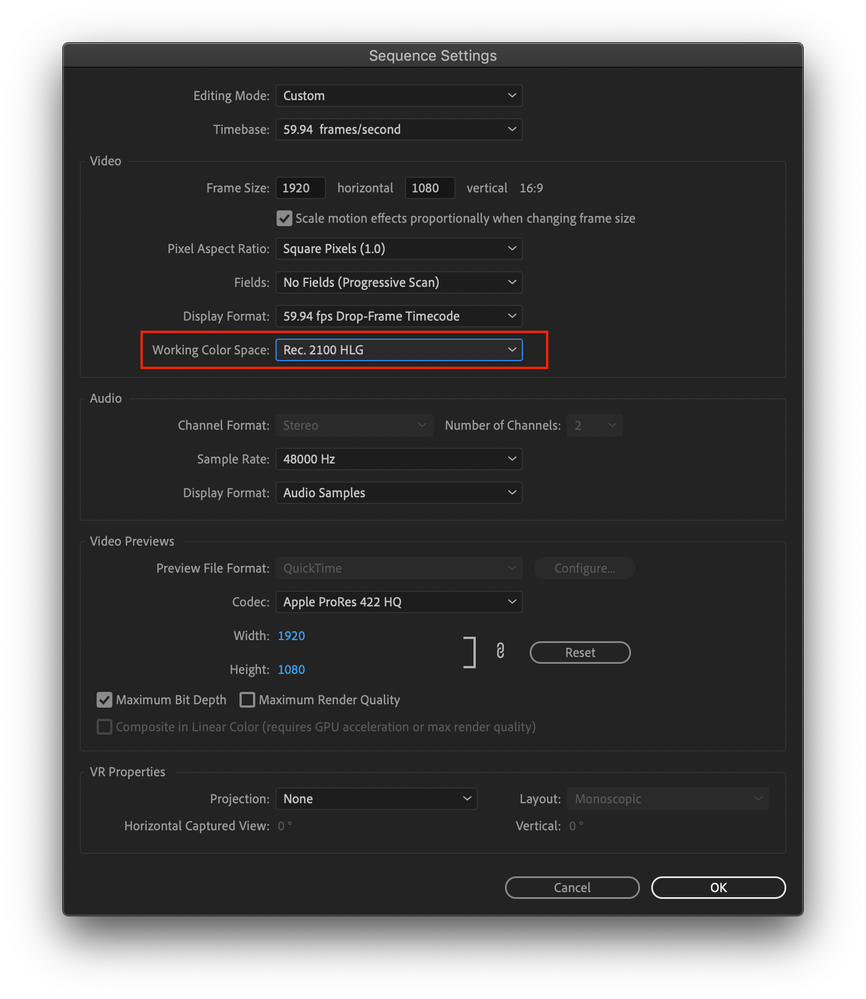
- Open the sequence settings to inspect the new working color space – been automatically set to Rec. 2100 HLG.
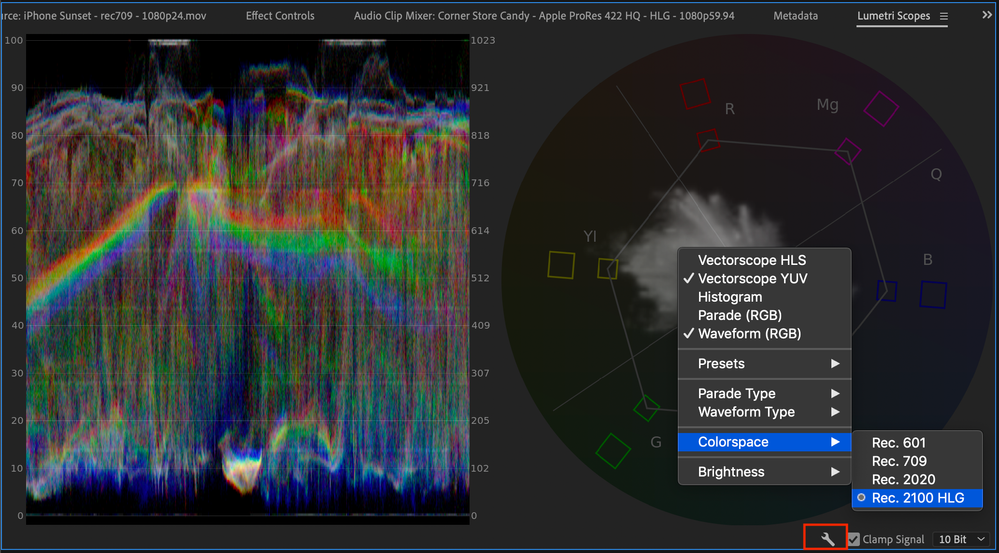
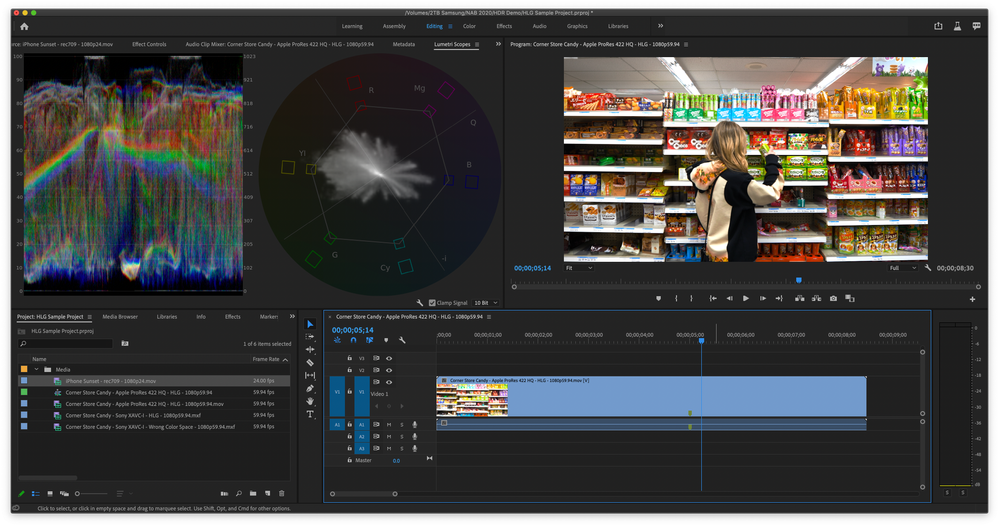
- Open the Lumetri scopes from the Window menu. Set the color space from the wrench menu to Rec. 2100HLG. You are now scoping HLG.
- Add some Rec. 709 content to the HLG timeline. Notice that the luminance only peaks at a little over 60% on the scopes and the image looks dim. Try changing the “HDR Graphics White” setting in the Project Settings to control the default brightness of Rec. 709 content added to an HLG sequence.
- Choose File > Project Settings > General – look for the color management section at the bottom. Change the “HDR Graphics White” setting to 203. Watch the Rec. 709 clip get brighter. Now it should peak around 75% on the timeline, which is the level that is recommended by the ITU.
- Export your sequence as ProRes HQ – Choose File > Export > Media and set the following options.
- Format: Quicktime
- Preset: Apple ProRes 422 HQ
- Video Settings: Render at Maximum Bit Depth – enabled
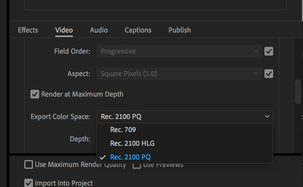
- Video Settings > Export color space – Rec. 2100 HLG
- Export
The details
Rec. 2100 HLG sequence working color space
Choose Sequence Menu > Sequence settings. All color values process within the timeline will now happen natively in Rec. 2020 color primaries using the Hybrid Log Gamma transfer function. If an HLG file is placed on an HLG timeline, no conversion is necessary, and the values are just passed through which is a great performance benefit. Rec. 709 files placed on the timeline will be converted to HLG using a colorimetric conversion method. No inverse tone mapping is performed. We do not yet have a PQ sequence working color space option. An HDR monitor and hardware transmit device are required to properly monitor HDR content. For an explanation of what you are seeing on your desktop monitor, look for the Program and Source monitor section below.
Color-managed import and export of Sony XAVC Intra HLG files
XAVC-I files with the HLG colorspace tag present in the metadata will pass though the GPU-accelerated color conversion library. An HLG sequence can be exported to an HLG file using any of the XAVC-Intra codec options.
- Choose File > Export
- Format > MXF OP1a
- Preset menu > chose any of the XAVC Intra codec options
- Video > Basic Video Settings > Render at Maximum Bit Depth
- Video > Basic Video Settings > Enable Hybrid Log-Gamma
If the source media is XAVC-I HLG footage and no effects have been added, smart rendering is possible, and no re-encoding will take place which is very fast.
Color-managed import and export of ProRes HLG and PQ files
ProRes 422 HQ and 4444 files in a MOV wrapper with the HLG or PQ colorspace tag present in the metadata will pass though the GPU-accelerated color conversion library. When placing HLG content into an HLG sequence, there will be no colorspace conversion necessary which has great performance benefits. If there is a colorspace mismatch, like putting PQ or Rec. 709 into an HLG sequence, we will do a colorimetric conversion but no tone-mapping. We do not yet have a PQ sequence working color space option. An HLG sequence can be exported to an HLG file using the Apple ProRes 422 HQ and 4444 codecs in a MOV wrapper. ProRes MXF is not supported for HDR at this time.
- Choose File > Export
- Format > Quicktime
- Preset > Apple ProRes 422 HQ or 4444
- Video > Basic Video Settings > enable Render at Maximum Depth
- Export Color Space > HLG
If the source media is ProRes HLG footage and no effects have been added, smart rendering is possible, and no re-encoding will take place.
Media colorspace override using interpret footage
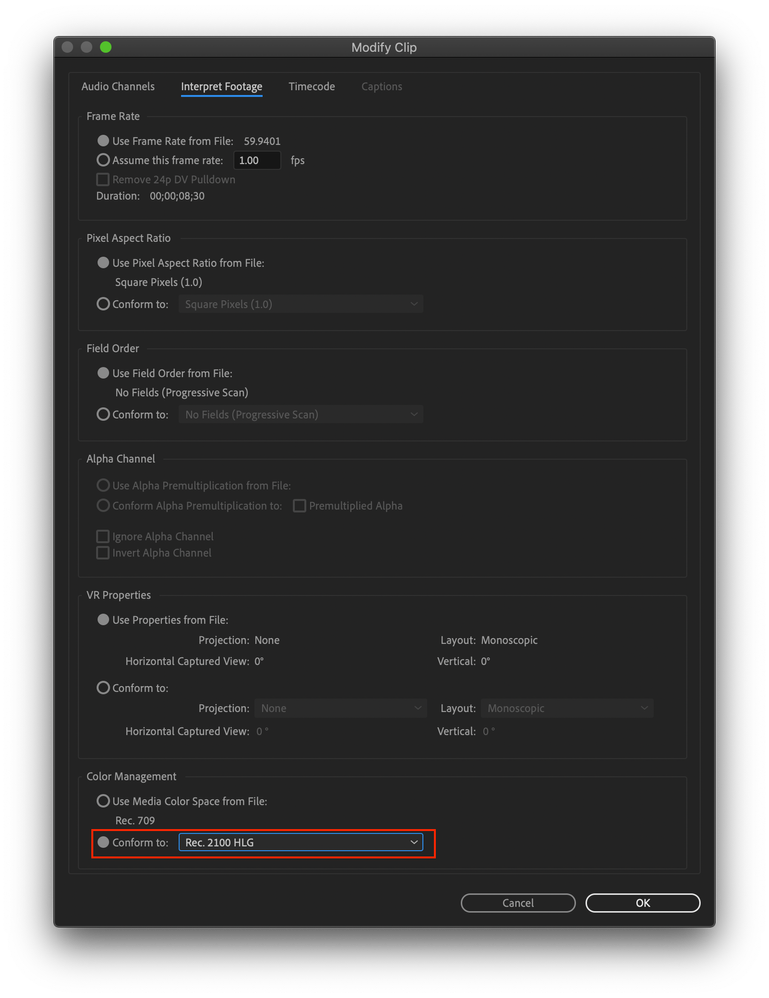
If the colorspace of the imported file is wrong or missing, you can force Premiere Pro to interpret the file using the correct colorspace. Currently, this will only work with color-managed files, which right now means XAVC-I and ProRes. It is surprisingly common when working in HDR productions that the color space in the file is incorrect. There is a file in the demo project linked above (HLG Sample Project) that is tagged with Rec. 709 but is supposed to be Rec. 2100 HLG. You can experiment with that file – overriding it to HLG (PANA3008 Sony XAVC-I - Wrong Color Space.mxf).
- From the project panel, highlight the file
- From the Clip menu, choose Modify > Interpret Footage (or right-click on the file and use the context menu)
- At the bottom of the Interpret Footage dialog, in the Color Management section, choose Color Space Override to > choose the correct color space from the dropdown. For the sample file, the correct colorspace is Rec. 2100 HLG
There is no colorspace conversion, the file is simply treated as if it were tagged with the chosen colorspace. Look for further development that will allow color space conversions from this menu.
Please note, there is a known issue that we are looking into where ProRes files tagged as Rec. 709 cannot be overridden. It is our intention that this should be possible. Look for future updates.- This issue has been fixed - please update to the latest beta version
***NEW***
Media colorspace conversion using a custom LUT in interpret footage
If an actual color space transformation is necessary such as upconverting Rec.709 to HLG with tone-mapping, that can be accomplished with a LUT.
- From the project panel, highlight the file
- From the Clip menu, choose Modify > Interpret Footage (or right-click on the file and use the context menu)
- At the bottom of the Interpret Footage dialog, in the Color Management section, choose Input LUT > Add LUTs and navigate to your custom LUT on disk.
- Specify the resulting color space of the file with the Color Space Override dropdown.
- Premiere Pro will use the LUT to transform the color space and will treat the file as the new color space throughout the project.
For example, apply a Clog to HLG LUT and tag the file as Rec. 2100 HLG. This option is not just limited to HDR production. You can use this to apply a Vlog to Rec709 LUT too. You must supply your own LUTs and these are often supplied by camera manufacturers.
Rec. 2100 HLG option and 10bit processing in the scopes
- Open the Lumetri scopes from Window > Lumetri Scopes
- From the scopes wrench menu choose Colorspace > Rec. 2100 HLG
You will notice that the new 10bit option is automatically chosen from the neighboring dropdown menu. 8bit is not appropriate for HLG production and that option is grayed out. You may still choose Float or HDR from the dropdown menu. The HDR dropdown option has known issues and should not be relied upon for HDR production at this time. It is recommended to stick with the 10bit scope option when working with HLG at this time.
*** NEW ***
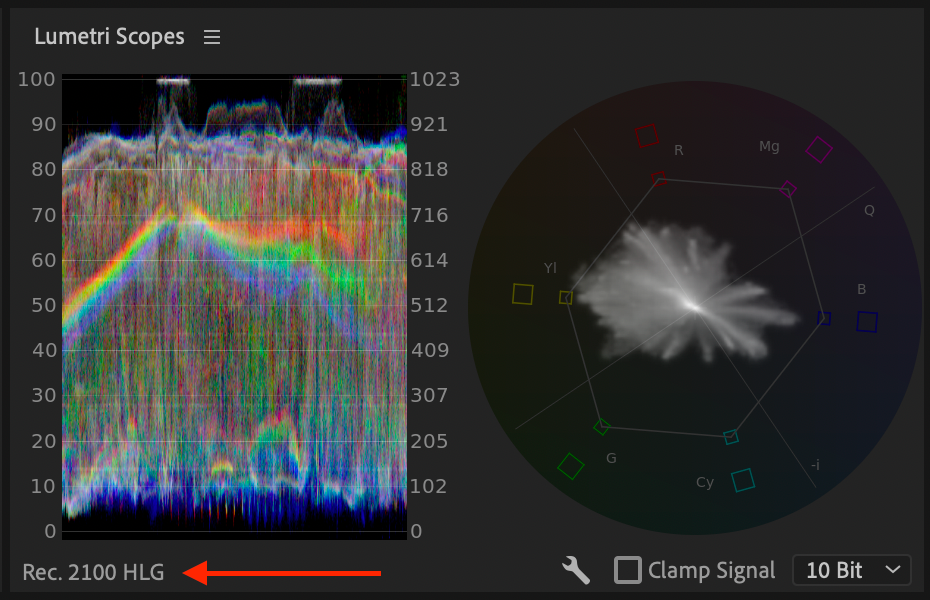
- Scopes will now automatically switch to the correct color space based on the selected sequence or media
- We now display the color space of the scope in the lower-left corner of the scopes panel
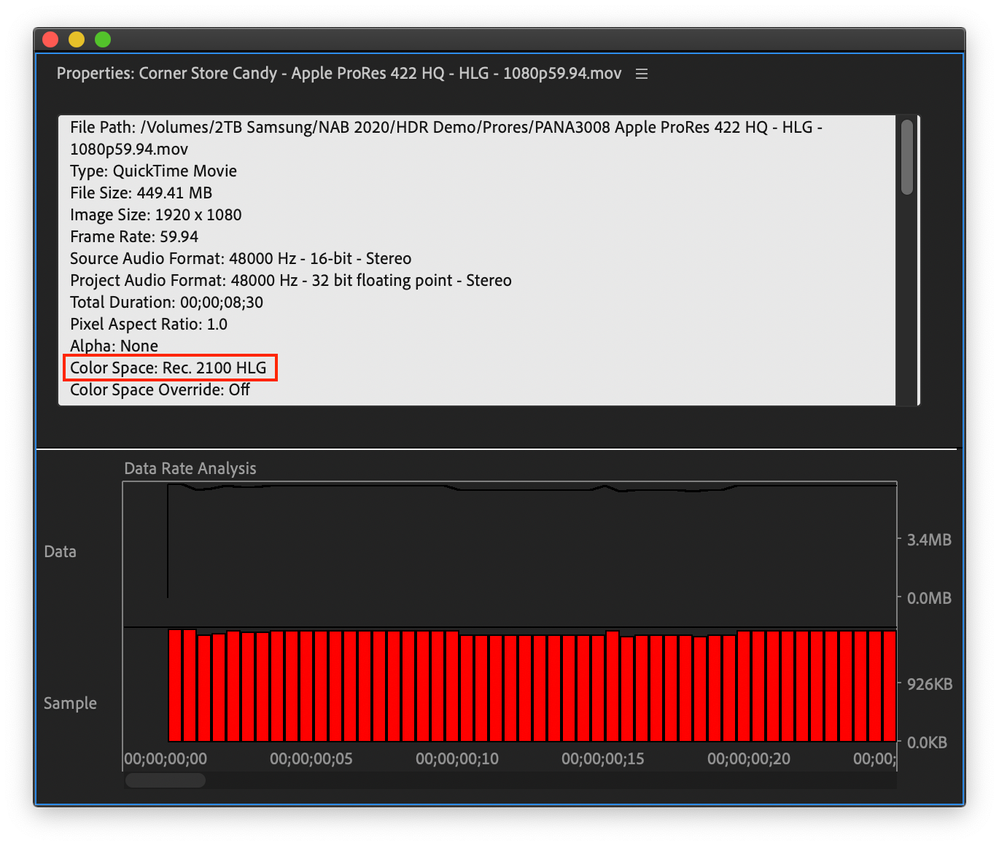
Color space information for color-managed codecs is displayed in the properties panel
Right-click on the file in the Project Panel and choose Properties. Color-managed codecs include ProRes HDR files and all XAVC-I right now. Non-color-managed files will not indicate the color space in the properties panel and it will be left blank. Non-color-managed files are brought in as Rec. 709 with over range values preserved in 32bit floating point. This is what has made HDR production possible in Premiere Pro in the past. It is our goal to change this behavior and have all HDR files handled in their native color space.
The Program and Source monitor – display color management
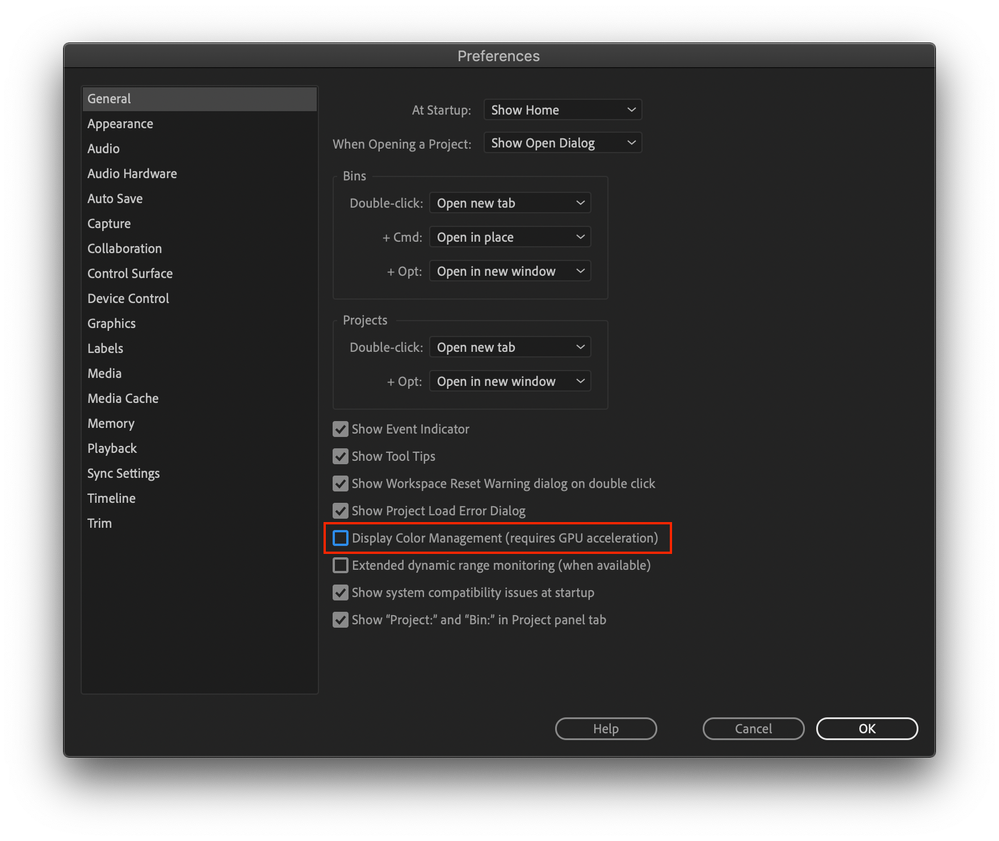
It can be a bit confusing to wrap your head around what you are seeing in the program and source monitors. By default, with display color management turned OFF, you will be viewing the raw HDR signal. It will, therefore, look quite low contrasty and not very colorful – not HDR at all. Turning display color management on in Preferences > General will convert the colors from HLG into the color space of your monitor using the monitor ICC profile set in your OS preferences. Colors that overlap between the two color spaces will now look correct, but we have another problem now – the color and luminance range that is beyond what the color space of your monitor can handle will get clipped by the display and the image will look blown out. Check the scopes to verify that the signal is not in fact clipped. To properly monitor HDR content you need proper transmit hardware. See below.
- Please note: Display color management settings have no effect on exported files; it only affects what you see on the screen.


__________________________
HDR reference monitoring with transmit hardware
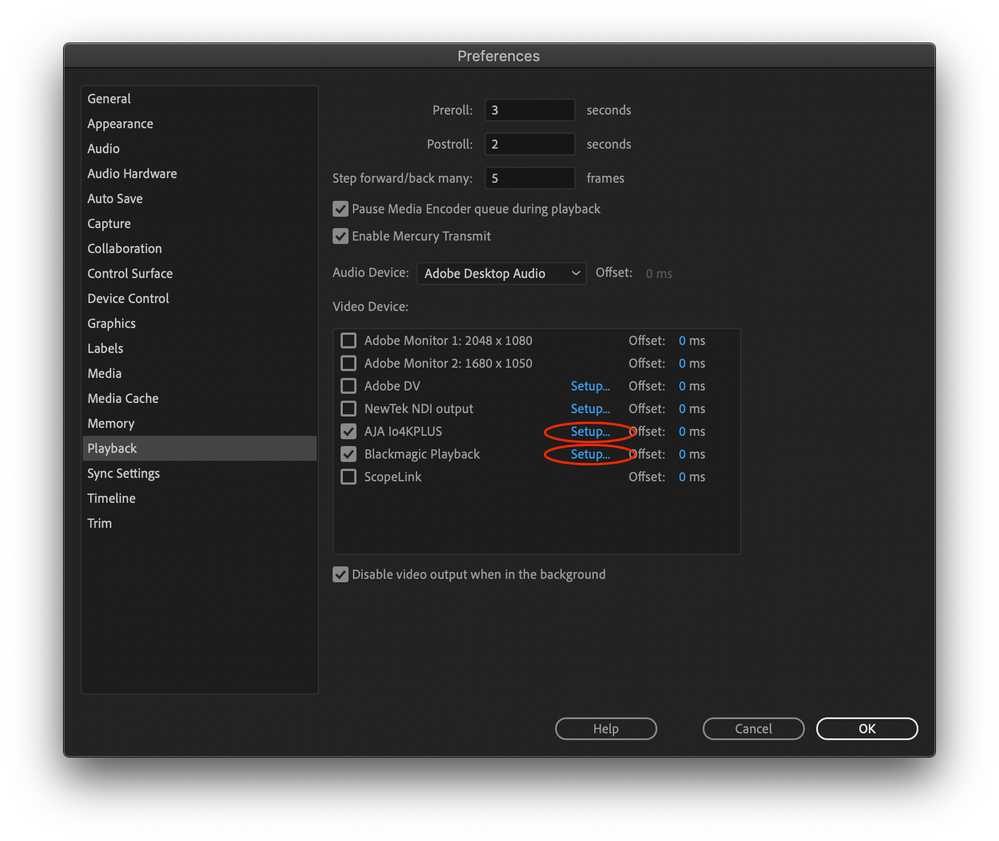
To properly monitor HDR content, an HDR reference monitor is required which needs to be hooked up through a compatible hardware HDR transmit device using SDI or HDMI such as AJA IO 4K Plus or Blackmagic Ultrastudio 4K. Please note that even if you have an HDR desktop monitor connected to your GPU, this is not supported at this time.
- AJA (io4K plus, Kona 4, Kona 5)
- Blackmagic (Ultrastudio 4k, Ultrastudio 4k Mini)
Preview rendering for HLG sequences using ProRes
If effects or adjustments are added that require rendering for smooth playback, the sequence can be rendered while maintaining HDR range and color space. When a sequence is set to the HLG color space, the video previews will automatically also be set to ProRes HQ at 1920 x 1080. You have the option to choose ProRes 4444 if you want higher quality color encoding and you may change the video preview file resolution if you wish (eg. 3840x2160), but no other codecs may be chosen for the preview file codec. Premiere Pro can export ProRes on Windows, which makes it an ideal high-quality cross-platform codec. Other codecs for preview rendering is expected to come at a later time.
Grading with Lumetri
Grading and color correction on HDR footage is possible using the Lumetri color panel today but there are a few things to be aware of. Do not use the “High Dynamic Range” mode in Lumetri. Wait! What? The HDR mode in Lumetri was designed for operating on over-range values in the Rec. 709 color space. In previous versions of Premiere Pro, HDR workflows were capable because we process everything in 32bit floating point and could hold onto the values outside of the Rec. 709 Gamut and luminance range. Internally we would end up with really large floating point values, well above 1. Now that we have a proper HLG working color space we no longer have values in the range that the HDR controls in Lumetri are expecting to operate on. We intend to re-engineer this, but for now, run Lumetri in the standard mode when working with an HLG sequence. And when judging the result of your work, you must be using an HDR reference monitor hooked up through appropriate transmit hardware. See the section above “HDR reference monitoring with transmit hardware”
*** NEW ***
The High Dynamic Range options in Lumetri have been temporarily removed.
HDR technology has evolved dramatically since these options were first introduced and the approach is no longer valid for true HDR working color spaces. To avoid confusion, we have disabled these options and are working to re-engineer them to work properly in our new HLG sequence working color space. Lumetri will work just fine on an HLG clip in an HLG sequence without the additional controls for specular highlights. Legacy projects that have used these settings will continue to function and the controls will be available, but the controls have been disabled from being enabled in new projects. We will bring these controls back in the future.
Graphics white setting for SDR <-> HDR range scaling
Graphics white describes the target luminance for a 100% white color (like white text – “graphics”) when performing SDR to HDR or HDR to SDR conversions. Mapping 100% SDR (100nits) to 100% HLG (1000 nits) would be far too bright. Conversely, mapping 100% HLG (1000 nits) to line up with 100% SDR (100nits) would yield an image that is too dark.
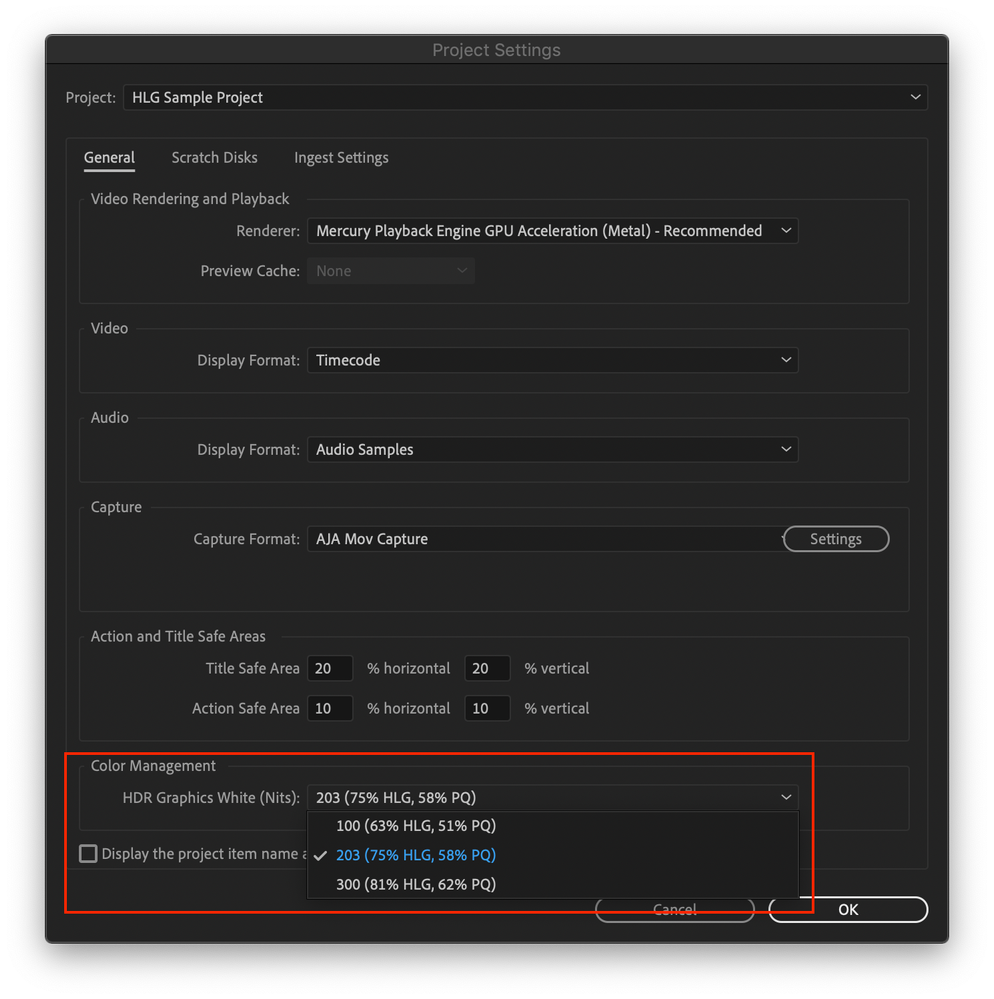
- Choose Project Settings > General > Color Management
- Choose HDR Graphics Whites setting from the 3 options [100, 203, 300]
The HDR Graphics White (nits) setting has three options: 100, 203, 300. The default currently is 100 but we plan to change this soon to 203 which is the recommended setting by the ITU. We also helpfully display the relative signal level for HLG and PQ. For example, 203 nits is equal to 75% HLG, 58%PQ.
HDR Graphics White is also the pivot point that is used by display color management to convert HDR content to your display space in order to display HDR content on your SDR desktop monitor. Viewing HLG content on an SDR monitor with the graphics white setting set to 203 will yield an acceptable looking image, although highlights will be clipped. This is, however, a really good approximation of what your HLG content would look like on a viewer’s old SDR TV if no range mapping or color space conversions are performed. This is one of the benefits of the HLG color space – it is fairly backwards compatible with SDR.
That’s all for now. We welcome your feedback and discussion on this exciting and dense topic!
Copy link to clipboard
Copied
Well now ... this is (mostly) good news! Very interesting and good to see progress being made.
Neil
Copy link to clipboard
Copied
Wow Good News
Copy link to clipboard
Copied
If I import and color grade HLG footage in an HLG timeline, am I able to then export as PQ HDR10?
Copy link to clipboard
Copied
Yes, you can.
Follow these steps to export an HLG timeline in PQ color space:
- While exporting, choose Format as Quicktime and preset as Apple ProRes 422 HQ or Apple ProRes 4444.
- In video settings, enable Render at Maximum Depth.
- Choose Rec 2100 PQ as export color space
Also, if you do not select any export color space while exporting, the encoding will be in 709 color space and not in the timeline color space (which is HLG in your case).
Copy link to clipboard
Copied
Thanks for the reply. My goal is to export in a format deliverable to YouTube 4K PQ HDR, which I believe is h.264,render at maximum depth, High10 profile, check rec 2020 color primaries, check High Dyanmic Range, check Include HDR10 Metadata.
Do those settings also result in a successful HLG to PQ HDR10 export?
Copy link to clipboard
Copied
Yes. You can export to H.264-PQ from HLG timeline just as you would do it from 709 timeline.
Copy link to clipboard
Copied
This is wonderful news, I would be very interested to know the plans for how you intend to support Windows 10 and its own native support for HDR. The default support i believe will be HDR 10 native on screen provided you have correct cable and monitor such as https://www.asus.com/Monitors/ProArt-Display-PA32UCG/
This workflow could enable potentially a wysiwyg approach to viewing colour whilst in application, but it also could lead to an enormous amount of issues if the application is not aware of the config of the hardware/os combo and them not matching. The joys of colour management is a minefield currently and this I can only see complicating matters if not addressed.
Copy link to clipboard
Copied
Thanks for the comment. We absolutely have the long term goal of being able to drive HDR monitors via the GPU directly without the need for transmit hardware. We have a few more pieces of the puzzle to sort out before tacking that problem, but we know it's a problem we have to tackle sooner rather than later. I've been looking at that ASUS monitor and think it's a great option. It meets a need where there are very few options in the market right now. It has HDR10 and HLG in a small package that can fit on your desk. Besides the super expensive reference monitors from SONY, EIZO, and Canon, you could choose a consumer TV as your HDR monitor, but it's almost impossible now to find a TV that's smaller than 60". Now, I see Neil's comment below about high-quality reference monitors, and I don't disagree with him, but there are plenty of situations where a pro-sumer level monitor like this Asus should be totally good enough. Stay tuned for more developments.
Copy link to clipboard
Copied
Thanks for the response, Francis.
Yea, the costs of working "real" HDR are totally prohibitive for most people unless you do a lot of decently paid broadcast work. That upcomong ProArt monitor (and the one it replaces) have been about the only really usable monitors that have any claim to affordablity ... with the caveat, you're talking about $5,000+ USD as 'affordable'.
Well, compared to $30,000 it's a heck of a deal!
Yea, like everyone else, I'm hoping for prices to fall on a truly usable monitor. Because even with some things to solve, the monitor is still the biggest and most expensive issue for HDR work.
Neil
Copy link to clipboard
Copied
I'm a contributing editor at MixingLight.com, a pro colorist's subscription service for training and advancement in color grading on a variety of apps. My "beat", naturally, is color in Premiere. And I'm constantly in contact with pro colorists, the most tech-savvy and driven color management people on the planet.
You're right about color management being a minefield!
Back to current situations ... Premiere still can't show HDR "internally" using the computer and GPU card outputs. Even with the above, you must have something like the AJA or BlackMagic gear mentioned in my Premiere HDR FAQ ...
FAQ: Setting up for HDR work in Premiere 2020
Note, this FAQ was the result of hours of time spent with Francis Crossman (who wrote the original post of this thread) and colorists Robbie Carman and Patrick Inhofer dealing with HDR in general and Premiere specifically. So, even with the wonderful new changes that Francis is showing, "we" users still need up to a grand or so of specialised kit not including an actual HDR monitor to be able to actually see HDR content.
This means that editing HDR in Premiere is geting possible, but grading ... still requires extra stuff. But then, grading HDR requires extra stuff in any app. Many of the pro colorists who routinely deliver HDR to Netflix and other places say you must have a monitor capable of showing at least 1,200 nits brightness. And to keep from having contrast/blooming issues, at least 800 or 1,000 dimming zones.
That Asus ProArt P32UCG will actually a minimalist monitor, as far as colorists are concerned. The general specs are adequate, it can be calibrated and accept pro LUT profiles, but overall uniformity of pixels has not been nearly as good with the Asus monitors as say a full Flanders or Eizo or high-end Sony broadcasct monitor provides. I'll be curious as to the price when it finally ships. It's a replacement for the discontinued -X model. Maybe ... I might be able to afford it.
If you want to grade for Netflix, there currently isn't any monitor under $30,000USD that is accepted. Yea, full-on HDR work is spendy.
The other thing that is a bit disappointing with the new HDR stuff being tested in Premiere, is that it's HLG and has no PQ setup yet according to Francis' comments above. For most colorists, PQ seems to be the preferred working option, and HLG is a deliverable option.
But it's a good direction and a set of major steps, and for that I'm rather pleased in all.
Neil
Copy link to clipboard
Copied
It works great with your HLG rec.2100 clips.
But I work with HDR10+ rec.2020 and thought the rec.2100 might work with it, even though it's not the same colorspace. But it doesn't
Is rec.2020 colorspace comming in the future?
And yes I am also waiting for HDR over normal HDMI to come, I would really love to use my LG OLED to color grade the final output.
Keep on working, HDR is even in Smart Phonos now and HDR on every TV.
Copy link to clipboard
Copied
HDR10 support is coming later for sure, but we're not quite there yet. HDR10 footage will definitely NOT look right when you place it into our new HLG sequence. Rec2020 refers to the color primaries used in the color space which happen to be the same for HLG and PQ (used in HDR10) but these formats are wildly different and are not compatible without substantial conversion between them. Stay tuned for a PQ working space.
Copy link to clipboard
Copied
Thomas,
You can use the LG OLED ... if you feed it from the HDMI output of the BM or AJA gear listed in Francis's comments above. I don't know of any colorists actually grading about anything that doesn't go through either an external LUT box or where the monitor has multi-LUT storage and use options internally for many-point 3D LUTs from calibration/profiling software.
Neil
Copy link to clipboard
Copied
"Do not use the “High Dynamic Range” mode in Lumetri"
Well, that's going to flood the support lines and the forums. Not using HDR settings to correct HDR material is the opposite of intuitive. 🙂
Copy link to clipboard
Copied
It is most definitely confusing and not the ultimate solution we will ship with. But that's part of the beauty of beta - we can work out the kinks while getting feedback on the pieces that ARE ready.
Copy link to clipboard
Copied
Jarle ...
Yea, ya think? If many start trying to work this process, it's gonna confuse the Hades out of them ...
Neil
Copy link to clipboard
Copied
Great news! Do you planning to put ACES in this new Color Management Workflow? It'll be great!
Copy link to clipboard
Copied
We are looking at ACES for sure. It's a very powerful workflow and the way of the future with regards to color management in a lot of respects. We don't have a timeline to share right now, but the work you see here is foundational plumbing that would be required by an ACES implementation. Are you working in ACES now? I would be interested to hear your workflow expectations.
Copy link to clipboard
Copied
Working in ACES first requires the ability to track and remember a BILLION acronyms. Sigh.
You need to set the IDT ... (input device transform) ... the RRT (reference rendering transform for managing the camera-referred transform to the display-referred transform monitoring situation) ... and at export, to choose the ODT (output device transform). And for acronyms, we're just getting started. But the app needs to have the controls to set these, and each nees to have a rather comprehensive listing.
And of course, which ACES color space (more acronyms) ... converting between said color spaces (involving further delineation of acronyms) ... and mapping various cameras in various spaces through IDT/RRT/ODT and of course handling the camera-specific things for RED gamut, Arri-Raw, all of that sort of thing.
Yea, we do need to get that in Premiere. I'm already working with this some in Resolve.
But oh my, there's more ways to mess your pixels up out 'there' ...
Neil
Copy link to clipboard
Copied
Do you anticipate the ability to conform or change the metadata flags for color space of file types other than prores or sony?
Copy link to clipboard
Copied
Yes, that is our intention. We are testing this internally, but it's not ready for external beta testing yet. Do you have a specific workflow in mind or a specific problem you are trying to solve?
Copy link to clipboard
Copied
We have added a few more bits and pieces which I have gone and added the details to the original post to make it easier to read.
- Input LUT in Interpret Footage
- Renamed "Conform" to "Override" in interpret footage
- Disabled the HDR mode in Lumetri
Copy link to clipboard
Copied
Interesting to be along for the ride, Francis. Looking forward for more controls too!
Neil
Find more inspiration, events, and resources on the new Adobe Community
Explore Now
