- Home
- Premiere Pro
- Discussions
- Re: 6 track Mono + 2 stereo (5.1 + stere) export
- Re: 6 track Mono + 2 stereo (5.1 + stere) export
Copy link to clipboard
Copied
Hi I'm new to Premiere coming from FCP7. I find the auido a little confusing but I think I'm starting to grasp it a little bit. Could anyone tell me how I proerply set up a sequence to do a 5.1 + stereo export. The feature I'm importing will have this audio layout. I'm merely chopping off bars and re-exporting. Are the settings in the attached image correct?
Also, I've run into a problem where the audio levels in the timeline appear to be -3db lower than the master file. From what I've read this is a pan affect which FCP seems to compensate for when working with multiple mono tracks. Is there a setting in premeire that can automatically make the necessary adjustment or is it just a matter of adjusting the track levels to compensate. Thank you. Any help would be appreciated.
 1 Correct answer
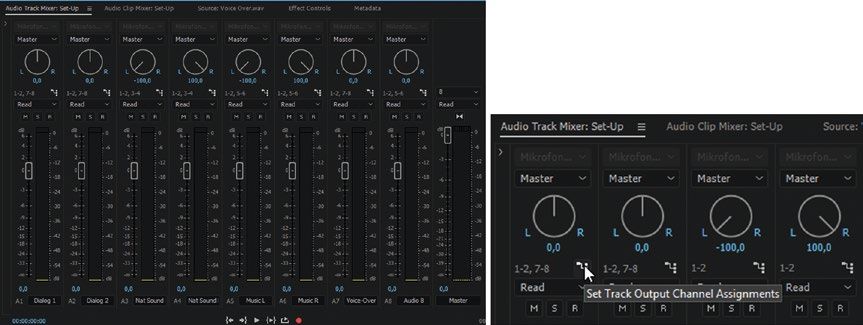
We need to see the Audio Track Mixer in the resulting sequence to be sure you've panned and routed everything correctly. In your image we only see panning, not routing (output assigment). Here's an image from the 140+ page chapter on Audio in "The Cool Stuff in Premiere Pro".
And then there's the Export Settings, where you need to specify the metadata for Audio Channel config. Another image from "The Cool Stuff in Premiere Pro".
If audio levels in the timeline appear to be -3db lower than the
...Copy link to clipboard
Copied
Copy link to clipboard
Copied
Thanks Neil.
Copy link to clipboard
Copied
We need to see the Audio Track Mixer in the resulting sequence to be sure you've panned and routed everything correctly. In your image we only see panning, not routing (output assigment). Here's an image from the 140+ page chapter on Audio in "The Cool Stuff in Premiere Pro".
And then there's the Export Settings, where you need to specify the metadata for Audio Channel config. Another image from "The Cool Stuff in Premiere Pro".
If audio levels in the timeline appear to be -3db lower than the master file, that probably means it's been panned to the middle. It should not happen when it's panned left or right.
Copy link to clipboard
Copied
Thanks, Jarle.
And it's that bit about being panned center rather than left or right that I CONSTANTLY forget about personally. And always puzzles me as I know I've done something not quite 'right'.
Which is why I call for help from The Master ... 😉
Neil
Copy link to clipboard
Copied
Thank you both for your help. I've attached a shot from my audio track mixer.
Jarle, I'll take a look at the book - thanks for the tip.
Dan
Copy link to clipboard
Copied
This looks perfectly set up for direct throughput. Your source also needs to be interpreted as Mono tracks before you put it in this sequence. Select the video clip and hit Shift+G to make sure it's interpreted as 8 mono tracks.
Copy link to clipboard
Copied
Thansk Jarle, is that Shift-G tip in the book?
If I wanted to export 6 mono + 2 stereo do I just hadnle the stereo at the Excport stage in audio setup?
Dan
Copy link to clipboard
Copied
Yep, Shift+G has been around for a long time - and of course it's in the book. And yes, the Export settings are handled at ..... EXPORT time! 🙂
Just make sure the routing is done correctly in the sequence before you export.
Copy link to clipboard
Copied
Thank you Jarle & Neil, and thank you for not commenting on my horrendous typos.
Dan
Find more inspiration, events, and resources on the new Adobe Community
Explore Now


