 Adobe Community
- Home
- Premiere Pro
- Discussions
- Exported videos are contrasty and blown out
- Exported videos are contrasty and blown out
Exported videos are contrasty and blown out
Copy link to clipboard
Copied
Hello, I am using Premiere Pro version 23.1 (build 86) on a MacBook Pro. I am producing basic videos of interviews using single clips shot with an iPhone 14. The original clips look and sound very good on the phone as well as in my preview window in Premiere.
For the past week, every video I export is coming out with way too much contrast and blown-out highlights. The original clips look fine and I am not applying any corrections. I am doing the exact same thing that I have been doing for the past year which produced great results.
The export is set for High Quality 1080p HD and the format is H.264. I have attempted to clear all settings and restore defaults, but nothing has worked. I have searched for similar problems but haven't found a fix.
Any assistance would be greatly appreciated!
Copy link to clipboard
Copied
Any assistance would be greatly appreciated!
By @Joseph283413002yb4
Solved: FAQ: How to fix saturated/over-exposed HLG/HDR cli... - Adobe Support Community - 12489252
Premiere Pro V22 - Understanding Color Spaces, HDR, and what that might mean to you - YouTube
The second link takes you to a video made by Karl Soule from Adobe and he explains everything you need to know.
Copy link to clipboard
Copied
Thank you for the reply, but I'm not sure that is my issue. The files look great on my phone, when viewed in Quicktime and in my Premiere timeline. The problem is that after it is exported the .mp4 is overly contrasty and blown out. I just want it to export like it looks off my phone and camera.
Copy link to clipboard
Copied
Actually, that problem is directly to do with the link provided.
You must set the color space for the file to match your working color space in the Interpret Footage dialog CM controls. As if the clip is as in this case, an HLG color space clip, Premiere will export that clip as HLG no matter the sequence or export settings.
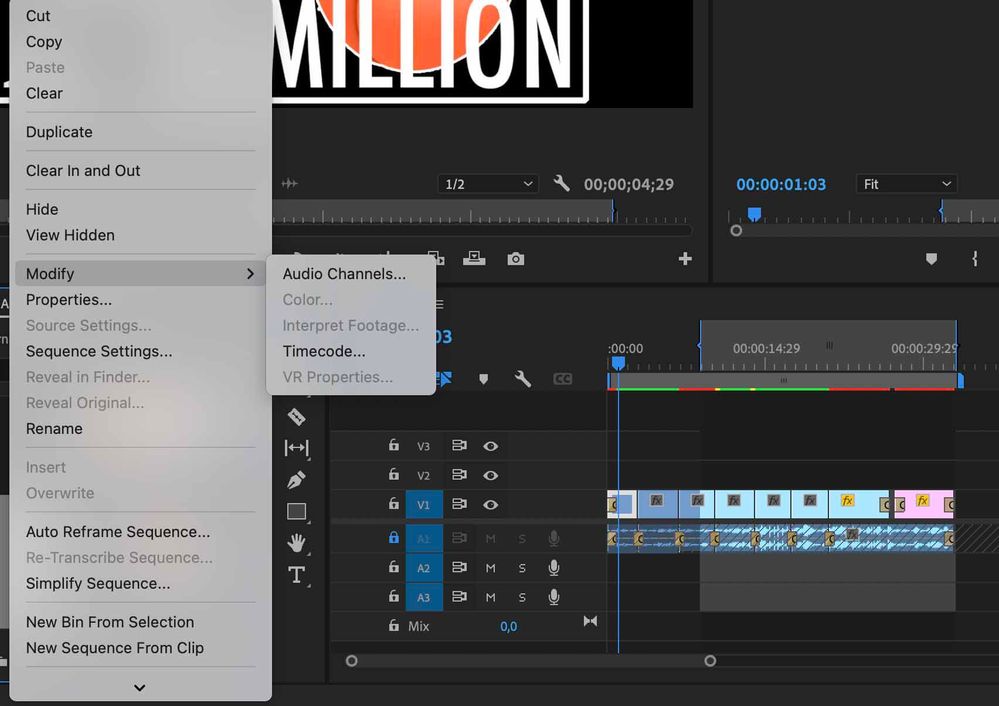
So select one or more clips in the project panel/bin, right-click ... Modify/Intepret Footage, set the Override-To option to Rec.709.
Now redo the color work on the clip in the timeline, then it should export ok.
Neil
Copy link to clipboard
Copied
Hey R Neil. I've follwoed the link exactly as it is said, but once I get to Modify, Interpret Footage is not "light up" and I can't click on it. Can you help cause so fart I can't find any other option. Thanks
Copy link to clipboard
Copied
Color Workspace, Lumetri panel, Settings tab.
That's the place where all color management settings are grouped together.
Copy link to clipboard
Copied
Hey @R Neil Haugen , just checking to make sure. The instruction you usually give is for the 'Color Workspace' but that doesn't really affect anything other than insures the Lumetri panel is available, right?
FWIW: I always read these threads as I know you'll be explaining the color process, always informative. Thanks!
Copy link to clipboard
Copied
Lumetri panel ... the SETTINGS tab. The one named Settings.
Copy link to clipboard
Copied
Got that, but the "Color Workspace" before it, is optional if you have the lumetri tab availble in whatever Premiere Workspace you are in...


