 Adobe Community
- Home
- Premiere Pro
- Discussions
- FAQ: How to fix saturated/over-exposed HLG/HDR cli...
- FAQ: How to fix saturated/over-exposed HLG/HDR cli...
Copy link to clipboard
Copied
With Premiere Pro v 22, new features around color management for H.264 and HEVC have been introduced. This FAQ will show you how to fix clips that appear overexposed or oversaturated due to these new features. Caution: iPhone shoots HDR by default.
- In case you don't want or need the HLG/HDR workflow and want to return to the standard workflow, please follow these steps to avoid oversaturated and overexposed previews.
- Right-click on your media in the Project panel.
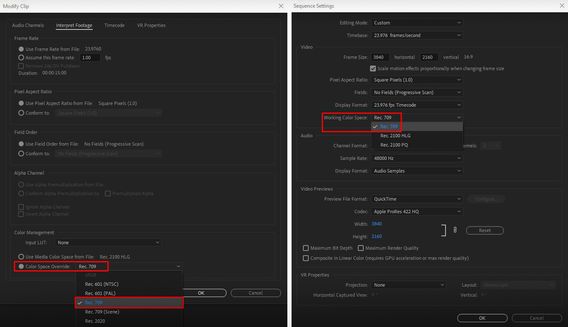
- Select Modify > Interpret Footage > Color Management.
- Set Color Space Override to Rec.709.
- Sequence > Sequence settings, set Working Color Space to Rec. 709.
- In case you do want to edit & deliver in HLG/HDR, please follow the steps mentioned below. Also, see R. Neil Haugen's in-depth article for the full pro workflow: Premiere Pro 2022 Color Management for Log/RAW Media
- Turn off HDR shooting on your iPhone by following the directions here. This allows you to return to a standard iPhone workflow.
So why do HLG files look saturated/over-exposed in Pr v 22?
In the previous version of Premiere Pro (v 15.x), HLG media was treated as Rec.709 & the sequence created from that media also used Rec.709 color space.
In Premiere Pro v22, H264 and HEVC are color managed, and the HLG media is treated as Rec.2100. So a timeline created from HLG media in v 22 will automatically be assigned HLG color space.
However, in v 22 opening a project created in the previous version (which had HLG media on Rec.709 timeline) results in HLG to Rec.709 conversion. This causes the clips to look saturated/over-exposed in the newer version of Premiere Pro.
Note: This only happens with projects (HLG media + Rec.709 timeline) created in the previous version. Newer project files will have the appropriate color space assigned and will show the correct preview.
How to solve this issue in v 22?
You may manage the color space of the entire timeline made from HLG clips.
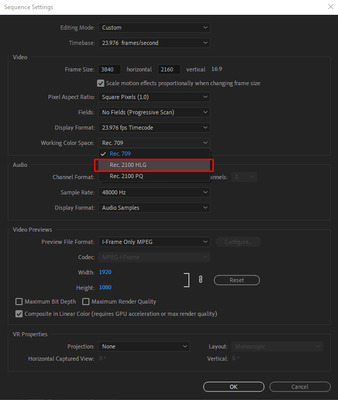
- Highlight the sequence & navigate to Sequence > Sequence settings.
- Under the Video tab, set Working Color Space to Rec.2100 HLG.
You may also color manage individual media files.
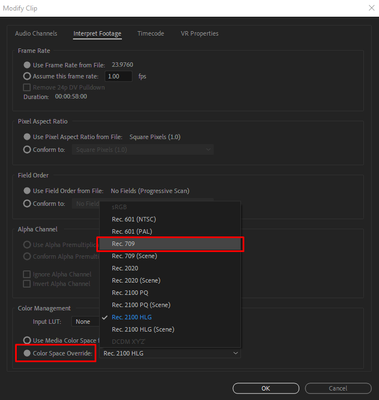
- To do so, right-click on the HLG file in project panel & navigate to Modify > Interpret Footage.
- Under Color Management, set Color Space Override to Rec.709. This will create a preview that matches the color of Premiere Pro v15.x.
How to correct saturated/over-exposed previews during H.264/HEVC export?
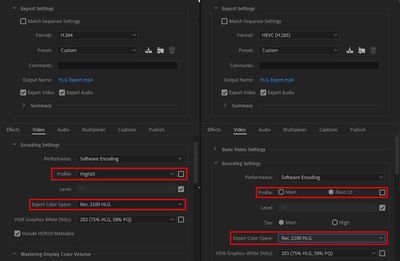
If you have edited in an HLG timeline & would like to export in HLG, please ensure that you use the following export settings.
- Select your Format as H.264/HEVC.
- Navigate to Video tab > Encoding Settings.
- Set Profile to High10 (for H.264) or Main10 (for HEVC).
- Set Export Color Space to Rec.2100 HLG.
Please note that the Match Source presets use Rec. 709 color space & might result in an incorrect preview if used to export a sequence based on Rec. 2100 HLG color space.
For the full HDR broadcasters workflow, see this page in the Premiere Pro User Guide.
Hope this helps.
- Sumeet
 2 Correct answers
Karl's video may help you understand how the HDR workflow all works.
For users recording their footage on a Sony Venice camera, using the Modify>Interpret Footage workflow will not work for those clips!
Venice uses the older unmanaged workflow, with a Source Clip Effect that has a toggle switch, and LUTs to adjust from there. You can batch-adjust these clips with an effect preset.
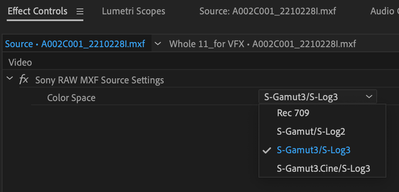
To see what I mean, load a clip in the Source monitor, and then open the Effect Controls panel. You should see something like this!
You can remove the source effect from there.
...Copy link to clipboard
Copied
FWIW I am a totally amateur user. Although I have used Premiere for more than 10 years and do not have any understanding of the finer details of colour handling, relying on software to look after that!
Over the Easter weekend I shot some stills and some video on an iPhone 12 on a family walk in the sunshine this Easter and I wanted to hack these into a 2 minute video. They were the only media imported into a project.
In the whole editing process everything looked fine apart from *some* video clips in the monitor looked 'thin' and overall the rendering looked variable, based on content.
After exporting thorugh ME, some of the clips (those that looked thin in the monitor) were completely burned out in the finished output if a high percentage of the content in the shot was sky or reflections of sky in water (i.e. overly bright) darker scenes were OK and stills were unaffected.
By experimentation, I found using a brightness and contrast effect overlay from video correction set to a 55% reduction of brightness produced a useable (albeit disappointing) output.
Unhappy with this, and after Googling I arrived here, and tried the procedure to "Set Color Space Override to Rec.709." on all media in the project, removed all the brightness and contrast effects and re-exported with the result that the finished export was perfect - or as I expected.
It appeared to me that in V22 some kind of AGC process was at work which was getting thrown off track by the average brightness value of any given frame.
Switching Colour Space fixed that. But that doesn't make sense to my simple mind because I would have thought that ALL content originated on one device should be treated equally without having to change/overide the colour handling to get satisfactory results??
It may be Apple who messed things up, but IMHO V22 users should not have to Google for ways around a problem that only appeared after an 'upgrade'.
Copy link to clipboard
Copied
Your media can easily have different color spaces ... the "SDR", Rec.709 color space of 'standard' video we've used for years is dramatically smaller in both color volume (the number and intensity range of hues) and dynamic range (brightness dark to light) than the brighter clips, which are HDR.
And they are massively different. You can't really auto-show both in the same display setup well. And that was the problem your media was having.
And why you needed to do the Override to Rec.709 to make sure all of it went through a transform to Rec.709 process. To make it all equal.
It's now necessary because the Premiere 2022 version has also had a massive upgrade in its ability to work with HDR ... high dynamic range media. And that accompanying massive increase in brightness range and color volume.
And necessarily changed default behaviors, as Premiere no longer assumes it is always working with Rec.709. The user needs to tell it what to do.
Neil
Copy link to clipboard
Copied
Thank you Neil, I appreciate the reply. That makes sense.
Clearly, the abilities of the software are getting well ahead of my own, which does not surprise me as an amateur using professional software. I do not (can not?) keep up with the rapid pace of development, leaving only the alternative . . .
But if I may make a suggestion?
A warning that the current project content media contains media with different colour spaces, and offer a solution, may alert less aware people like myself and save a lot of head scratching.
I entirely get that it is my problem, not Adobe's, but after being a CC subscriber since the begining it is time for me to give up fighting the learning curve and look for a simpler solution.
Copy link to clipboard
Copied
Totally understand. Adobe's eductational/training stuff is simply ... not that useful. It sort of is, but like their training tutorials: they're bits & pieces of how to do basic but different bits of stuff. It's not an organized, in-depth database.
I thoroughly dislike the UI for Resolve, though I work in it near every day. But their training materials are vastly deeper, broader, and more complete.
And though there is a manual you can find through Adobe's online help, and it's vastly improved from say three years ago, it's still barely past a presentation of the main features. And presentations of features are not an operating manual.
Neil
Copy link to clipboard
Copied
I, too, am just an enthusiast, and I share your frustration. It seems like Premiere is becoming more of a hurdle than anything else these days. I spend way too much time on this forum finding fixes for technical issues -- not great for getting the creative juices flowing. I'm transitioning to Mac soon and will be checking if the grass is greener on the other side perhaps.
Copy link to clipboard
Copied
The cameras are creating more complex media. Our screens are getting more complex. And color management is going to be a very necessary bit of knowledge for any user.
Are you working in SDR or HDR? They're very different, and the user needs to know what they're intending there. With any software. You'll have to set your projects or timeline to one or the other in color management settings wherever you go.
So ... yea, it's more complex. And ... yea, you need to learn a few more steps.
Neil
Copy link to clipboard
Copied
Thank you for your response. But I see six pages filled with folks complaining about this issue. Perhaps it's up to Adobe to come up with an easier solution than the one offered in its 2022 version of Premiere.
Either way: I'm bringing in HLG footage exclusively. Converted the sequence to Rec.709, which I guess answers your question regarding SDR vs. HDR. Why would I then still have to convert each clip individually through "Interpret Footage"? Secondly, if the footage looks good in the timeline with proper grading, shouldn't it be up to Premiere to ensure that the exported end result conforms to what I'm seeing, regardless of export settings?
I'll readily admit I'm not an expert. But I'm a fairly advanced videographer and have worked with Premiere for 6 years now. The whole thing seems unnecessarily confusing to me.
Copy link to clipboard
Copied
The reason it's confusing is that unlike say Resolve, Premiere has always made a ton of assumptions and decisions for you. The users of Resolve have always had a ton of color management settings.
And I'm actually considered an expert at Premiere's color system. I've spoken to pro colorists about it, I teach it to them. I just finished another NAB, spending several days here in Vegas with a number of the Adobe video people. Asking a ton of questions. Challenging them on things. And making sure I'm solid on Premiere's color system.
Up to Pr2021, Pr was totally Rec.709/SDR centric. The entire app was built around sRGB primaries, and assumed every user had a broadcast-standard monitoring setup: sRGB primaries, gamma 2.4, both the standard-original scene transform and the display transform added in Bt1886, and operating in a semi-darkened room with monitor peak whites at around 100nits.
Period.
Anything else was stuffed into this and sometimes it worked mostly, sometimes not so much. But no one needed to pay any attention to color managment, as long as they worked SDR media on a properly setup monitor. By the way, many of my posts over the years here have been correcting user misunderstandings and therefore unexpected (to them, not me ... ) results.
Why did it mostly work? Because everyone was using Rec.709 media on monitors that couldn't get overly bright or saturated for Rec.709 anyway.
That time is GONE, and that's why you're having to change.
Look at your response: you're shooting HLG ... which has both a dramatically wider dynamic range and color space/volume.
How dramatically different? HLG can allow up to 1,000 nits ... or more. Compared to the 100nits of Rec.709, that's ... dramatic.
And color "volume", the number of specific different hues, is up by a similar magnitude. There are simply color hues in all HDR forms that do not exist in Rec.709/SDR.
I work daily with professonal colorists, most of whom have yet to have someone pay them for an HDR deliverable. And some are considered leaders in HDR, as they've done the in-house DolbyVision training for Dolby.
But the numbers of HDR deliverables are coming up pretty quick. Premiere simply must change, and change dramatically, because the media and expectations you and others are throwing at it have changed. That is why the Pr2022 series came out with a completely new color system, junking the assumed Rec.709 system of before.
I've chastised the supers personally over the rollout though, and understand your surprise at the changes. Adobe is required by their massive legal department to keep most things ... very private. But when even I don't know of something as big as this coming out ... and I didn't! ... well, that's a problem.
How the heck are the users supposed to manage the transition if they don't know there IS one! And when I've stated in person that this has a completely new color-space agnostic system ... they made no objection, nor comment at all. And believe me, Francis, Patrick, Lars & the others I've talked with would have corrected me if I was wrong.
Why the secrecy on the dramatic change ... I've no clue. But the above handles why the change has finally come to Premiere.
We users can have a rolling argument with them over where the controls are put in the UI ... but all those user-settable controls must be created and implemented. Because the media now ... like your HLG ... demands it.
Neil
Copy link to clipboard
Copied
I am 'getting on a bit' and no longer able to hold my own at a professional level, but I have used comuters since the early 1970s and programming, in a semi-pro way, since 1977 and still playing. One of the best publications on human engineering was an appendix in a book called "De Re Atari" which was the bible for Atari programmers around 1980.
Appendix B is specifically about human engineeering and contains, IMO, much wisdom that today's programmers would do well to take on board. Remember this was in the 8 bit days of 40 years ago, and programs were ludicrously simple compared to today but, even then, Atari were concerned to highlight how programmers should approach user interaction with their games (My apologies for preaching):
The current crop of personal computers have attained throughputs which make them capable of sustaining programs intelligent enough to meet many of the average consumer's needs. The primary limiting factor is no longer clock speed or resident memory; the primary limiting factor is the thin pipeline connecting our now-intelligent homunculus with his human user. Each can process information rapidly and efficiently; only the narrow pipeline between them slows down the interaction. . . .
And further on . . .
Closure
Closure is the aspect of communications design that causes the greatest problems. The concept is best explained with an analogy. The user is at point A and wishes to use the program to get to point B. A poorly human-engineered program is like a tightrope stretched between points A and B. The user who knows exactly what to do and performs perfectly will succeed. More likely, he or she will slip and fall. Some programs try to help by providing a manual or internal warnings that tell the user what to do and what not to do. These are analogous to signs along the tightrope advising "BE CAREFUL" and "DON'T FALL." I have seen several programs that place signs underneath the tightrope, so that the user can at least see why he failed as he plummets. A somewhat better class of programs provide masks against illegal entries. These are equivalent to guardrails alongside the tightrope. These are much nicer, but they must be very well constructed to ensure that the user does not thwart them. Some programs have nasty messages that bark at the errant user, warning against making certain entries. These are analogous to scowling monitors in the school halls, and are useful only for making an adult feel like a child. The ideal program is like a tunnel bored through solid rock. There is but one path, the path leading to success. The user has no options but to succeed.
The essence of closure is the narrowing of options, the elimination of possibilities, the placement of rock solid walls around the user. Good design is not an accumulative process of piling lots of features onto a basic architecture; good design requires the programmer to strip away minor features, petty options, and general trivia.
This thesis clashes with the values of many programmers. Programmers crave complete freedom to exercise power over the computer. Their most common complaint against a program is that it somehow restricts their options. Thus, deliberate advocacy of closure is met with shocked incredulity. Why would anyone be so foolish as to restrict the power of this wonderful tool?
The answer lies in the difference between the consumer and the programmer. The programmer devotes his life to the computer; the consumer is a casual acquaintance at best. The programmer uses the computer so heavily that it is cost-effective to take the time to learn to use a more powerful tool. The consumer does not have the time to lavish on the machine. He wants to get to point B as quickly as possible. He does not care for the fine points that occupy a programmer's life. Bells and whistles cherished by programmers are only trivia to him. You as a programmer may not share the consumer's values, but if you want to maintain your livelihood you had better cater to them.
I have checked out Final Cut Pro to see if I would have had the same problem, and of course, I would have. The colour space issue still remains. but FCP immediately warned me what I was doing wrong and thus I was able to avoid the hours of Googling - hours because initially I did not know what the question was that I needed to ask 🙂 I Googled the warning and instantly found the solution (which thanks to the explanations from Neil, I at last understood.)
In other words although FCP offered ma an imperfect journey, someone was there to catch me as I fell. With PP, as it stands today there isnt and that's a geat pity. For professional users I absolutley understand the PP has to go the way it has - of course it does. But Adobe has always produced software that is useable by the amateur, but it seems to now be moving away from that user base (me!).
I have appreciated all the replies above and thank you all for your time in discussing this.
Copy link to clipboard
Copied
Adobe has two video editing apps ... Premiere Pro, and Premiere Elements. The latter is a mostly automated app making it easier to get in, do some things quickly (and without needing to know much if anything) and get your export out.
Premiere is of course the pro version ... very little automated, tons of options, all can interact and at times interfere with each other. It's bewildering at the start, and ... sorta stays that way even when you can work pretty solidly in it. Because there are several ways to do everything.
Neil
Copy link to clipboard
Copied
Exactly this.
Copy link to clipboard
Copied
I really appreciate your response, but again, the problems with Premiere are broader than just the HLG issue. Just one example: I've been perusing webfora for half an hour now in order to figure out why my timeline would disappear when I select the effects panel, making it impossible for me to drag effects into the timeline. The two suggested solutions aren't working, so I'm kind of stuck. It's always something with this program. In addition, it's bloated and slow, just like Lightroom.
You're obviously invested in the Adobe ecosystem and happy to defend it from its detractors. I'm just an enthusiast shelling out $600 of my hard-earned cash every year to be able to use a program I'm starting to dislike more and more. (And no, I outgrew Elements years and years ago.) I get that times and standards are changing, but I'm willing to bet that there are more folks like myself than you. Like many, I shoot HLG solely to avoid having to use 8-bit LOG. How many folks are as knowledgeable about this stuff as yourself? The really big players don't use Premiere anyway, and the bulk of its users are probably YouTubers or small independent contractors, or weekend warriors like me.
A simple compromise seems to me a single checkbox which would enable Premiere to force both timeline and export to Rec.709, thereby circumventing this entire issue. The pros can still have their fine controls if they so choose. Instead, we're all wasting time on the internet trying to figure it out.
For the rather exorbitant price we're all paying for the CC suite, we the user base may expect some more user-oriented thinking from Adobe. If they can't bring themselves to it, I will check out alternatives.
Copy link to clipboard
Copied
I was able to export my footage following your instructions without ending up in overexposed footage. So that's great, thank you. But changing the video encoding settings must have messed with the images I had on my timeline. The video footage got exported correctly, but it changed the color or the images. Is there anything I can do about that?
Copy link to clipboard
Copied
You're a life saver. Thank you!!!
Copy link to clipboard
Copied
Is anyone else working with Productions? Since the update, previously created timelines are showing up blown out and oversaturated. In my Timelines project, when I select the clips via Reveal in Project, the separate project containing the clip is opened and I can Interpret Footage to Override the Color Space so that it looks "washed out" again in that Media project. But the other project - the one where the timeline is that's using that source clip - is still over corrected. In fact, right-clicking>Properties in the clip in the Media project will show that Color Space Override is active to Rec.709. Doing the same on the clip in the Timeline project shows a Properties window where the Color Space Override is not being applied. So, it seems the Interpret Footage fix is not cascading across Productions projects, which is very frustrating to say the least.
Copy link to clipboard
Copied
Wow ... I've not seen this behavior ... might have some time later to try and invoke it though.
Neil
Copy link to clipboard
Copied
I work with productions and have footage that is experiencing the exact same issue. It's maddening seeing the clip washed out as expected in the source monitor without the ability to bring that into the sequence without some color being applied behind the scenes.
I was about to vent about all the things I had tried when I took one of the clips in question and brought it into the project that contains our main timeline. It updated the color space interpretation.
Tried it on a few other clips with some success. Might also mean bringing your multicam clips into the same project as your timeline. Thankfully it's easy to drag and drop items between projects in productions.
When the color space is right, clips can go back in their original projects and all seems well. Hope this helps.
Copy link to clipboard
Copied
For users recording their footage on a Sony Venice camera, using the Modify>Interpret Footage workflow will not work for those clips!
Venice uses the older unmanaged workflow, with a Source Clip Effect that has a toggle switch, and LUTs to adjust from there. You can batch-adjust these clips with an effect preset.
To see what I mean, load a clip in the Source monitor, and then open the Effect Controls panel. You should see something like this!
You can remove the source effect from there. Hope this is helpful!
Copy link to clipboard
Copied
Hey there,
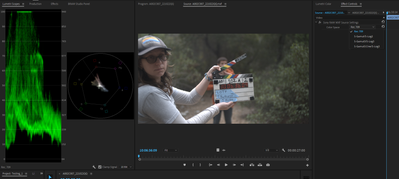
For a while I've been searching for a fix with footage shot on Sony Venice as the 'Interpret Footage' solution everyone else mentions is greyed out. I saw your answer and was so excited but alas it also hasn't worked for me. Any other thoughts? It happened half way through my project, which is frustrating and I don't want to give VFX a prores file with Rec 709 baked in. I can't switch to older versions of PP my project won't open. Clicking any of the below options doesn't change the image:
Copy link to clipboard
Copied
Thanks for your reply.
Here is a clip you can test out:
https://www.dropbox.com/sh/purh2eohxnocnp9/AAAqiGKEu-CjNVgiz8ZEJDe2a?dl=0
I opened up a clip in PP version 22.0 and I was able to change the source
settings so S/log 3 and it worked, so I suspect it's something to do with
the latest version for me (23.2.0)
Look forward to hearing your thoughts.
tim@heypresto.t *v*
www.heypresto.tv
Copy link to clipboard
Copied
Thanks. Can't shake loose some time until later today. But I'll give it a look.
Neil
Copy link to clipboard
Copied
So the options I had in the ECP/Source tab were like yours ...
And yes, the top option takes the built-in normalization to Rec.709. And that line at the top could not be removed via any Lumetri control, so the Rec.709 option clearly clips highligt data ... not good nor usable!
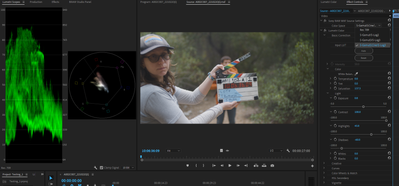
But the three other options were clearly displaying log images, and were a bit different from each other. I took the S-gamut3.cine one, and did a manual normalization through Lumetri's Basic tab. Lifted Exposure a titch to more center image data on the scale, then popped Contrast to the max, then dropped Shadow, raised Higlights & Sat to get this ...
I think I'd be comfortable with the manual normalization, even for VFX work, as long a Max Depth is set on any export, AND the "bpc" option is set to 16bpc.
Copy link to clipboard
Copied
Any thoughts on what I should do in PPv 23.2.0 where it allows me to click
the S/log options in Source Select but there's no change to the image? All
three options (visually) look the same as Rec709 when I click them, which
is what has me stumped. I can't seem to get it back the way it was
(S-Gamut3/S-Log3) when I setup the project.
Starting a new project in PP 23.2.0 now does the same. The files only
cooperate in an older version of Premiere (22) but it seems extreme to
recreate my project there.
tim@heypresto.t *v*
www.heypresto.tv
Copy link to clipboard
Copied
That's strange, as on mine all the options were different. The vajed in Rec.709 which clearly clipped, and 3 slightly different log views that didn't.
Wondering if making sure the Preferences option to auto-detect log and sequence auto-tonemap options are off would help?
Neil
Copy link to clipboard
Copied
if that would change anything but same situation.
I'm new to the support community, do you know of a phone number or any
service that offers tech support with Adobe?
Thanks for your help so far, Neil.
