 Adobe Community
- Home
- Premiere Pro
- Discussions
- Re: Help with correcting S-Log footage with LUTS?
- Re: Help with correcting S-Log footage with LUTS?
Help with correcting S-Log footage with LUTS?

Copy link to clipboard
Copied
Hi all, I'm editing some news documentary footage in Premiere that a videographer shot for me in S-log-v2 on a Sony A7sii (he also said picture profile 7 and color mode: S-gamma3.cine). We usually prioritize speed in editing, so I'm not accustomed to the LOG workflow (and frankly never figured it out). The footage has that classic flat LOG look which is to be expected. But when I apply various LUTs to get a baseline correction (I've tried several and it's always the same result), the footage look awful. I've tried the s-log2 to rec7 lut from Sony as well as slew of others. They mostly have the same effect. Orange/red cast, too much contrast, just gross. Am I missing something here? I'll also add I'm on an M1 Max MacBook Pro, running Premiere version 22.1.2. I've tried applying the LUT different ways in Premiere but it always yields the same result.
To complicate things, I also read that Premiere can now read S-LOG out of the clip's metadata and auto-convert it to REC-709, but this does not seem to be happening either (I'll note that when I check the properties of the clips in Premiere, they say they're rec-709 and not s-log, which seemed odd to me).
Overall, I'm very confused and not a competent colorist (I'm also moderately but definitely red/green colorblind which doesn't help), and the deadline for this is approaching. I could really use some input from those who are familiar with LOG workflows. I can provide any other info you need as well. Thank you!
Oh here are some exported stills (I also attached them): https://imgur.com/a/Q12F5vI


 7
Replies
7
7
Replies
7

Copy link to clipboard
Copied
I'm not sure if this could be part of the solution, but please read Neil's recent post on this topic:
Copy link to clipboard
Copied
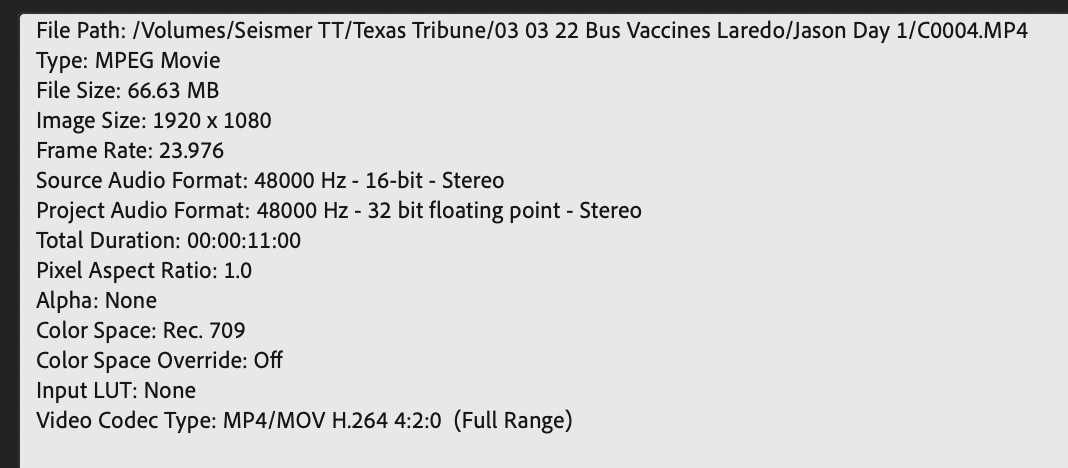
The source clip is a 4:2:0 MP4 file ... not a lot of information to play with.
Why hasn't the camera guy opted for sth like ProRes 4:2:2?

Copy link to clipboard
Copied
I responded on Reddit (as I see you made that post there too) - but I figured I'd respond here instead since I was able to see your images here. My original post is below:
I think it's worth mentioning that video work in Premiere Pro can be done in 1 of 3 color spaces: Rec 709, Rec 2100 HLG, and Rec 2100 PQ (per your sequence setting). However, it is up to you if you want Premiere to manage your display to conform to that. If you have Display Color Management disabled in settings, then you might not be looking at your footage "through the lens" of Rec 709 at all. Macs for example often times have a default color space of Display P3, which has a wider gamut than 709.
Now that I've mentioned that, let's assume you are working in a Rec 709 sequence and have Premiere set to manage your display. Yes, newer versions of Premiere can read embedded color spaces of more files now (including H.264 video files), which it can use to calculate color conversions. That said - it all comes down to what color space was actually embedded in the file.
For example, cameras may shoot in Log or something else, but still write a "Rec 709" file. You can check all of this by right clicking files and going to Modify > Interpret Footage. At the bottom you'll see a section for Color Management, which shows you what profile is embedded, and lets you override with other color spaces too, if you want.
Log color spaces may be in there too now as you say - but to be honest those log spaces might only be in Beta builds of Premiere only still. (because I don't see the log options in my 22.2.0 build.) Adobe has a beta forum post on that here, if you want more information. In short though, this is an alternative workflow to using technical LUTs (such as SLog -> 709 LUTs).
It all comes down to what you want your approach to be though. Jow you go about it: Using LUTs, using the Color Space Interpretation, or just taking the Log footage as-is (assuming it as Rec 709) and manually grading is completely up to you. I'm no pro colorist myself, but everyone has their own approach.
Personally, I leave log footage assumed as Rec709 (which means it will look low contrast and desaturated), and then manually make adjustments from there, but that's also because I know I have the time to do that. Everyone's work environment and needs are different.
My Premiere has color managed enabled, so I know what I see is a close approximation to what other 709 playback environments will be, and I use Lumetri Scopes to make sure my levels are what they should be. I do a Primary Lumetri Color pass, to get the log footage closer to a more 'normal' image via the tools Lumetri provides (typically increasing saturation and contrast... that could be done with a technical LUT, but I just choose not to), and then a Secondary Lumetri Color pass to apply any creative or fine-tune looks (Creative LUTs, vignettes, etc.)
So in recap: check your color management and environment, and if LUTs aren't working for you for whatever reason (perhaps it's the wrong LUT, or just too aggressive, etc.) then don't be afraid to start with the flat image and use all of the tools Lumetri makes available to bring the image to something more acceptable. Lumetri Scopes can help you in ensure luminance values are what you'd expect them to be, ensure skin tones are accurate, etc.
Hope any of that rambling helps. If you need help with Lumetri Color's tools, I'd suggest searching some tutorials or guides on Lumetri Color.
New, going off of your screenshot:
What you've shown seems pretty typical for a Log to 709 LUT. Increased contrast and saturation, overall. Just keep in mind though that a LUT is usually never a "one click solution". You still may need to make adjustments on a per scene basis, and if you feel - through your scopes and eye - that something isn't right, don't be afraid to make those adjustments. LUTs are if anything, a starting point - not the final solution.
Copy link to clipboard
Copied
Really helpful, thanks so much. I'm going to take a look at all this and see what I can do.

Copy link to clipboard
Copied
ah.photo has an excellent post in answer, splendidly organized and phrased!
There's one more issue that might be an issue here, the photog shot this in 'full' encoding ... so you might try applying one of the Lumetri presets of Full->Legal as the first correction step. This may fix the over-dark bit immediately. The transform they've got now for S-log3.cine is actually very fine in the crafting.

Full vs Legal range is an encoding issue, and some people think by going 'legal' you have fewer values to your file. Not so, and for nearly all "YUV" (technically Y*Cb/Cr) legal is the expected encoding process, and full is expected for full RGB formats, typically 12-bit ones. The displays then simply properly display the data to 0-255 for all types.
After applying the above preset, then do all your corrections in another added instance of Lumetri "under" this one in the ECP, or listed in the drop-down list in the Lumetri panel where we can go between instances of Lumetri.

Neil
Copy link to clipboard
Copied
This is interesting, I'm going to try it, thank you!
Copy link to clipboard
Copied
Will be interested to hear how it works ... if it does.
Neil

 AdChoices