 Adobe Community
- Home
- Premiere Pro
- Discussions
- Re: How do I recreate a border like this?
- Re: How do I recreate a border like this?
How do I recreate a border like this?
Copy link to clipboard
Copied
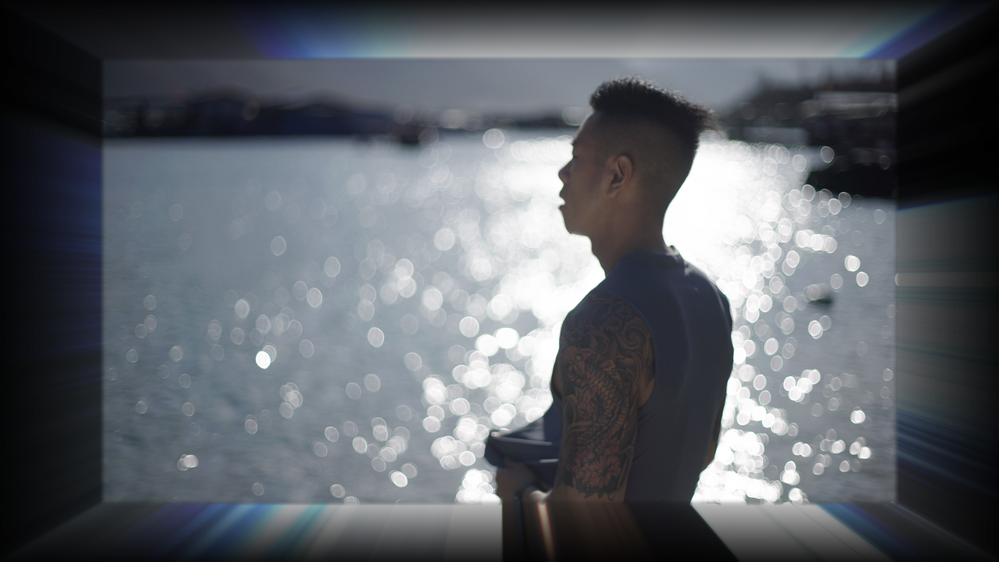
I have tried googling tutorials for anythig similar and I can't seem to find anything. Does anyone know how to recreat a border like one in the image attached? It appears to use the image and smear it outwards to create a border. Is this possible in Premiere Pro or would I need some different software?
Copy link to clipboard
Copied
Hi Thomas,
Thanks for the message. That is a good question as we see this effect a lot these days. If I am not incorrect, it is sometimes referred to as the "god rays" effect.
I don't believe you can create this effect directly in Premiere Pro without a third-party plug-in that contains a radial blur feature. You have that effect in After Effects. You can also download "god rays" overlays from third-party content providers. Look around, there might be some free ones. Report back after trying these things to let the community know any findings you may have. Much appreciated!
Thanks,
Kevin
Copy link to clipboard
Copied
I just tried doing this in PPro and the simple answer is: no, this cannot be done here.
In After Effects, however, you can use this free Godrays Plugin: https://news.productioncrate.com/download-free-godrays-plugin-for-after-effects/
Here's a tutorial on how to use it: https://www.youtube.com/watch?v=YQPPykQmRak
Hope this helps.
Copy link to clipboard
Copied
Yes, with the plugin Crate's Godrays, I was able to achieve this...
You do need to follow the steps inside the video, which means that you have make the image you want part of a preComp first, before masking out the desired effect on the area that matches the size of the original image. If you apply the effect directly on top of the image, the effect only works inside the image (it does not know where else to ray to).
Copy link to clipboard
Copied
Thanks so much! Do you know if it's possible to do this with a video and not a still image with this plugin?
Copy link to clipboard
Copied
Right-click the video clip in your Premiere Pro Timeline and choose Replace with After Effects Composition. If After Effects is already open, the source clip and a corresponding Composition will be added. If After Effects is not already open, it will launch and the source clip and a corresponding Composition will be added.
In the After Effects Composition, select the Layer, press S to show Scale and then change the Scale from 100, 100 to 80, 80.
With the Layer selected, choose Layer > Mask > New Mask.
Deselect then reselect the Layer and choose Edit > Duplicate to create a second Layer. (Be sure to deselect and reselect, otherwise you will have a duplicate Mask instead of a duplicate Layer).
While the duplicate Layer (Layer 1) is selected, press M twice (tap, then tap again) to reveal the Mask properties and then change Add to Subtract, change the Mask Feather from 0, 0 to 20, 20 and change the Mask Expansion from 0 to -100.
Choose View > Resolution > Quarter to lower the Composition Resolution for the next part, applying CC Light Burst 2.5.
With Layer 1 still selected, choose Effect > Generate CC Light Burst 2.5. Change the Itensity from 100 to 300.
With Layer 1 still selected, choose Effect > Stylize > Glow.
Select Layer 2 (the original Layer) and press M twice to reveal the Mask properties and then change the Mask Feather from 0, 0 to 50, 50 and the Mask Expansion from 0 to -25.
Choose File > Save and return back to Premiere Pro.
Important notes:
- CC Light Burst 2.5 slow to render on most computers.
- On the Premiere Pro side, render the Composition via one of the Sequence > Render options upon returning to Premiere Pro. Assuming your computer plays video at the current Sequence Video Preview settings, the clip chould play smoothly once rendered.
- If Dynamic Link does not handle the After Effects Composition as source in the Premiere Pro Timeline as expected, render the Composition using the After Effects Render Queue in After Effects with the "Best Settings" Render Settings Template and the "High Quality" Output Module Template and then import that into your Premiere Pro project.


