

- Home
- Premiere Pro
- Discussions
- Re: How to Crop a Video in Premier Pro CC 2015
- Re: How to Crop a Video in Premier Pro CC 2015

Copy link to clipboard
Copied
OKAY, so I finally get the hang of rotating, only issue is when I rotate the file takes form of the previous mold. In other words, if the video was sideways and I flip it horizontally, there is a black casting of the previous sideways direction. Is there anyway to "crop" the black out?


 1 Correct answer

That's the info I needed. As I suspected, that's the problem. Under the video section is says "1080x1920" - that's the frame size of your video clip, measured in pixels. The frame size is always measured horizontally and then vertically. In other words, this shows that your footage is taller than it is wide - 1080 pixels wide, 1920 pixels tall. The good news: 1080 and 1920 are standard sizes; the bad news: they're backwards.
The solution: Create a sequence that we know is correct, and then add th
... 5
Replies
5
5
Replies
5
Copy link to clipboard
Copied
I think I know where your problem is, but I need you to take a screenshot of something to confirm:
- In the project panel, please select that clip (IMG_5314)
- Then, choose Window>Info
- Take a screenshot of that panel and post
My suspicion is that Premiere is interpreting the video as vertical - in that case, we need to adjust how Premiere is interpreting the video instead of rotating the clip. On the upside, you'll now know how to re-interpret footage AND rotate your clips! 
Copy link to clipboard
Copied
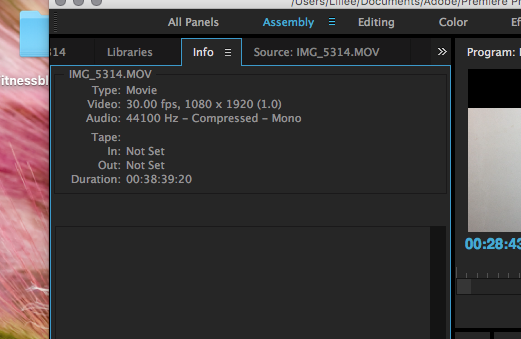
Hmmm, this is what comes up when I go to Window>Info
Copy link to clipboard
Copied
That's the info I needed. As I suspected, that's the problem. Under the video section is says "1080x1920" - that's the frame size of your video clip, measured in pixels. The frame size is always measured horizontally and then vertically. In other words, this shows that your footage is taller than it is wide - 1080 pixels wide, 1920 pixels tall. The good news: 1080 and 1920 are standard sizes; the bad news: they're backwards.
The solution: Create a sequence that we know is correct, and then add the footage into that sequence (no reinterpretation necessary) and rotate. What happens when you simply drag a clip from the project panel to the timeline is that Premiere creates a new sequence for you that is tailor made to that clip. That's awesome when everything is to spec. However, in this case it works against you because the video isn't to spec. So, we need to use what you did before but tweak it.
1. Click in your Timeline to make it the active panel
2. Choose "Sequence>Sequence Settings..."
In the new dialogue box, you'll see something akin to this:

The editing mode and timebase will likely be different, but look at the area that I've outlined in red.
3. Change the Frame Size to 1920 horizontal, and 1080 vertical.
4. Click "Ok"
You'll probably notice that the video now looks wrong again, even though the black bars are now on the left and the right. Just a few more things should solve the problem.
5. Select the clip in the Timeline
6. Choose "Window>Effect Controls" (unless that panel is already open, in which case just start using it)
7. Change your rotation value until the video is correct - usually this is either 0, 90, 180, or 270.
Hopefully this helps. If not, please let me know.
Copy link to clipboard
Copied
OK I took screenshots OF EVERYTHING I had done because though it worked I'm confused on the meaning! For example, what does it mean to "delete all previews"..it claims the operation couldn't be done yet it occurred, how odd. Thank you for allllll the help ❤️


Copy link to clipboard
Copied
Sorry - forgot to include that little bit.
The "Cannot be Undone" part means that you can't press Cmd-Z to undo an operation like you can with a simple copy/paste.
Preview files are something that you won't worry about until you're a more advanced user. Simply put, they're a way of making the program work more smoothly if you add several complex effects that cause your previews to start stuttering. The dialogue box is just a warning that, if you had created preview files, changing the sequence settings would delete them and you'd have to recreate them. Since you hadn't done created any, clicking "OK" did nothing to your work.
I'm glad it worked out. If you need any more help, just post a new question on the forum or send me a message directly.

Find more inspiration, events, and resources on the new Adobe Community
Explore Now
 AdChoices