 Adobe Community
- Home
- Premiere Pro
- Discussions
- Re: Proxies are not toggling off/on after creating
- Re: Proxies are not toggling off/on after creating
Proxies are not toggling off/on after creating
Copy link to clipboard
Copied
I have been trying to research this issue but I haven't found the answer. I have worked with proxies before and it's usually very simple. I am now working with 2020 premiere pro and .MXF files (filmed on a C300 Mark II).
I have created a proxy, it shows "attatched". But when I go to toggle it, nothing happens. The footage looks exactly the same and when I go to play it, it is choppy. I
have tried creating proxies under multiple formats, I can not do h.264 because of the audio channels. So I have done "Quicktime" / ProRes low resolution, Cineform low resolution, and DNxHR VR monoscopic proxy and it does not make a difference. Each time, when I go to toggle it on/off nothing changes.
Copy link to clipboard
Copied
You'd have to provide your workflow in more detail so we can help you out on that. H.264 should not even be an option in creating proxies, they are exactly the wrong choice. I typically use cineform but also like ProRes Proxy.
Is it just by the 'choppy' playback making you think they are not 'attached'? What differences are you trying to see, the less the better, right? In fact, I usually shoot UHD 3840x216 and create 720p cineform proxies, and because I could not readily see the difference I started creating the proxies with a small timecode window, so I'd know right off I was using them.
Copy link to clipboard
Copied
Thank you for replying! So in the past when i've done this and I go to toggle on the proxy there is usually a vast difference to the resolution of the original file. It will be so different that it would put black bars at the top and bottom which would let me know that the proxy was in fact there and working. What happens now, is the resolution doesn't seem to change at all, but I do see that when I maginify the view to 400% and toggle the proxy there does seem to be a considerable difference to the qualiity of the footage so maybe it is working but something still seems off?
When I go to "properties" on an individual clip where it says a proxy is attatched, it tells me that the proxies are supposed to have an image size of 1024 x 540 which is substantially less then the resolution of my original file which is 4096 x 2160. So why isn't that being reflected in the view?
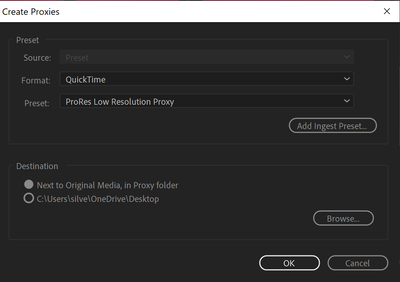
The way I created the proxies is, right click on the clip -> proxy -> create proxy and then I select "quicktime" and ProRes Low resolution. Then it opens media encoder and creates the proxy. I decided to keep it next ot the original media inside of a folder. I hope that helps!
Copy link to clipboard
Copied
Yes, it looks like the proxies are a red-herring to 'choppy' playback.
It looks like your proxies are attached. Your proxies were wrong previously, created at a wrong aspect ratio and and thus the bars. It's amazing you would edit with that. You should have asked then what's the deal! 🙂
My footage: 3840x2160, divided by 3=1280x720
Your footage: 4096 x 2160 divided by 4=1024x540
These are some correct settings for the aspect ratio in question.
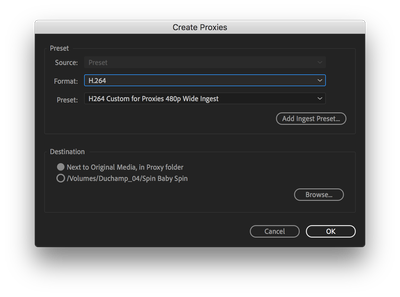
Maybe try a preset and add the timecode window on the proxie, then you can toggle on/off and it shows right away.
Here's my Encoding with timecode preset:
Copy link to clipboard
Copied
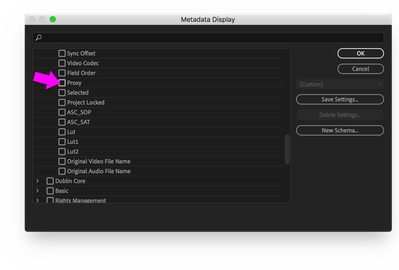
what a great idea to add a timecode window to show when you're viewing a proxy. I've had enough issues with proxies that I have a metadata preset for only showing whether proxies are attached or not, so I can quickly check in the bin... that said, when done properly, the premiere proxy workflow is solid. and I've learned if I'm working with a new format, to test my workflow from soup to nuts...
Copy link to clipboard
Copied
haha well that's interesting to know I was doing it wrong before, that makes sense. I actually just looked up
Is my method of creating proxies the best way or is there a better way? I just looked up how to do it years ago on youtube and that's how I have been doing it since. Currently I do the right click on the clip -> proxy -> create proxy method. In ealier versions of premiere I feel like there were more options to choose from via drop down menus after you clicked "create proxy", now all I see is the following:
Which doesn't give me room to select a specific resolution at all like 1024x540 for example. Did you bring up the export settings box in your photo instead? I'm curious to know if there's a way to make proxies that allows me more selections? Not sure if that's even necessary just curious.
Copy link to clipboard
Copied
yeah, it's not the most intuitive workflow, but if I remember correctly, you've got to create an... do I really have to do this... you need to create an encoding preset in AME then use it as a reference for an ingest preset... or is it the other way around, then export it, then in the create proxy dialog within premiere, load the encoding preset ... or is it the ingest preset... not simple, not intuitive, but I know I've made it work... but as I say over and over again, test your workflow before digging yourself a very deep hole. If necessary I'll work this all out and post back... let me know if it's necessary... Don't get me started if you've got camera original that's got is it 8 audio tracks that's impossible to set up the proxy workflow for... It's a mess, but once you've got it set up, it works (except for the 8 audio track format...I think it's sony those .... in that case, I've learned to just transcode to prores, or whatever with 2 audio tracks....
so if somebody has a simple way of describing the correct workflow, pleasse do so. Happy to work it out and put it down in black and white if no one else is willing to do so... I've done it before... and it's definitely worth it. just seems like you should be able to click on a file and create a proxy preset based on pixel dimensions, frame rate, etc. with a lower res codec... and maybe there is a way and I'm just too stupid or too tired...
Copy link to clipboard
Copied
Sometimes it is difficult to tell the difference without zooming in and toggling. Like others here I also use metadata to check which of my clips have proxies attached, or you can tell in the properties. The black bars you had before were due to the aspect ratio being incorrect between the source and the proxy. Again, just echoing others.
Copy link to clipboard
Copied
@phillipJoseph okay that's great! If that's the case then my poxies are attatched and correct! I do see that they are marked as attatched in the metadata and also in properties. And I do see a difference when zoomed all the way in and I toggle between. I was just doing it wrong before haha good to know.
Copy link to clipboard
Copied
Honestly, probably 95% of the time I make proxies exactly the way you described, ViaLiv. In recent versions of Premiere they did dumb down the presets menu a bit, which I don't personally love, but it probably makes it less intimidating to newcomers.
As mrgrenadier described you can create your own ingest / encoding presets with AME, and that's good if you want to watermark the footage or add timecode, or you're dealing with an abnormal aspect ratio, audio tracks, etc. It can take some testing to get it right. It can be a bit finnicky. That's why for most projects I'm perfectly content with the ease of the Quicktime ProRes Proxy preset. Most of the settings are all match source, which is what you want. It is good to be familiar with setting up your own presets with AME in case you encounter the need, but I think for most people it's a bit of an overcomplication.
Copy link to clipboard
Copied
Thanks everyone for all of your help! I'll look into creating my own presets with AME just for the sake of knowing how to do it.
Copy link to clipboard
Copied
H264 is a proxy choice, but QuickTime is better in just about every respect when it comes to video editing.
Copy link to clipboard
Copied
actually quicktime is not necessarily any better. You can have a quicktime file with the h264 codec. you want to choose a codec that's not an mpeg format like prores lt or proxy...
Copy link to clipboard
Copied
QuickTime allows for taking advantage of Smart Rendering while H264 does not. Of course, this requires picking a CODEC that Premiere Pro support for Smart Rendering. The best advice I have: always go with ProRes.
Copy link to clipboard
Copied
between prores proxy and h264 proxies.
Copy link to clipboard
Copied
If you happen to have a project that was H264 from start to finish, transcode all the source to ProRes and then do it again. For Smart Rendering, it's important to be sure your source is ProRes, your Sequence Video Previews are ProRes and your Export format is ProRes. Other CODECs are supported for Smart Rendering. Just about any Mac from 2004 onward can handle 1080i ProRes and 1080p ProRes with ease.
At it's simplest, ProRes is a mezzanine CODEC from high-end to low-end while H264 is on the high-end (AVD-Intra, for example), but form the mid-range (Hi422P, Hi10P) to low-end (High Profile, Main Profile) it is not.
Copy link to clipboard
Copied
I think this was mentioned earlier, but here's a screen shot. Enabling Proxy Status in the Metadata Display of the Project tab can be very helpful.
Copy link to clipboard
Copied
If anyone is reading this in 2022, here is the answer to this question:
First, yes you can create an h.264 proxy, normally, it depends on how you shot your footage.
If you filmed say on a Sony FX6 you will need to created a QT proxy.
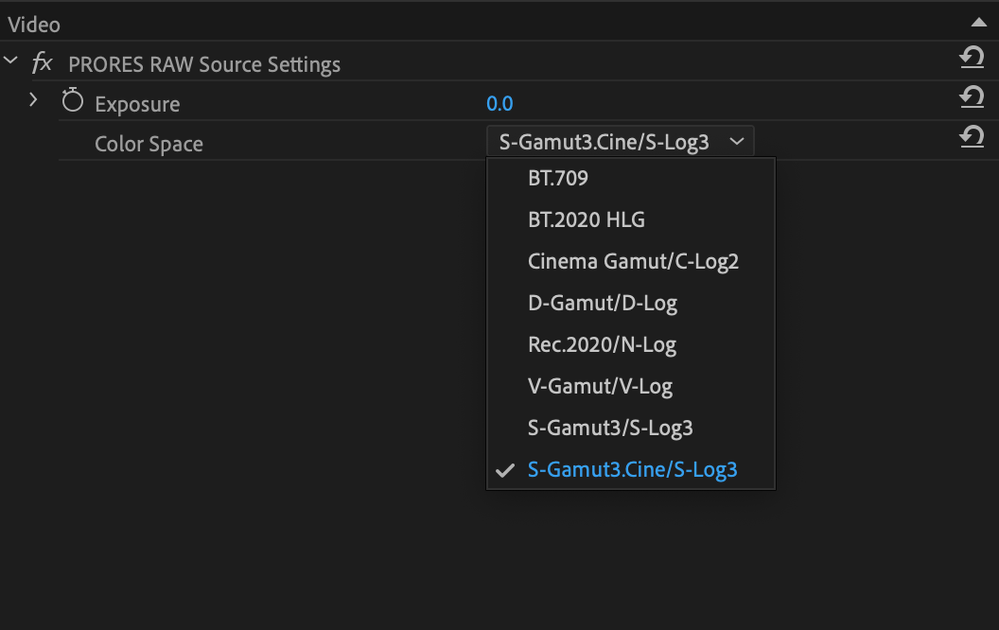
The reason you are unable to toggle between your RAW footage and the Proxy is you need to change the Color Space. Double click on the file and bring it into your Editor Window, click on the Effect Controls tab, you will see "ProRes RAW Source Settings." Likly it will be set on BT.709, you will need to change that to the color space that you shot the footage on. In my example of using the Sony FX6 I need to change it to S-Gamut3.Cine/S-Log3
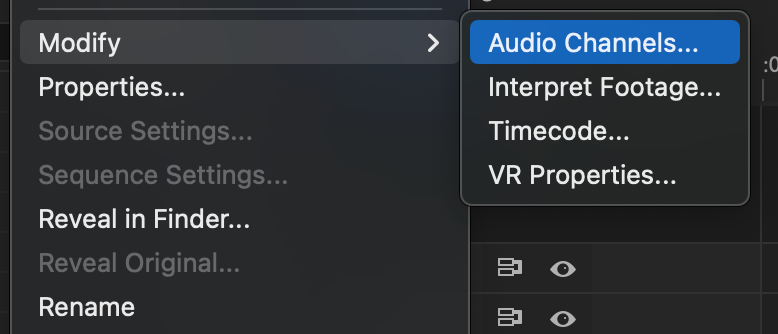
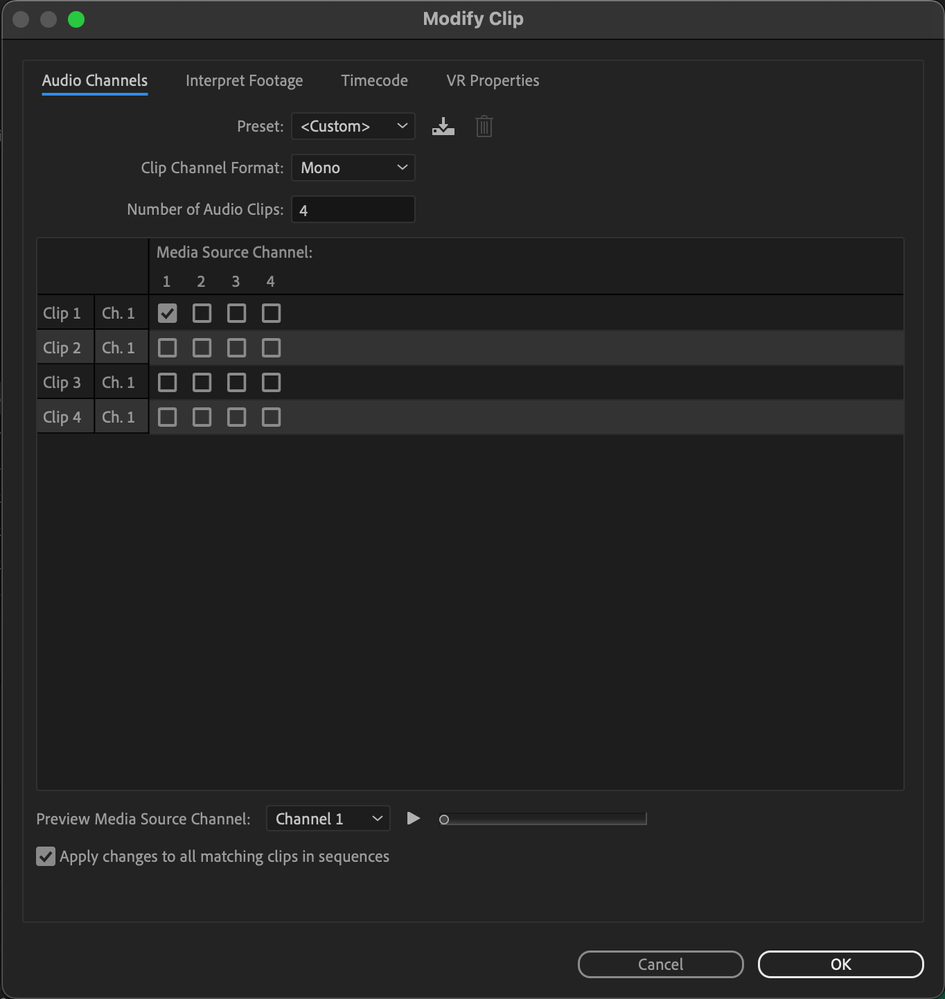
One other thing to know. Often you will have empty or "dead" audio channels, because there are 4 audio channels possiable for a camera like this. If you only recorded on 1 or 2. Right click on the file in your project window go to Modify, Audio channels
Then de-select the channels that have no audio on it. This will save you a lot of work later when inserting them onto the timeline.


