 Adobe Community

Copy link to clipboard
Copied
Hello Everyone.
First of all, Thank you very much for all your help in the past. I appreciated very much
I was watching this Tutorial on Exporting for the Best Quality for 1920x1080 Video.
Best Export and Render Settings for Adobe Premiere Pro CC 2017 - YouTube
The Instructor explaining for Exporting 1920x1080, It Is best to have the following Setup In your Export Settings- Video, as follow:
H.264 custom
Profile: High
Level: 5.1
Bitrate Encoding: VBR, 2 pass
Target Bitrate: 14
Maximum Bitrate: 16
Check the Box, Render at Maximum Depth
------------------------------------------------------------
Ok, I have a Footage that was shot with 4k Sony Camera 3840x2160, File Format: XAVC QFHD, and I want to export It as Highest possible quaily.
Which Format, Bitrates, Profile you recommend.
Thank you very much.


 1 Correct answer

No problem! Here are the answers to your questions! 
For Archiving Purpose:
Archive the Original Premiere pro Project files, and all the Camera footages As Is.
Correct?
Absolutely. Since it is your original footage, it is the perfect archive format! You can always convert it (or not) later for any purpose.
For Conversion Purpose:
1080p,720p, use: Video Codec: 1080p DNxHD,
4K, use: Video Codec: DNxHR
Correct?
Correct, if you wanted to convert your footage usually for the purposes of a smoother editing exp
... 16
Replies
16
16
Replies
16
Copy link to clipboard
Copied
If you want the "Highest possible quality" you should not be using H.264. For the record, H.264 is a high compress format even at its highest. But the truth is XAVC is quite compressed as well and the guts of XAVC has a lot in common with H.264. If a HIGH-QUALITY format/codec for working in Premiere, I would suggest Mezzanine/Intermediate codec:
- QUICKTIME (CINEFORM YUV 10-BIT) at QUALITY 4 (of course if you bit depth is higher consider CINEFORM 12-BIT)
- QUICKTIME (PRORES 422/HQ or 444)
- QUICKTIME (DNxHD for 720p/1080p or DNxHR for 4K+)
These codecs will most likely be higher bitrate than your footage, so while it won't improve your actual footage, it will allow more flexibility when working with your footage. All these codecs beat the bitrate you have listed with the H.264. If you are looking a super high quality codec for web/social media:
- H.264 @ 30-45+ megabits/second to high encode for web.
Here is what Youtube lists for 4K video:
| Type | Video Bitrate, Standard Frame Rate (24, 25, 30) | Video Bitrate, High Frame Rate (48, 50, 60) |
|---|---|---|
| 2160p (4k) | 35-45 Mbps | 53-68 Mbps |
This is why 16 megabits is not great for what you are listing if you were referring to web export. All of this largely depends on your camera footage and what you want to do with it. If you were referring to footage you can work with in Premiere--the Highest Quality, won't improve your footage but can improve successive transcodes, visual effects and color grading scenarios.
Personally, I am very impressed with CINEFORM and DNxHR for 4k+ material. We have worked this material for broadcast a lot. It provides a very smooth workflow in Premiere. Since I am raving about it, here is the older breakdown of the CINEFORM QUALITY slider:
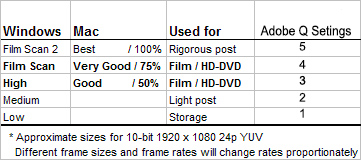
We use QUALITY 3 and 4 for almost all our workflows.
Copy link to clipboard
Copied
Dear. Kristian.
Thank you very much for you quick Reply.
My Camcorder Is Sony PXW-Z150
When you are talking about CINEFORM YUT, OR PRORES 422, You are talking about Archiving after you have finished your Master Project, Correct ?
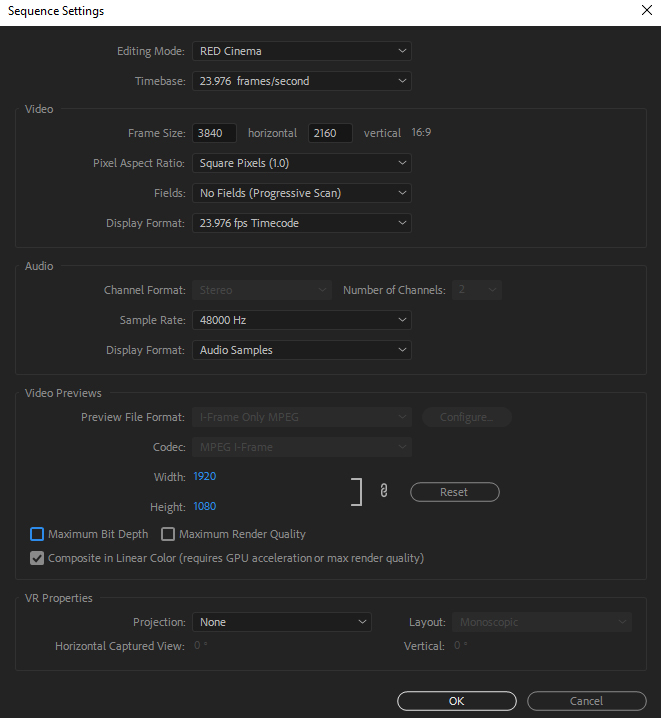
When I Import my 4K footage In Premiere, the Sequence Settings, Editing Mode Is: RED Cinema, 3840 x 2160 23.976fps.
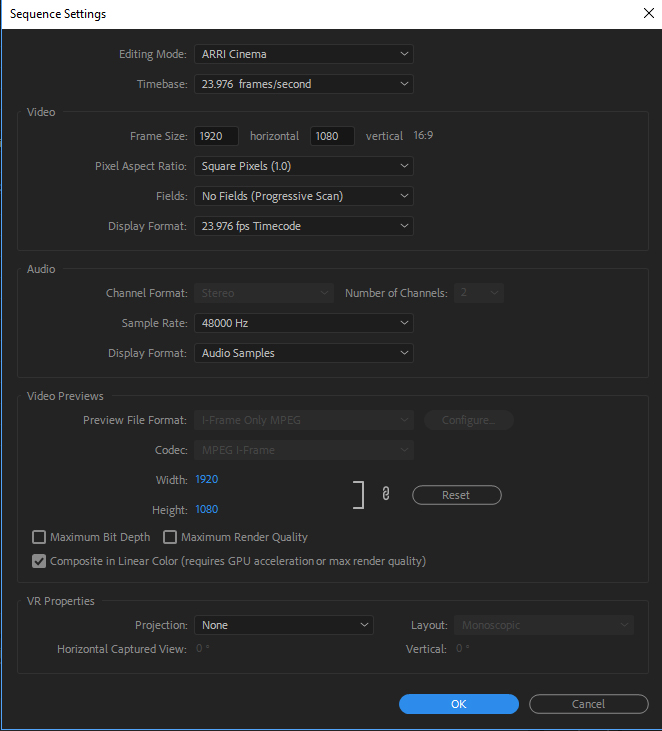
and when I Import The 1080 Footage In Premiere, My Sequence Settings Editing Mode Is: ARRI Cinema, 1920 x1080, 23.976 fps
I also noticed Inside Premiere Export Settings there Is: DNxHR/DNxHD MXF OP1a. This is also for Archiving, Correct ?
If I want to shoot Slow Motion, S&Q Mode, I can Only shoot at: 1080, Not 4K
NOTE: This camera Shoots at 10 Bit In 1080, and 8 Bit In 4K, so Techniquly, the 1080 10 Bit Is better ?
Would you please look at my Screenshots.
Thank you very much.
UPDATED:
This Camcorder Shoots 4K XAVC QFHD FILE FORMAT: 2160/24-30fps @100Mbps
XAVC HD 1080/24-30 fps @ 50Mbps
MPEG HD 422,1080/24-30 fps @50 Mbps
MPEG HD 420, 108024-30 fps
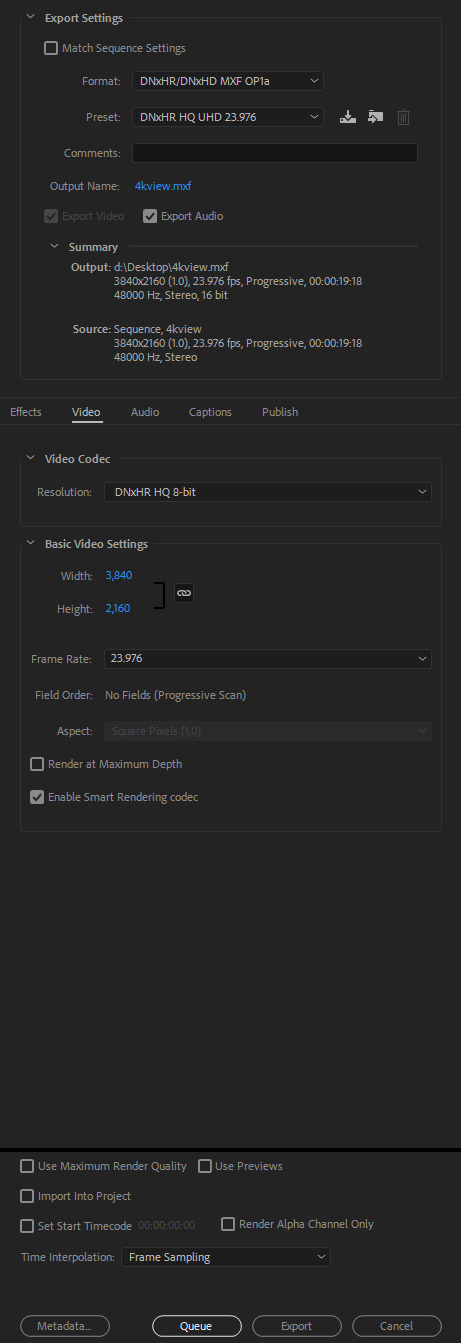
4K Export Settings:
1080 Export settings:

4K Sequence Settings:
1080 Sequence Settings:
Copy link to clipboard
Copied
To answer your earlier question, Your ORIGINAL XAVC footage is fine for archive as they will take up less space than the working media. Here is a breakdown of answer to your questions as I understand them (please correct me if I've misinterpreted:
When you are talking about CINEFORM YUT, OR PRORES 422, You are talking about Archiving after you have finished your Master Project, Correct ?
- No. I'm talking about transcoding your footage, both 1080P and 4K into one single high quality format for EDITING and FINISHING in Premiere.
When I Import my 4K footage In Premiere, the Sequence Settings, Editing Mode Is: RED Cinema, 3840 x 2160 23.976fps and when I Import The 1080 Footage In Premiere, My Sequence Settings Editing Mode Is: ARRI Cinema, 1920 x1080, 23.976 fps.
Because you are working with two sets of media 1080 and 4K at different framerates this can get a little tricky but you should be working with one unified SEQUENCE and force the 1080P to work in a 4K Sequence. Here is ONE OPTION for editing while maintaining a High Quality workflow with XAVC mixed media:
METHOD For Mixing 4K and 1080P (HFR/Slow Motion)
- IMPORT XAVC NATIVELY (ORIGINAL FOOTAGE): You shouldn't have to transcode at all. Just import all footage into Premiere as is.
- VIP: MODIFY 1080P CLIPS IN BIN: Select all your 1080P "Slow Mo" Clips, go to CLIP > MODIFY > INTERPRET and set the frame to the FRAMERATE of your 4K FOOTAGE SEQUENCE. This will re-interpret your 1080P to play back as Slow Motion.
- USE 4K FOOTAGE TO CREATE SEQUENCE IN PREMIERE: Use your 4K Sequence to edit both 4K and 1080P in the 4K sequence. Note: You will need to select SCALE TO FIT to RE-SIZE 1080P footage to match the 4K size in your sequence.
- AFTER EDIT IS FINISHED: Just OUTPUT as necessary. A 1080P Output would look amazing and a 4K Output, depending on the footage should look respectable as well.
METHOD#2 For Mixing 4K and 1080P (HFR/Slow Motion)
- TRANSCODE 4K to QUICKTIME (DNxHR) or CINEFORM (10/12 Bit)
- MODIFY 1080P CLIPS and RE-OUTPUT as QUICKTIME (DNxHR) or CINEFORM (10/12 Bit)--SCALED TO 4K
Now that all your media is in one single HIGH QUALITY format, just CREATE YOUR 4K SEQUENCE and EDIT/FINISH as normal.
I also noticed Inside Premiere Export Settings there Is: DNxHR/DNxHD MXF OP1a. This is also for Archiving, Correct?
DNxHD, DNXHR, CINEFORM and PRORES are WORKING FORMATS for EDITING and FINISHING in Premiere (though they all have Proxy/Low Quality settings as well). They maintain high quality through your entire workflow until you are ready to color grade and then output. However, they are also good for archiving.
If I want to shoot Slow Motion, S&Q Mode, I can Only shoot at: 1080, Not 4K
NOTE: This camera Shoots at 10 Bit In 1080, and 8 Bit In 4K, so Techniquly, the 1080 10 Bit Is better?
Yes, the 10-Bit footage has greater COLOR DEPTH and it should be easier to correct in Premiere. The 4K 8-Bit is still solid footage but won't have the same depth. If the footage is shot well, color grading should still be good. The question is, can you upgrade the 4K to 10-Bit. Yes, you can use a 10 or 12 codec like DNxHR or CINEFORM but the improvement is marginal and you cannot FORCE the 4K 8-Bit up to DEPTH of the 10-bit because that information was never originally there.
As an additional note, takes more time and space, but the Method#2 above will provide the smoothest workflow for editing and eliminates a lot of potential issues. Method#1 is what many use for efficiency and speed.
Copy link to clipboard
Copied
Dear Kristian,
Thank you very very much for the time you spend writing all these valuable Information.
I Truly appreciate it.
Let say I am not Planning to Mix my 1080 Footage with my 4KFootage.
When you say: Your ORIGINAL XAVC footage is fine for archive as they will take up less space than the working media,
Do you mean that Just save your Premiere Pro file AS Is for Archival?
My friend told me when you Import your footage Into premiere and do your Editing, and color corrections, you are not losing any quality until you go to the Export Tab, Is that Correct?
I am a PC user, not Mac. I heard for PC Users PRORES 422 does not work well with PC is that correct?
Inside Export Settings- Format: DNxHR/DNxHD MXF OP1a, Is this a good choice?
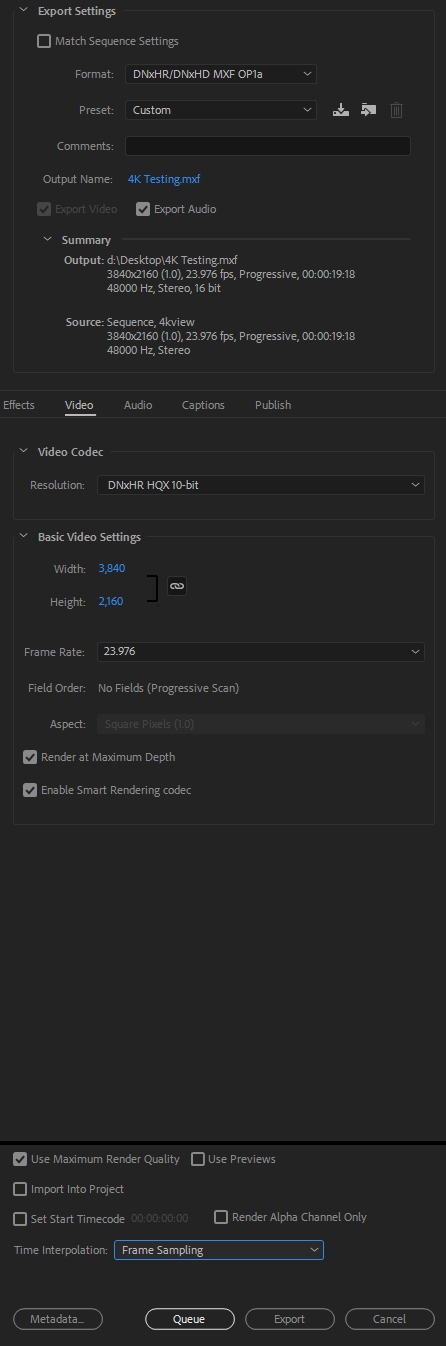
By default, when I take my4K Footage to the Export Settings and Choose: DNxHR/DNxHD MXF OP1a,
It Automatically Gives me the Preset: DNxHR HQ UHD 23.976. and the Resolution: DNxHR HQ 8-bit
Inside the video codec-Resolution, I see DNxHR HQ 8-bit
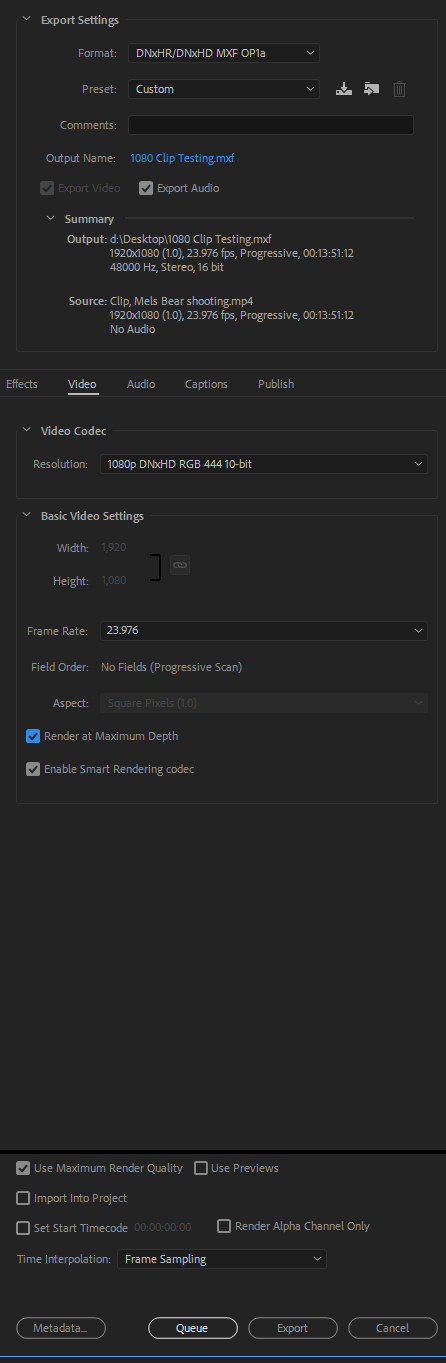
and When I take my 1080 10bit Clip to export Settings and Choose: DNxHR/DNxHD MXF OP1a,
It Automatically, Gives me the Preset: DNX HQ1080p 23.976
Inside the Video Codec-Resolution, I see 1080p DNxHD HQ 8-bit
Of course, it's a 10bit Clip,
Do I have to change the settings for Video Codec Resolution?
Out of all these Codecs would you please choose only One Codec, which one Is your favorite choice.
Thank you very much
Copy link to clipboard
Copied
When you say: Your ORIGINAL XAVC footage is fine for archive as they will take up less space than the working media, Do you mean that Just save your Premiere Pro file AS Is for Archival?
This would be a great choice if you just editing with your ORIGINAL footage rather than transcode. Your two choices for editing would be editing with your ORIGINAL FOOTAGE (which makes things easier) or TRANSCODE to a NEW FORMAT then EDIT. TRANSCODING would be better if you were MIXING different footage together and you wanted make all the footage the same for editing.
My friend told me when you Import your footage Into premiere and do your Editing, and color corrections, you are not losing any quality until you go to the Export Tab, Is that Correct?
This is correct. Premiere is really non-destructive. Losing quality happens on export and this is where you would need to focus after editing. This is why if you have the ability, just editing with the original footage first and then you can worry about output to social media, broadcast, theatrical presentations, etc.
I am a PC user, not Mac. I heard for PC Users PRORES 422 does not work well with PC is that correct?
I am a PC user as well! Though I use both PC and MAC. This information is incorrect. WINDOWS PC users can read and edit ALL PRORES in Premiere natively. I do it all the time. The trick is that if you want to EXPORT PRORES, you have to invest in PLUGINS like CINEMARTIN or REACTOR MEDIA LITE to export PRORES from Premiere. Or you can buy a number of Windows applications that can encode to Prores as well.
Inside Export Settings- Format: DNxHR/DNxHD MXF OP1a, Is this a good choice?
This is a great option if you need a high quality format FOR EDITING or COLOR GRADING. The reason being that this codec and format is a SMART RENDER CODEC. You will notice in your settings there is a check box for this. This enables faster processing while maintaining high quality.
By default, when I take my4K Footage to the Export Settings and Choose: DNxHR/DNxHD MXF OP1a,
It Automatically Gives me the Preset: DNxHR HQ UHD 23.976. and the Resolution: DNxHR HQ 8-bit
Inside the video codec-Resolution, I see DNxHR HQ 8-bit and When I take my 1080 10bit Clip to export Settings and Choose: DNxHR/DNxHD MXF OP1a, It Automatically, Gives me the Preset: DNX HQ1080p 23.976
Inside the Video Codec-Resolution, I see 1080p DNxHD HQ 8-bit
Of course, it's a 10bit Clip,
Do I have to change the settings for Video Codec Resolution?
It depends on your footage, however, based on what you are saying, these would be my choices:
FOR YOUR 1080P FOOTAGE (MAINTAINS COLOR DEPTH 10-BIT)
- 1080P DNxHD HQX 10-Bit or 1080P DNxHD RGB 444 10-Bit
FOR YOUR 4K FOOTAGE (MAINTAINS COLOR DEPTH at 8 or 10-BIT)
- DNxHR HQX 8 or 10-Bit or DNxHR RGB 444 10-Bit
And be sure to ENABLE SMART RENDERING when encoding. FYI--HQX is a High Quality version that would saving a little more space than the 444 version and the 444 version would be if you want the highest color level possible (note: like I stated before, concerning your 4K it won't necessarily improve your original footage if it was originally 8-Bit but you may gain some flexibility when you working color and add fx to the footage.)
Out of all these Codecs would you please choose only One Codec, which one Is your favorite
choice.
Thank you very much
My favorite codec is really basic on what camera I am using and what kind of project I am working on. It helps largely to know where you are going deliver this video: web, broadcast, theatrical, etc. I do love the one you have chosen, DNxHD/HR however, I also use CINEFORM quite a bit as well. If you tell use your intended delivery, happy to throw more stuff at you!
Copy link to clipboard
Copied
Dear Kristian.
You have helped me so much, These are very very Valuable Information's. It Is very obvious, that you are very professional In this field.
Ok, Based on your advise, I have attached a Screen shots of the Settings you have approved, Please let me know If I Its correct ?
Also, I noticed there Is Time Interpolation: Frame Sampling. Should I change It to Optical Flow ?
If I Shoot 4K, which Is 8 Bit, Not 10 Bit, Is It better to use the 10 Bit Codec that, you have mentioned above, or since it was not shoot In 10 Bit It dose not make any different to use the 10 Bit or 8 Bit codec that you have choosed above ?
What If I have footages from Canon C100, Or Canon 5D's, or Canon 80D, can I use above 1080 Settings which Is:
- DNxHR HQX 8 or 10-Bit or DNxHR RGB 444 10-Bit.
Thank you very much.

Copy link to clipboard
Copied
Lots of great information here, so forgive me if I missed this somehow, but I don't believe this question has been asked - WHAT is the intended purpose of the file being "exported at the highest possible quality"?
The "best" export settings for YouTube will be different than the best settings to archive a master on the hard drive for instance. There is no one perfect export option, depends on the destination. So what is the intended delivery target for the export - where is the file going?
Without knowing that, we're all spinning our wheels.
EDIT: I see now that Kristian did ask that in last post, missed with all the reading!
Thanks
Jeff
Copy link to clipboard
Copied
Dear SafeHarbor11.
Actually, It was for the Purpose Of Archiving.
Thanks.

Copy link to clipboard
Copied
Kristian has gone way above & beyond in the many wonderful posts on this thread alone ... and it's been excellent information.
The only thing I could possibly add is I know of editors who simply 'drop' all new media in a watch-folder setup in Prelude or MediaEncoder that 1)renames the files 2) creates Cineform t-codes and puts them in X folder for editing 3) puts the renamed originals in Y folder for archiving.
This is done say overnight.
When editing, they use the Cineform t-codes for smoothest work. After the project is finished, as part of their archiving tasks, they dump all the t-codes and move all project files/assets in with the renamed originals for archiving. They can re-create the t-codes at any time, so there's no reason to store them.
Neil
Copy link to clipboard
Copied
Here are some answers to your questions! 
Also, I noticed there Is Time Interpolation: Frame Sampling. Should I change It to Optical Flow ?
No. Optical Flow is a high powered feature for smoothing out footage that has speed changes applied while editing. Unless you are slowing down clips while editing and want an "in Camera" looking slow mo, don't touch this.
If I Shoot 4K, which Is 8 Bit, Not 10 Bit, Is It better to use the 10 Bit Codec that, you have mentioned above, or since it was not shoot In 10 Bit It dose not make any different to use the 10 Bit or 8 Bit codec that you have choosed above ?
If the original footage is 8-Bit, 10-bit conversion will maintain 8-bit but it will not improve your original footage. Sometime--people will archive their footage at a higher bitrate because they just want all their footage in one single format and bitrate. The only issue with this is that it can take up more space during archive. If you archived your 8-Bit footage as 8-Bit and your 10-Bit footage as 10-Bit you would be fine.
What If I have footages from Canon C100, Or Canon 5D's, or Canon 80D, can I use above 1080 Settings which Is:
- DNxHR HQX 8 or 10-Bit or DNxHR RGB 444 10-Bit.
If you footage is 1080P and you can save it at the higher DNxHR codec, but remember that you won't necessarily gain anything. DNxHD was made to be more efficient for 1080P and 720P and DNxHR for for everything that is bigger than that like 4K. It's about efficiency. You might be create too big of files.
------------------------------------------------
ADDITIONAL STORAGE NOTES:
ARCHIVING YOUR FINISHED PROJECT & FOOTAGE
- ARCHIVE YOUR PROJECT & the FOOTAGE YOU USED AS IS (Conversion would mostly be unnecessary if you use the ORIGINAL FOOTAGE or created HIGH QUALITY MASTER CLIPS to edit with). Note: If you used low-qality PROXY files to edit with, you will need to relink your project with the ORIGINAL FOOTAGE or your NEW MASTER MEDIA (DNxHD/DNxHR) and then archive your PROJECT and that HIGH QUALITY MEDIA.
ARCHIVING YOUR FOOTAGE BY ITSELF
- ARCHIVE YOUR YOUR ORIGINAL CAMERA FOOTAGE AS IS: The reason is that your ORIGINAL footage will take up less room and they always can be converted into another format later. Your ORIGINAL CAMERA MEDIA is fine for archive because that is the ORIGINAL QUALITY.
------------------------------------------------
If you are archiving, most people want to save money because storage can be expensive. It is not necessary to convert your footage JUST FOR ARCHIVE. If you edit with the ORIGINAL FOOTAGE, archive that. If you have converted your footage to a HIGH QUALITY FORMAT and you edited your project with that, archive that (or if you want to save space your can just save your ORIGINAL CAMERA FOOTAGE and PROJECT). The reason for converting your footage to DNxHD or DNxHR would primarily for converting all you footage to a single format so that it makes editing much easier. It also helps if you have different camera formats or different frame rates and you want to convert everything to a single frame rate or format. This can eliminated issues in the EDITING process. Whether you save your ORIGINAL MEDIA as the ORIGINAL CAMERA FILES or the DNxHD/HR high-quality format, honestly your are set for archive. It's just that one will take up less hard drive space.
Copy link to clipboard
Copied
Dear Kristian.
Thank you very much for your advice. I am sorry If I am Asking Too Much, As I said before, these are Extremely Valuable Information, and I am sure many people In this Forum, will appreciate this Information, Because It Is an important Topic.
I think by now I know where I am standing:
For Archiving Purpose:
Archive the Original Premiere pro Project files, and all the Camera footages As Is.
Correct?
For Conversion Purpose:
1080p,720p, use: Video Codec: 1080p DNxHD,
4K, use: Video Codec: DNxHR
Correct?
What Is the different Between HQ, HQX, SQ, LB, RGB?
I have many old footages that I shot with Canon GL1, they are 720x 480, DV NTSC, 29.97fps, Fields: Lower Field First, What Codec you recommend?
Thank you very much.
Copy link to clipboard
Copied
No problem! Here are the answers to your questions!
For Archiving Purpose:
Archive the Original Premiere pro Project files, and all the Camera footages As Is.
Correct?
Absolutely. Since it is your original footage, it is the perfect archive format! You can always convert it (or not) later for any purpose.
For Conversion Purpose:
1080p,720p, use: Video Codec: 1080p DNxHD,
4K, use: Video Codec: DNxHR
Correct?
Correct, if you wanted to convert your footage usually for the purposes of a smoother editing experience (Like mixing multiple formats and/or frame rates).
What Is the different Between HQ, HQX, SQ, LB, RGB?
DNxHD and DNxHR are special codecs known as MEZZANINE CODECS or INTERMEDIATE CODECS. Just like I wrote earlier, they make offline editing smooth. They help maintain quality of your footage through the editing process. DNxHD, DNxHR, Prores, and GoPro Cineform are all cut from the same cloth. These are some of the best formats in Premiere. Just to be clear, DNxHD is for 720p and 1080p workflows. DNxHR is for UHD (Ultra High Defintion) or DCI (Digital Cinema Initiative) workflows. The following is the official breakdown for DNxHR for resolutions 4k and higher:
- DNxHR LB - Low Bandwidth (8-bit 4:2:2) Offline Quality
- DNxHR SQ - Standard Quality (8-bit 4:2:2) (suitable for delivery format)
- DNxHR HQ - High Quality (8-bit 4:2:2)
- DNxHR HQX - High Quality (12-bit 4:2:2) (UHD/4K Broadcast-quality delivery)
- DNxHR 444 - Finishing Quality (12-bit 4:4:4) (Cinema-quality delivery)
I have many old footages that I shot with Canon GL1, they are 720x 480, DV NTSC, 29.97fps, Fields: Lower Field First, What Codec you recommend?
This entirely depends on the destination of your footage. You can "preserve" footage by capturing from the original DV tapes into a format like H.264, non-H.264 MPEG-4, and MPEG-2 formats. You can also use Proxy or Low-Bitrate HD formats Cineform, Prores and DNxHD as well. Since the color space of Standard Definition tends to be 4:1:1--formats like H.264 and MPEG-2 which tend to be around 4:2:0+ can easily preserve this old footage while saving you space on your hard drive. If you are going to be cutting your SD footage in modern-day projects I would recommend converting the 720 x 480 to 720 x 540, 720 x 534, or 640 x 480 at a Square Pixel (1.0) aspect ratio. This will prevent you having issues with any DV distortion in your computer. Just as a side note: Standard Definition was meant for those old, analog tube television, not computers. So, when you rip a DVD or capture your old DV tapes into your computer--this footage will always be distorted or appear stretched. Premiere and other video editing applications can automatically correct this if you are cutting in a standard definition project. Unfortunately, if you are not, you may have to tweak or convert the footage to prevent some issues.
Once again, if you are just archiving and saving this footage--just capture to a nice H.264/MPEG-2 format to preserve as is.
Hope this helps!
Copy link to clipboard
Copied
Dear Kristain.
Very Important Informations. I am sure many people In this forum also can use these very valuable Information.
Thank you very much.

Copy link to clipboard
Copied
What are the best settings to export a 4K Video from adobe premiere pro 2020 ?
Copy link to clipboard
Copied
What's the best airplane? Depends ...
How much motion do you have in the material? More motion takes higher bit-rates.
How will it be viewed? Browsers on laptops or phones is one thing, viewed on large desktop monitors and TVs needs more bitate.
How is it being delivered? Via flashdrive, file size is no problem ... drop-box type deployment, file-size no issue, YouTube/Vimeo, well ... still depends partly on your 'membership' I think and your up/down speeds along with their data-rate practices.
And for the YT/Vimeo stuff, they do a ton of re-compressing when they take your file and completely re-encode it to stream.
So ... what is in you media, how are you deploying it, and what do you expect viewers to view it on?
Neil

Copy link to clipboard
Copied
I'm jumping in because you are obviously very informed.
I am using GoPro Fusion to do VR. I use CineForm '422 High' to do "5K" video for YOUTUBE when I am in GoPro's processing. I usually set it for editing in GoPro Fusion Studio APP so I can easily edit in Premier, and that works....HOWEVER....
1) It keeps trying to set it up as AVI which is a lower setting, and that is not the original videos setting(it went from 5k to 1080p). Yes it happens when I try to set it as original....even though it says on the original that it is something else.
2) I go into settings to change from AVI to 464, and it does have VR options. It natively knows that this is VR, and GoPro has Plugins for it in Premier.
3) Curious if there is a better option out there for color depth. I want to make my colors better....however I am a Noob to this, and WORSE I have no artistic ability other than singing.
Please Help

 AdChoices