 Adobe Community
- Home
- Premiere Pro
- Discussions
- Re: Adjusting lumetri for multiple clips
- Re: Adjusting lumetri for multiple clips
Adjusting lumetri for multiple clips
Copy link to clipboard
Copied
I am about to make a video from a musical. I have used six different cameras, synced them, nested, and enabled multi camera so that I can change active camera easily. I started the project by applying lumetri correction to all files for each camera bin. This way, I corrected for the differences in how the cameras record colour, contrast etc. During editing, I now wish to make a change to the lumetri settings I earlier made to all files from a camera. There are more than 30 files from each camera, so I would like to avoid to go into each file, remove the previous lumetri correction and apply a new one. Is there any way to create a global lumetri correction applying to all files from one of the cameras, and being able to change? An adjustment layer won't work, because it will apply to all footage from all cameras.
Copy link to clipboard
Copied
What you should use is an adjustment layer and apply it only to the settings you need. or in any case choose the clips as master (attached photo)
try it.
Copy link to clipboard
Copied
Thanks, but wouldn't an adjustment layer apply to all six cameras, as I have them in a nested sequence with multicamera enabled? Or is there a way to make an adjustment layer apply only to one of the six cameras in my nested sequence?
Copy link to clipboard
Copied
You could simply apply another instance of Lumetri on one clip, make it a preset from the menu by the Lumetri panel tab. Then apply that preset to the clips in the bin. They would take that as a second instance of Lumetri in the same way that timeline clips can have mulitple instances.
This would apply your changes across all the clips. Oh, and after making the presets from the timeline while matching clips, remove those instances of Lumetri so when you apply to the bins, you don't double-apply anything.
Neil
Copy link to clipboard
Copied
Thanks for your reply! I feel that after applying a number of consecutive lumetri settings, I lose control of the colours, and the clips don't look natural anymore. I would prefer a way to have some kind of "master" which I could apply to all files from a certain camera and then adjust the master to produce an effect on all clips I have attached it to. Is there any such function?
Copy link to clipboard
Copied
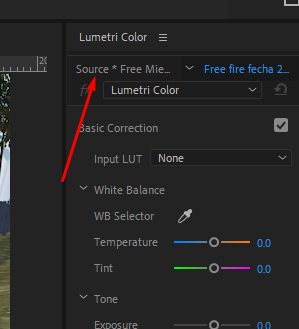
If you go to the Source tab for a clip, and change the settings there, that will be applied across all instances of sections of that clip on any sequence in the project.
So you could simply change the Source tab settings of the Lumetri instance you've already applied.
I typically work with multiple Lumetri instances ... up to 4/5 on a clip, and perhaps with Lumetri applied via the Track Matte process to other things on a clip. And an adjustment layer or two as needed for final overall project look.
Getting 'fake' look is from going too far with any one tool normally. Do some change to get close, then do another similar change to get closer. Do small changes across mulitple tools. Don't try to do everything NOW with one tool.
For instance, do basic tonal balancing with the Basic tab, then do some further trimming with the Color Wheels luma slider controls.
For color, do the basic WB pass in the Basic tab. Do you understand what that WB tool does? Most don't.
The "Temp" control balances the Red channel white point against the Blue channel white point. Watch say the Parade RGB scope while sliding it ... the Red and Blue channel white points will move opposite to each other.
The "Tint" control balances the Red and Blue channels ganged ... together ... against the Green channel. Watch in the RGB Parade, and you'll see this in action.
WB is a white point correction, meaning ... it's exactly like using the end top point of each channel of the RGB Curves tool. So the correction is strongest at that white point end of the channel, half as strong at the mid-point, and very little if any noticeable down in the shadow tones.
So using WB to correct for an overall color tone issue or a shadows color issue will never work. It over-does the change to whites/highlights and doesn't change shadows enough.
For correcting shadow tones, the Creative tab's Shadow & Highlights tint wheels are great. You can use the Shadow wheel to fix shadow color problems without affecting the highlights much. Plus ... you have the "balance" slider which is the ONLY pivot tool in Lumetri. This allows you to set the blend point up or down. Set it to the left, you will affect more the deeper shadows and less into mids/highlights. Set it higher, your shadow changes will go more into mids/highligts. And vice versa.
And of course, you can use the three wheels of the Color Wheels tab.
One thing to be aware of: there are very few ways to accurately target a small area for correction in Lumetri. Most "targeted" tools like the Shadow luma slider and color wheel only affect the shadows more than they affect the highligts, as they do change the highlights some. So if say you're using the Color wheels shadows wheel to cool/blue your shadows, you need to apply a small amount of opposite direction change to the mids color to compensate, and limit the shadows correction to the shadows.
Neil
Copy link to clipboard
Copied
Thanks for the advice and for taking the time. I will try what you suggest, it seems like a good way forward.

