 Adobe Community

Copy link to clipboard
Copied
I'm creating 10 second video loops for playback on a website. But when I export the video, it seems to be adding a black frame at the end of the render, so it skips when it loops.
I've created several of these videos just fine awhile back with the same file, and same preferences. The problem didn't start until I updated to CC 2014.
Anyone have any ideas? Am I just missing something in my render dialogue box?


 2 Correct answers
Kevin, thanks for you help on this, I think I've figured it out!
When I play the file with VLC, there is no black frame. But when I play it in Quicktime, there is. I think the problem must be in the player and not in the video file, potentially a Quicktime glitch with the H264 codec.

Hello @Tobiasz23517314g5xu,
To be honest, Avid and Final Cut does this too. The key is to avoid setting the out point using the Playhead as a guide. If you do, go back a frame, then mark out!
Why is it that way?
The Playhead represents an entire frame, which has a head and a tail. It is not a "needle," even though it appears that way when zoomed at a normal Timeline zoom level.
If you zoom way in on the playhead, you can observe and understands why it behaves as such, and why you need to ste
... 41
Replies
41
41
Replies
41
Copy link to clipboard
Copied
Hi Cody,
If you tend to use the Playhead for marking an Out point in a range, you will add a frame of black. To avoid it: after the last clip in the sequence, move left one frame and then mark Out. You are including one frame of black by not doing so. You now have an export without the black frame.
Hope that helps,
Kevin
Copy link to clipboard
Copied
Thanks for the response, Kevin, I've tried this and it's not the problem. No matter where I mark the in or out—or even if I don't mark them at all—it still adds the black frame.
Now this is where things get interesting. The more I tweak my export settings, I'm finding this only happens when I export as H264. If I export as Quicktime, but with an H264 codec, it's fine.
I feel like it has to be something in my render settings?
Copy link to clipboard
Copied
Hi Cody,
cody_paulson wrote:
Thanks for the response, Kevin, I've tried this and it's not the problem. No matter where I mark the in or out—or even if I don't mark them at all—it still adds the black frame.
Now this is where things get interesting. The more I play with my export settings, I'm finding this only happens when I export with as H264. If I export as Quicktime, but with an H264 codec, it's fine.
I just did a test and there is no black frame on my export. Can you try again with a new project and different media?
Thanks,
Kevin
Copy link to clipboard
Copied
Kevin, thanks for you help on this, I think I've figured it out!
When I play the file with VLC, there is no black frame. But when I play it in Quicktime, there is. I think the problem must be in the player and not in the video file, potentially a Quicktime glitch with the H264 codec.
Copy link to clipboard
Copied
Hi,
Sorry. You may get that black frame if you use the playhead to mark an Out and then export In to Out.
If the playhead is involved in setting the Out point at the end of any clip, instead of marking Out, move left one frame, then mark Out, then Export. The playhead is not a "needle" It has a head and tail. It also has a duration of 1 frame. If you snap to the end of the clip and mark Out, the tall of it is touching black; the head of the frame hovers over your last visual. That is why you must move back before marking Out.
Zoom way into the playhead to see this phenomenon. Makes sense now?
Thanks,
Kevin

Copy link to clipboard
Copied
Hi Kevin,
Helpful answer - and 7 years later too! Better late than never, huh?
Copy link to clipboard
Copied
Hi, arthurm,
I exported a .mp4 on macOS and had no black frame. I wonder what's going on with your situation? Can you give us any further info? Sorry for the frustration.
Thanks,
Kevin

Copy link to clipboard
Copied
Again, this is not the correct answer. It does not matter where the outpoint is. QuickTime adds 1 black frame if it's not exported as a QuickTime file. It is a glitch with QT

Copy link to clipboard
Copied
Hi Kevin,
I'm getting individual hidden black frames added to the end of my renders...
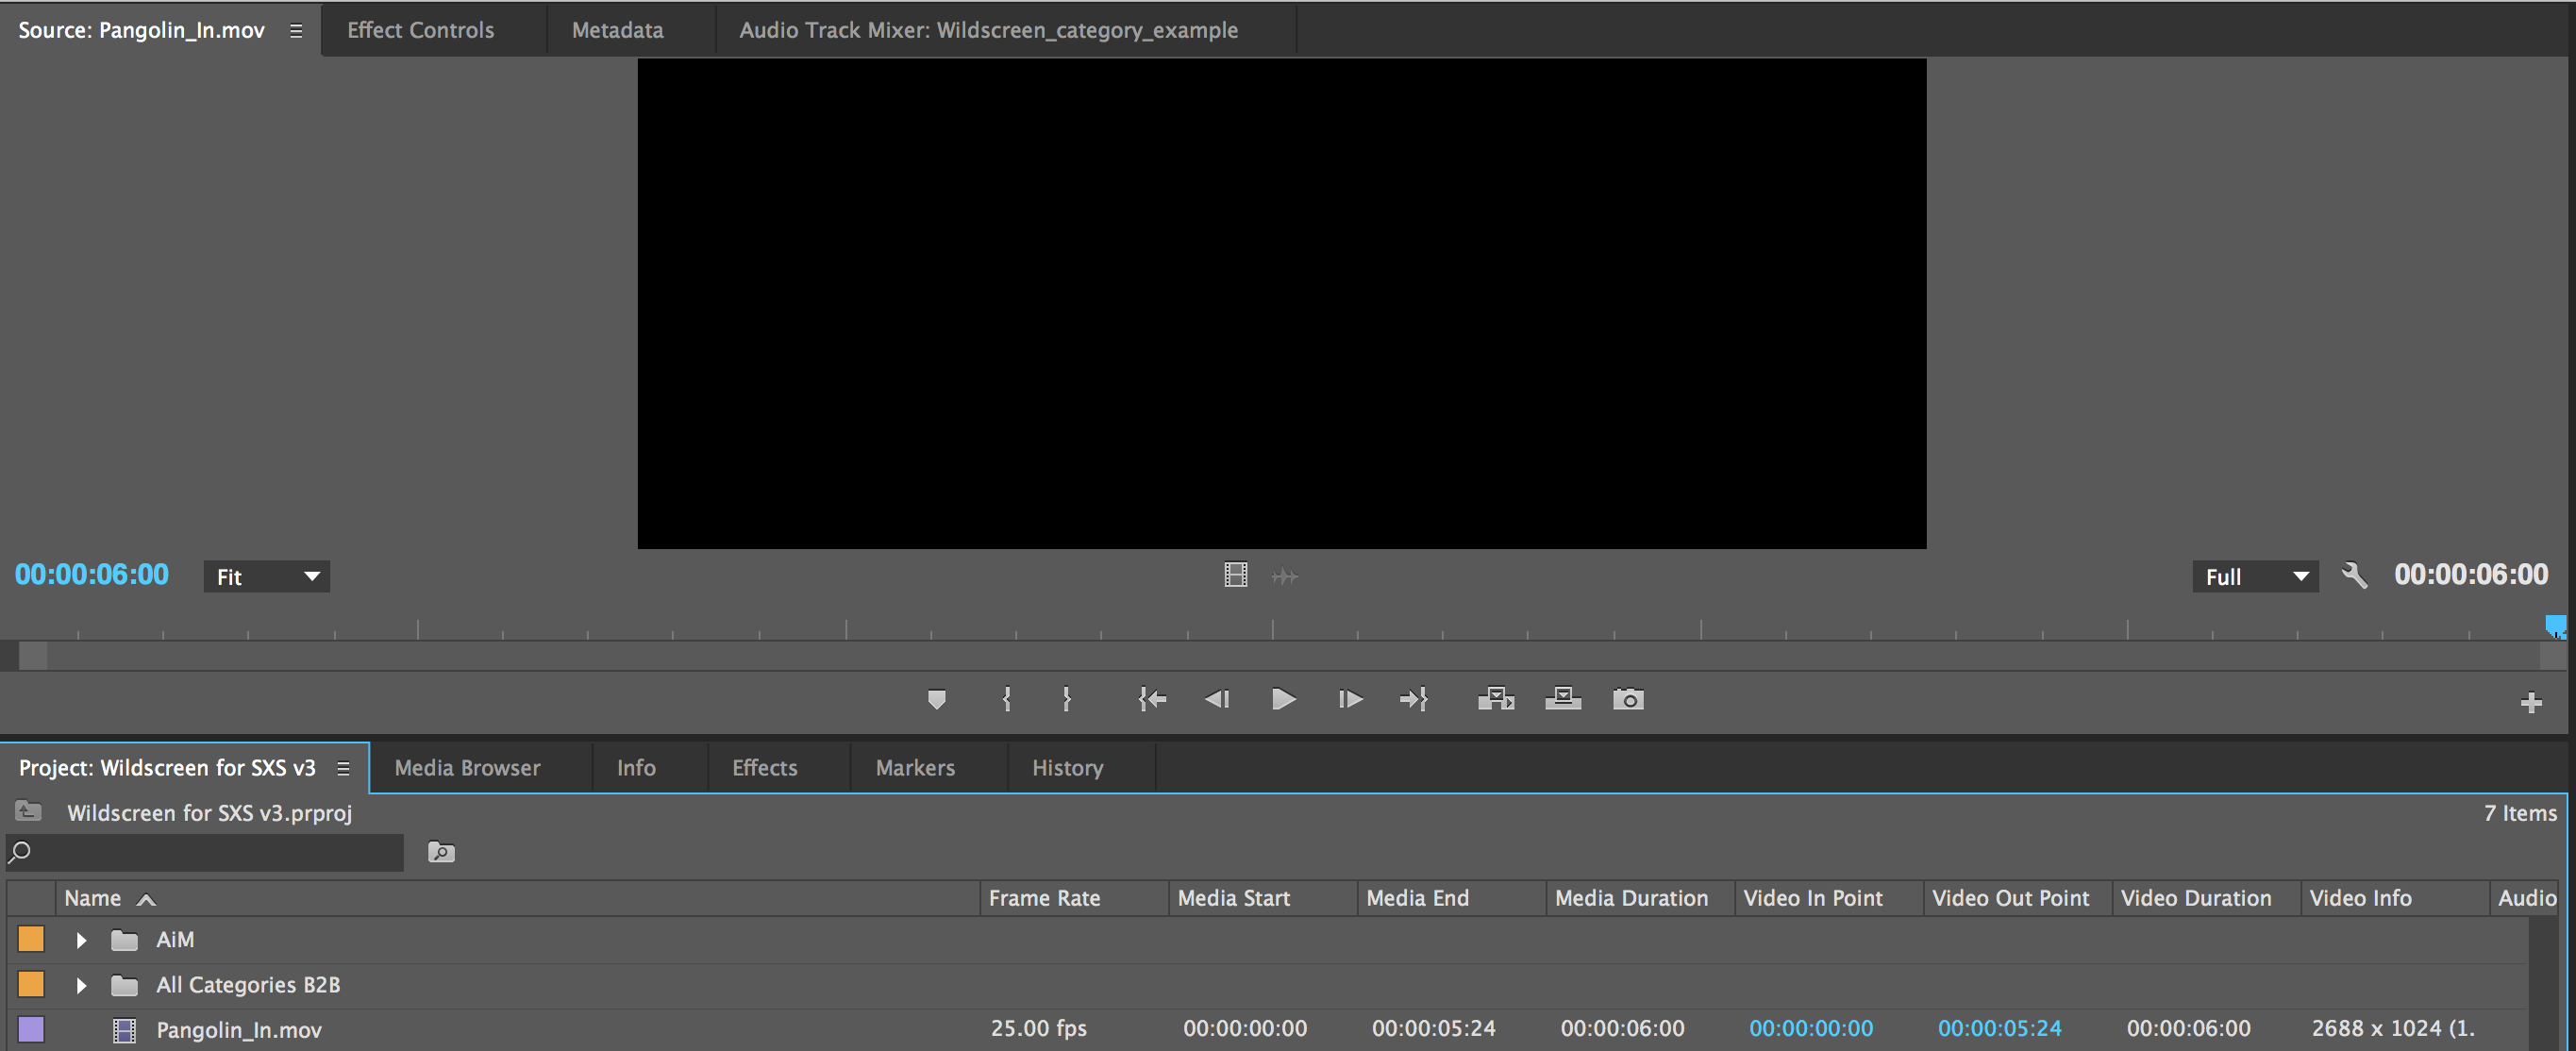
For instance, a 6 second composition in AE (start timecode 0:00:00:00, ending at 0:00:05:24) shows in Premiere project window as 6 seconds long, and as 6 seconds on the timeline. However, in the source window it is possible to pull out to reveal frame 0:00:06:00 which is black. This frame can't be pulled out on timeline. It would be no problem but I'm making graphics for a live awards show and the way these shows work is to hold on the last frame of each graphic until the next graphic is queued up. The media server that runs the event does see these black frames and so the holds are coming up as black.
I've attached a screenshot showing the problem frame in the Premiere Source window.
I'm using AE 13.7.2.3 on an iMac (Retina 5K, 27-inch, Late 2014), 4 GHz Intel Core i7, 32 GB 1600 MHz DDR3, AMD Radeon R9 M295X 4096 MB running Yosemite 10.10.5
I don't have long to sort this problem, so a quick reply if possible would be appreciated!
Cheers,
Michael

Copy link to clipboard
Copied
Hi Cody,
I saw you did have one answer but here's another solution - It may have to do with the options you chose at the beginning. Try this:
- New Project
- window pops up where you name the project
- New Sequence window is next (this is where you designate the frame size and will get rid of the black frame or borders - pillow boxes or letter boxes)
- When filming I use 29.97 frames per second and I then chose:
- Digital SLR
- 1080 p
- DSLR 1080p30 (the 30 at the end stands for the 29.97 frames so if you've filmed in 24 or 25, chose that ending).
You will now see at the left in "Video Settings" that is should have the Frame Size as 1920h x 1080v and the Frame Rate will be whatever you chose.
I know this is an old discussion stream but it didn't looked like it could have used a more complete answer.

Copy link to clipboard
Copied
I found out at least one way to solve this problem.
I export videos without audios, and when the tick "export audio" is selected, there is always a black frame at the end. When it's not, everything is ok. Hope it helps someone.

Copy link to clipboard
Copied
Your comment helped me to solve my problem, thanks.

Copy link to clipboard
Copied
The fact taht this worked blows my mind. Thank you! Is this a codec issue then?

Copy link to clipboard
Copied
DANKE!

Copy link to clipboard
Copied
This completely fixed it! So annoying, but wow thank you for the solve!!!

Copy link to clipboard
Copied
Yes, this was the correct answer for me also. Thanks!

Copy link to clipboard
Copied
This worked in version V22.2.0 in 2023. Thanks!

Copy link to clipboard
Copied
Fantastic - thank you! How did you figure this one out???

Copy link to clipboard
Copied
I found a solution! So if you're exporting from the Adobe Media Encoder you can do this (you can run your video through the encoder after you've exported it as well):
Right click on your video in the Queue (that Instagram Video is my preset so it may say something different on yours such as "Match source - high bitrate):

Click Export Settings.
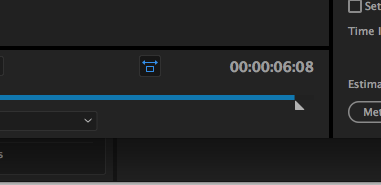
Then. under your video preview there is a timeline that shows the duration of your video. If you move the far right notch over to the left a few frames before the end of your video it will only export the video length within the blue timeline; thus eliminating the final few black frames.
Copy link to clipboard
Copied
Keep having the same bug over and over. Tried to mark the Out point 1 frame behind in AE and in encoder.
The output seems to be random. In some renders I have one black frame, in other I don't.
I don't understand this lack of precision for such a simple task coming from a company like Adobe.

Copy link to clipboard
Copied
WORKS THANKS CAITLIN !!

Copy link to clipboard
Copied
I know the answer to this - when you export to save do this: file / export / media / the trick is here - see the timeline under your video - amend the time so that it matches exactly where you want it to end - thats it! voila! 🙂

Copy link to clipboard
Copied
GUYS I FIGURED IT OUT!
Right click on the hamburger (3 lines) button next to your sequence name on your timeline
and DESELECT "Show Audio Units"! VOILAAAA!
When you set your timeline to show audio units, your In and Out points will automatically set to the audio and it doesn't always match the video so it adds a black frame! hope it helps someone.!

Copy link to clipboard
Copied
I don't know if there's anyone still looking for answers about this, but I want to share what worked for me:
After a while experiencing this problem I'VE SOLVED THIS FOREVER: you have to select your render in Premiere or Encoder as OpenCL. This one won't never provide you random black frames!
-
- 1
- 2

 AdChoices