 Adobe Community
- Home
- Premiere Pro
- Discussions
- Change skin color person with Lumetri?
- Change skin color person with Lumetri?
Change skin color person with Lumetri?

Copy link to clipboard
Copied
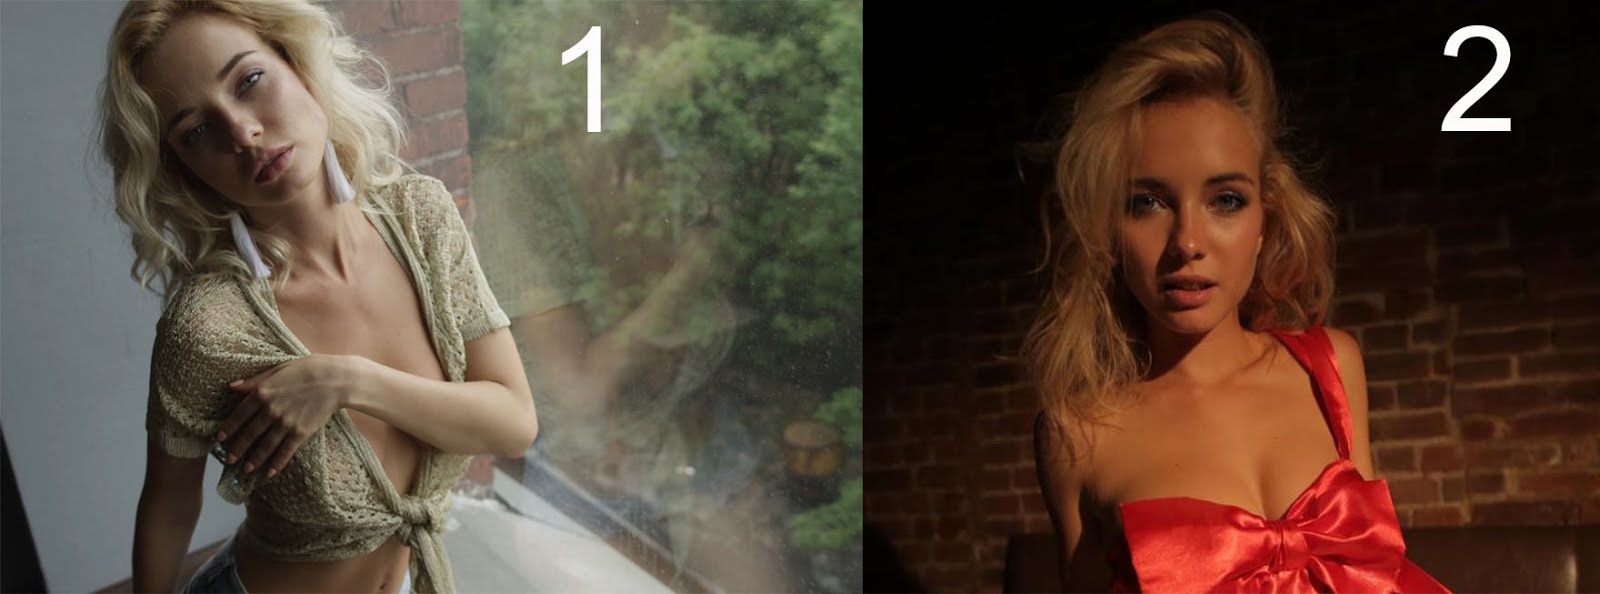
I have some videos of the same model, but in all the videos their skin color is different because they are different cameras.
How should I make all skin colors look similar with Lumetri Color?
For example, I like the image 1 and would like all the videos to be seen with that color tone.
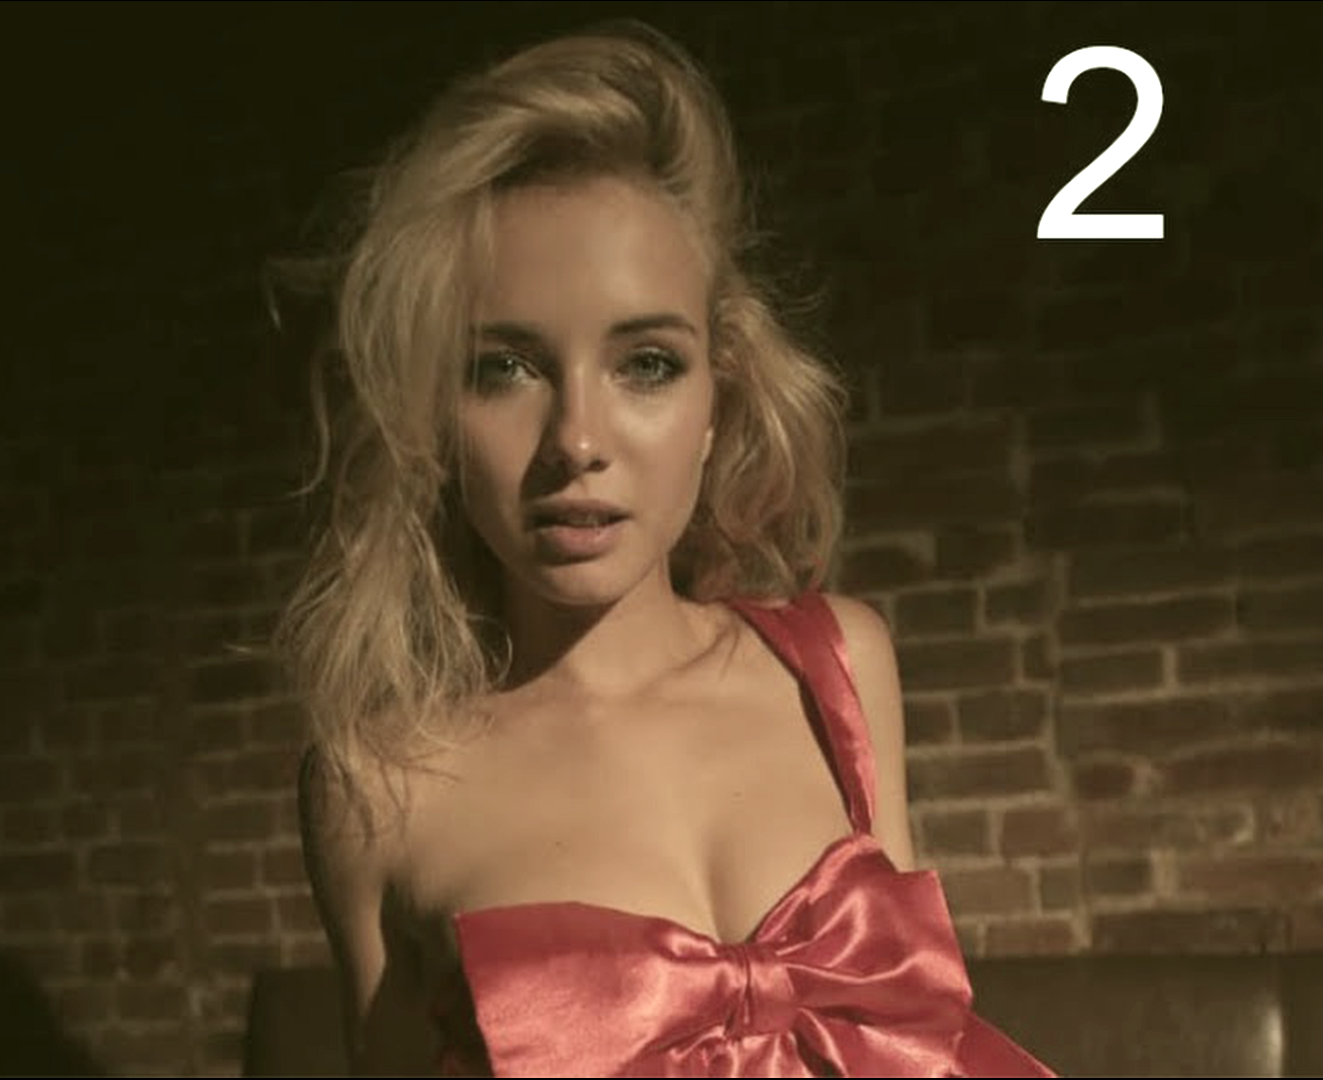
And the image 2 I do not like. It looks too orange.
The videos are not made by me, so I do not have the RAW file.
I do not put videos as an example because it's +18


 22
Replies
22
22
Replies
22
Copy link to clipboard
Copied
This is a brief (4-min) intro to the Lumetri color correction controls: Adjust colors & white balance |

Copy link to clipboard
Copied
Fine controls in color work take some knowledge, training, and just plain time practicing. To get a smooth result for what you want could take work in Basic, Creative, and Color Wheel or Curves tab, with or without some HSL. Or maybe easier, depending on many things.
First suggestion is second image has too high saturation. That will take care of part of the issue. Next could be working Creative Tab Shadow/Highlights tint wheels for a bit of cooling the color if needed, and/or Color Wheels to do something similar, and/or work in the new Curves tab to pick the skin tone and modify hue and saturation to taste.
Neil

Copy link to clipboard
Copied
you can either match all with color chart or use pure scopes. you can isolate certain parts and match up HSL and YUV scopes by changing hue, lightness, saturation. there are new hue tools.

Copy link to clipboard
Copied
Doing it fairly quickly on laptop (not using editing computer with panel controls ) you can get something a bit more palatable doing basically what Neil suggested. See image below.
There are things you can do to make it better but it would require a bit more work selecting specific stuff (areas) and I don't believe you'd ever get it to 'match' your first sample. The light is simply harder in 2nd shot (more contrasty ) and the color temp is totally different overall.
If you had the raw stuff it might help a bit but probably wouldn't be a magic solution either.
Copy link to clipboard
Copied
A note about lighting, in case you ever get to talk to the guys shooting video (raw ) that you are getting sent to you.
daylight is 56k color temp. The light from outside, coming in window of 1st shot, is 56k. Even shooting raw the camera should be set to 56k.
The indoor light used in the 2nd shot is 32K. If ( even shooting raw ) the camera was set to 56k then what you are seeing is exactly what you end up with.
The thought that you can change color temp in RAW to anything you want is sorta true, but it's really a good idea to try and match the temp of the lighting when you shoot anyway. Less adjustments have to be made and it's my belief the product comes out better.
Some will disagree, that it doesn't matter. But what you SEE in your 2nd shot is exactly why the color temps should match.
This is also why full CTO and full CTB color correction film gels ( on 4 foot rolls ) are made by Roscoe and Lee Filters. If you put full CTB on the 32k light indoors, it turns that light into the DAYLIGHT color temp ( 56k ). This is handy when mixing tungsten ( indoor light ) with light coming from outside. It's a long subject.
Nowadays the (expensive) new LED lights can be dialed in to any color temp you want including 32k and 56k, so you don't have to use the color correction gels.
Anyway, that is what is causing your problems... it's not being different CAMERAS, it's the difference in LIGHTING.

Copy link to clipboard
Copied
One more note: re: delivery
I exported a 1080p timeline to 720p and uploaded sample to vimeo ( about 10 seconds).
If you are delivering to some specific media ( web, DVD, BD, etc. ) so a little test at some point... so you can SEE what the outcome is. Weird things happen to color and tonality when delivered. And also everybody PLAYS things ( to watch ) with different color monitors etc...
So before you get too nuts about being exact with all your color and balance adjustments, do a little test export to see what you are getting. That way you have the whole workflow down pat and know what little adjustments you might want to make so the final product is as good as you can get it.
I'll delete this in a few days...
Copy link to clipboard
Copied
corrected version (using scopes for Y LIFT )
will delete this stuff in a few days or before then if you happen to see the stuff before then.
Copy link to clipboard
Copied
video deleted from vimeo… links no good anymore.
Copy link to clipboard
Copied
I could not watch the video, could you pass me again? Mediafire, google drive, etc. plese!
Copy link to clipboard
Copied
Sorry, Mark, I deleted that stuff from vimeo and my computer a few days ago. It wasn't my images and I didn't feel comfortable having someone else's work up there, if that makes any sense. It was just a few seconds of showing the still images you supplied, numbered 1 and 2, corrected a little bit... like the still image I put up on this thread that you can see ( tweaked a little bit more but basically the same ).
good luck !
Follow Neil's basic directions to do what you want. Adjust luminance ( white and black points ) .. which I call Y lift and Y gain and tweak Y gamma ( that is tone, NOT COLOR ADJUSTMENT). Then desaturate. Then move everything to ( on my program it's called 'offset' ) suit your orange vs blue color... I think I moved it toward yellow a bit.
Copy link to clipboard
Copied
use you scopes as well as eyes ( judgement of eyes ).. but initially especially the scopes initially to get close to normal.. hehe, hard to explain.
Copy link to clipboard
Copied
Also, CMGAP left you a nice link to watch a good video on how to use lumetri to do what you want..
Copy link to clipboard
Copied
Sorry Mark, I don't usually download stuff from the internet. What are the trailers about ? Why would you like me to look at them?
??
Copy link to clipboard
Copied
P.S.
I probably should mention.. I am a retired old motion picture mechanic ( grip) who was always into photography from young age, so it led me to current 'hobby' of editing and shooting my own video now that it's affordable. I am not fond of 'boudoir' still images in general, and nor am I fond of videos with that content. It's just not something I like much, as I'd rather focus on telling simple stories and family oriented material.
I don't know what your motivation is to 'fix' the color problems you're having with sample of still images you supplied, but assume it is just wanting to know about how to fix the problem re: white balance and color, etc. That's why I responded. I have no interest in being involved with an production related to boudoir material.
Hope you're not offended by my preferences re: what I like as a general rule, but it is what it is...
good luck !
Copy link to clipboard
Copied
I get it.
Could then pass me a YouTube video that can help me with my problem to solve it on my own.
I do not mean a youtube video made by you, if not some video where explain how to correct the color in the way that you did with the captures that you uploaded to the forum?
I have found color correction videos but they are very basic always talking about basic things. Sorry for my English grief, I use Google translator.

Copy link to clipboard
Copied
Here you go:
New COLOR MATCH Feature in Adobe Premiere Pro is Awesome! (April 2018) - YouTube
The color match feature in Lumetri can use skin tone only to do the matching, you might end up with some off balance color in other areas of the frame that you will have to manually correct.
MtD
Copy link to clipboard
Copied
I just watched the video that CMGAP left for you... re: Using Lumetri color ...and it's pretty good. Certainly a great way to start using it so you know the basic controls and even some more advanced ones.
I don't use Lumetri, but color stuff ( I guess people call it GRADING, which is synonymous sorta with CORRECTION ) pretty much works the same way regarding most of the operations. Lumetri seems to have some built in special stuff ( like the vignette thing ) but using the color wheels is pretty much the same as what I use...
Don't be afraid of messing things up cause you can always just undo what you've done ( maybe use "save as " as you work on various clips ).. like save as color-1 , save as color-2, etc. etc.
I'll search for a video that uses Lumetri to convert what you want for pic 2....
Copy link to clipboard
Copied
Mark, you're right, there's a lot of junky videos up there showing how to do stuff. The one link you got already is the best to get started.
Then there's this document from Adobe
Color grading workflows in Adobe Premiere Pro CC
It must be really hard to get started with this stuff... I've been doing it a while and can't remember what it was like when first starting out.
Probably was totally confused most of the time.
As noted earlier, look at the bottom part of Neil's message. It is pretty much right on for what you want to do. Lessen saturation a bit for the whole clip, adjust your shadow and highlight using scopes ( I use the RGB parade mostly for that ). That gives you your black and white (shadows and highlights) levels. Also adjust midtones. In my program this is called lift gamma gain. I do lift first, then gain, then gamma as a rule.
After that it's a matter of sampling the color of her dress or blouse.. and I think I used the curves set to hue vs. saturation to get that close to what I wanted for that specific range of color. There's no white in shot, so you can't use a simple tool to get white 'balance'. If you look at brick wall there's light skimming it, and that should look kinda white ..as you do your adjustments.
Then I went to her face (skin tone of face) and did something with that ( probably hue V saturation again with curves). There's other stuff (tint, and so on ) but to be honest I kinda do stuff depending on what's happening as I work, like it's different almost all the time.
If you just get started you'll be glad you did.. and pretty soon you'll have a pretty good idea what's going on,
Good luck !
Copy link to clipboard
Copied
Meg the dog, that is a great feature ! And should get him close to what he wants if not exactly what he wants.
Good going uploading that link !!!
Copy link to clipboard
Copied
Fascinating how we all do things differentely. Especially, when I see a number of people still doing everything from the Effects and ECP panels for every clip for color work. Grabbing color effects then applying them one by one to clips is to me a waste of time. Use the Color workspace which has Lumetri in a panel, which is vastly faster in use than through the ECP.
From the Lumetri panel, as you work down the line, you stop the playhead on a clip, adjust something in the Lumetri controls, and the Lumetri effect is auto-applied to the clip. You don't have to go the Effects panel to drag/drop the effect on a clip ... and THEN go to the controls. Working down a long sequence, that alone saves a ton of time.
And by the by ... the Red Giant Colorista effect can be opened in a panel, and works the same way in panel usage. Work down a sequence, touch the Colorista panel controls, it auto-applies the effect to the clip and adjusts the image according to the controls you are changing. I have two color workspaces, one built around Lumetri, the other Colorista, as they have different strengths.
Next ... why take the time to hunt down & drag/drop the ancient "Fast Color Corrector" when you can do the same things in the Lumetri panel without hunting, drag/drop & etc.
To do this exact set within Lumetri panel you would use the WB eyedropper & sliders, then in ECP set a mask. I typically just use the oval opacity mask, press & hold Shift outside the mask, then click on a mask control point and size the mask small enough to fit on a face, drag to face. Then in Lumetri Curves tab go to the HSL Curves, the Hue vs Hue curve, and drag the line to line up the skin-tone hue.
Or ... instead of moving all the image color, eyedropper the skin to put control points on the Hue vs Hue panel, then click between them and drag up/down to set the skin tones without moving anything else.
As with anything else, there's 50 ways to do it ... and we'll all work differently.
Neil
Copy link to clipboard
Copied
David,
Yea, grading especially at first is awful time-consuming. Well ... and if you get lost in enjoying it, that's a rabbit-hole time sucker too! Done both many times.
It's why I really want to stick with color effects in Premiere that can be run as panels, nut just in the ECP. Because any effect that runs in its own panel can be applied to any clip the CTI is sitting on without the drag/drop step. As noted, I've got two color workspaces, one based on the Lumetri panel, the other on the Colorista panel. I've thought of adding the Colorista to my Lumetri one, just by adding it as a tab in the same panel.
The Lumetri is great to use with my Tangent Elements panel ... and works very well with their Wave2 and Ripple panels as well as those by several other people. Using a control surface DRAMATICALLY speeds your workflow ... double or triple at least. And with the Tangent panels now adding in the ability to control graphics and audio items, along with mapping to about anything you want, they're becoming the Swiss Army knife of Premiere.
A button box is another biggie. SO many of Premiere's keyboard shortcuts are panel-specific, right? So you need to switch panel focus before using them. A button box ... whether it's a gamer rig like the Razer Orbweaver Chroma that I use, the Xkeys, or what's really taken over colorists, the Streamdecks ... makes a huge difference. Program mulitple actions into one button with macros!
So ... switch focus to Program monitor, invoke Global Fx Mute on press & hold the button down ... on release, focus back to Lumetri panel. Right there, that saves a ton of time for me.
Next, splitting tasks in color by proper order, with different instances to do each. First is always neutralize ... try to get a 'normal' looking file no matter what the end result is desired! ... no clipped whites or crushed or lifted blacks, 'neutral' contrast and color balance/saturation. That is a massive key to being able to match clips down the line.
Next ... match the neutralized clips. Which is SO much easier/faster than matching whatever comes into the program.
Now ... check for general skin tones or and general contrast issues, or other crucial color/tonal points. ONLY the crucial things, don't go for everything being perfect. Fix the worst thing, next clip ... next clip ... keep going and DON'T "perfectize" anything or you're gonna be there all night to get done.
It's breaking things down like this, and using separate instances of Lumetri for each step, that makes it possible to work quickly and when needed, go back and correct/refine an earlier task without screwing things up big time.
So scrub to some reasonable general representational point of each clip, touch Lumetri for what you need do, then either keyboard-short to the next clip or scrub that next clip if needed ... tap the controls ... next clip ... and with a panel-based color process, there's no time spent going to the Effects panel to apply anything.
There's an 'auto' correct button in the basic tab of Lumetri, and for some things that's a quick start on tonal work. Same with the color balance ... but I tend to do color well ... and tonal ... both manually as I can do them fast and to my needs just off the top. Without a control surface, I'd probably use the buttons as a starting point more often.
White Balance is exactly what it says ... white balance. It's the precisely same operation as taking the top of each color in the RGB Curves panel. So it changes whites, but has less effect as you go down to the shadows. For some situations it's great. For those with an overall cast including shadows, it's ... limited.
So I quite often do my 'white balance' ... really my main neutral color work, with the Creative tab's Shadow & Highlight color wheels.
I used to do a lot of HSL Secondary work, but since they added the HSL Curves to the Curves tab, I don't make nearly the secondaries I used to. Go through those and learn what they do! They're awesome but ... make a very WIDE Lumetri panel before using them, so the curves 'boxes' are big in the UI. Any slight up/down movement is a major change to your image, so a bigger box makes the change easier to control.
I've got to run, but I'll try & get another tutorial on this on my site ... you can start with this older one though much of what it covers is still spot-on. My patterns have changed some since. But read through this and the newer posts, to get a better handle of what the tools do and how I use them.
I do need to update that a ton ... sigh.
Neil
Copy link to clipboard
Copied
That was a tricky fix in that YouTube ... but shows some of the things you can do at need.
The HSL Curves in Lumetri have pretty much revolutionzed my working process, and I really need to update the blog and get some YouTube up on it.
And ... I'd be happy to do some work with you, although the next month or so is pretty tight for me.
Neil

 AdChoices