 Adobe Community
CUDA Acceleration Colour Shift
Copy link to clipboard
Copied
Hi guys,
Posting this here because for some reason trying to speak to an Adobe employee is impossible.
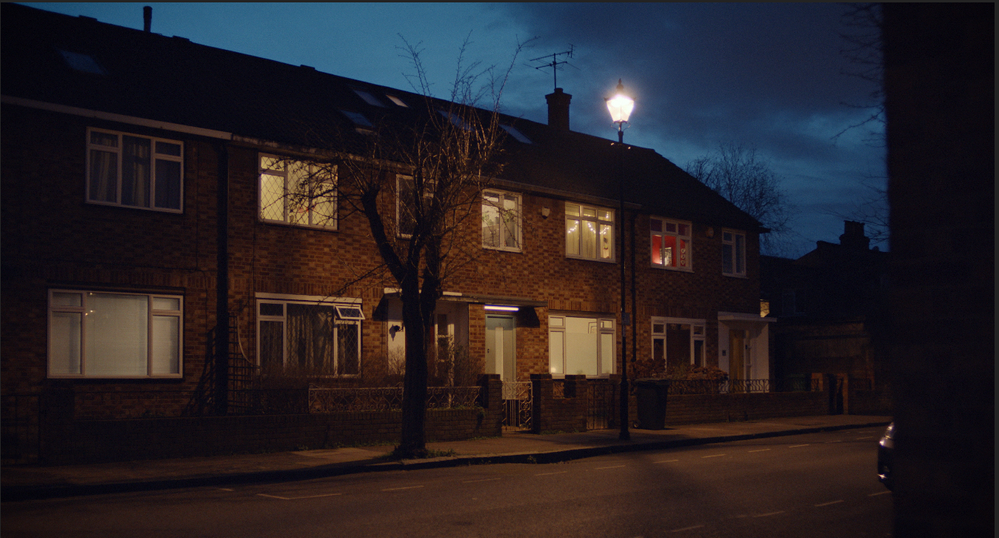
For some reason selecting CUDA Acceleration is causing the black levels to get thrown out of whack in the playback window. This is the frame without CUDA selected :
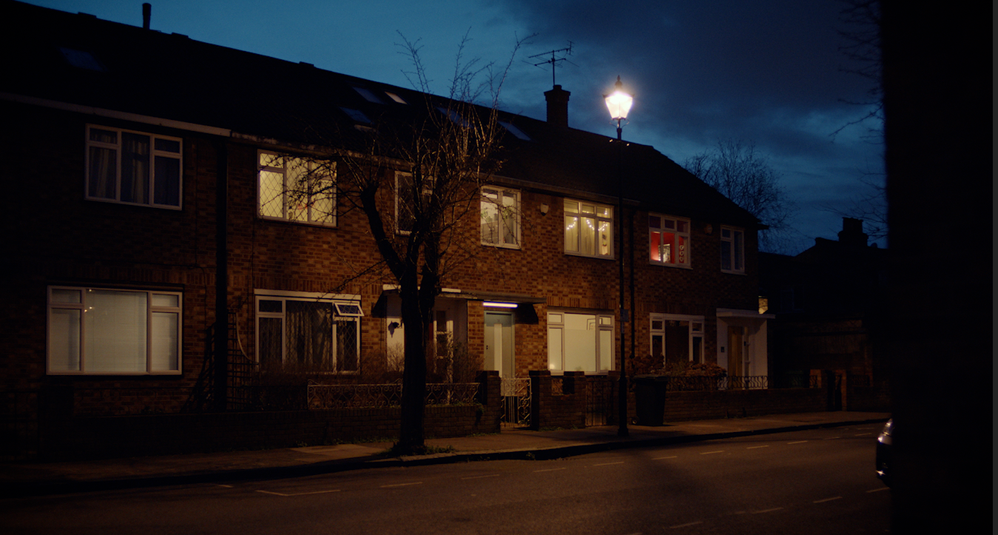
And this is the frame with CUDA :
When I export the video from premiere the black levels are fine again. I really don't understand how CUDA acceleration could possibly have an effect on the black levels? My NVIDIA driver is up to date as is my version of Premiere.
Would love some ideas on this!
Copy link to clipboard
Copied
nvidia control panel 16-235 video levels may cause some differences. also premiere preferences h.264 decoding checkbox.
Copy link to clipboard
Copied
With "Mercury Playback Engine GPU Acceleration" selected but "Display Colour Management" deselected, the colours in the playback window match the exported video in VLC and online. It seems weird that I should have to deselect the colour management in Premiere to get matching colours though - any ideas what might be causing this?
Copy link to clipboard
Copied
For almost all video media, one should leave the video card settings for 'full/legal' (the 0-255/16-235 stuff) either on auto (as in Resolve) or set to 16-235.Which sounds odd, but it DOESN'T mean the monitor will display Rec.709 media 16-235, but it will accept Rec.709 media as 16-235 mapped in the file (which it is) and display it as 0-255 on the screen ... which is the normal and correct process.
Very counter-intuitive, and like nearly everybody else, I got this wrong starting out. I got schooled by the colorists I now work for.
Color management is a morass, really. Different OS do things differently, as for example Apple's ColorSync color managment app uses what they call "sRGB gamma" for Rec.709 media. No one knows what "sRGB gamma" is from any standard though. What ColorSync applies in reality has been reverse-engineered to either 1.95 or 1.96 depending on who does the measuring.
The Rec.709 broadcast standard PrPro is setup to use period is 2.4.
Yea, not the same at all. So there was an issue with the ColorSync on Macs with the Retina monitors. Adobe then came up with the "display color management" option as a way to get the app to look at the ICC profiles of the monitors used and attempt to remap the image within PrPro to correct Rec.709 standards. On a Mac Retina, with DCM on, the image normally looks pretty appropriate for a Rec.709 clip.
It doesn't help though for viewing the file on a Mac after export. Adobe can't tell the OS or ColorSync what to do of course. But ... it can help on a Mac within PrPro.
And at times, it's good even for those on PCs to use. But depending on your gear and calibration processes, maybe ... not. So the user needs to check.
And yea, it's confusing as heck. On my system, I've run a full calibration via i1 Display Pro for Rec.709, and then ran a profile of that calibration to check it running Lightspace (a high-end pro calibration app) connected with Resolve to generate the patches. My graphs came out quite nice, dead-on for all Rec.709 specs. So I do not normally need ... nor in fact should I ... have the DCM option selected.
Many PC users with non-Rec.709 screens however should have DCM 'on'.
And ... if you're working with the Public Beta and trying to "play" with HDR on Windows, you need to have the Windows option for HDR for that monitor enabled and turn on DCM. So ... if I'm in the public beta messing with HDR, I have DCM on. If not, I don't.
In Resolve, there's the "Rec.709-A" export option, and yes, the A stands for Apple. It gives a slightly different NLC 'tag' to the file header, which ColorSync then uses gamma 2.4 while playing the file. So on a Mac with ColorSync, it looks as expected.
However ... on many b-cast compliant systems, with that tag applied, that file now plays too dark and contrasty.
And the above is the simple explanation of things.
Neil
Copy link to clipboard
Copied
Hi Neil,
Thanks for your super thorough reply - I know what you mean about the black levels settings for Resolve exports all too well. That was another total head-scratcher for a while before I found the issue through trial an error hah. Especially when sending files to MAC which I assume had an sRGB display.
I'm on PC and my monitor is set to rec.709 (HP Dreamcolour) so I guess leaving the DCM set to "off" was the right move?
What I still don't understand though is when I switch my monitor to sRGB and turn on DCM the file looks fine in Premiere, terrible everywhere else including online. Changing my the dynamic range on the NVIDIA control panel from limited to full seems to make no difference at all too.
Is it safe to just leave the monitor set to rec.709 for everything and turn off DCM in Premiere?
Copy link to clipboard
Copied
Premiere's window only temporarly transform items from 2.2 into 2.4 and renders 2.2 back out again. that's because srgb is 2.2. chrome uses 1.96. and rec. 709 mostly is 2.4. so you're never going to have a congruent viewing experiece unless you can account for the changes.
Copy link to clipboard
Copied
That's what you've tested and is working on your system. So yes, that's what I would suggest.
And I find the comment from Chris that PrPro "temporarily changes" something from 2.2 to 2.4 a bit odd. Even within his comment, he notes that Rec.709 is 2.4. Which is all PrPro is concerned with. As nearly all video is Rec.709 ... which in use is typically 2.4 ... that's what PrPro works in because it is the correct way to display Rec.709 imagery.
If one is working in a bright office environment of course, then setting the monitor to 2.2 will get approximately the same image viewed as in a semi-dark room with 2.4. So both 2.2 and 2.4 can be allowed as fitting for Rec.709 media depending on viewing environment.
For critical viewing, the semi-dark room and gamma 2.4 are always preferred.
Neil

