 Adobe Community

Copy link to clipboard
Copied
Hello. I have an Adobe Premiere Pro import issue. I have an MP4 file with a frame rate of 50 (see picture Frame rate import) But when I have imported the file, it only has a frame rate of 25 (see picture Frame rate imported) What can I do to solve that problem ?
Best regards
Thomas Frost


 1 Correct answer

As Basil notes, if it's interlaced (which is probable) that can be listed as either 50i or 25 ... as interlaced means there are actually two separate images per frame, an 'upper' and a 'lower'. Each one has every other horizontal line of image pixels. So it takes both half-frames to make a full frame.
There's a half-frame recorded 50 times a second. But only 25 full frames per second.
Neil
 14
Replies
14
14
Replies
14

Copy link to clipboard
Copied
Likely the source is interlaced, use MediaInfo > View > Tree to check
Copy link to clipboard
Copied
As Basil notes, if it's interlaced (which is probable) that can be listed as either 50i or 25 ... as interlaced means there are actually two separate images per frame, an 'upper' and a 'lower'. Each one has every other horizontal line of image pixels. So it takes both half-frames to make a full frame.
There's a half-frame recorded 50 times a second. But only 25 full frames per second.
Neil
Copy link to clipboard
Copied
Hi Neil. Thanks for the explanation. Will it help if the file is recorded in 1080P?
Best regards
Thomas

Copy link to clipboard
Copied
It means your file is likely 1080i50 which can also be denoted at 1080i25. They're the same thing, one favoring fields per second (50) and the other favoring frames per second (25).
You'll want to decide if you want to edit with interlaced video (so, your Sequence settings will also be 1080i50) or deinterlace it, forcing the footage to 1080p25. You could leave it i50 from source to Sequence to edited master or switch to p25 at some point (at the Sequence level or when you export).
All that said... looking at your screenshots, it looks like you might be getting incorrect information in Explorer.
Try checking the file in MediaInfo (freeware published by MediaArea):
https://www.microsoft.com/en-us/p/mediainfo/9nk81654hhv5?activetab=pivot:overviewtab
Although, sometimes you have to manually inspect the footage to verify interlacing. After Effects works really well for this as it allows you to advance to next field rather than next frame in the Footage panel, but you'll have to disable "Separating Fields" in the Interpret Footage dialog box.
Is this a recording of a live sports broadcast? If so, that's a hint that it is indeed 1080i50.
Copy link to clipboard
Copied
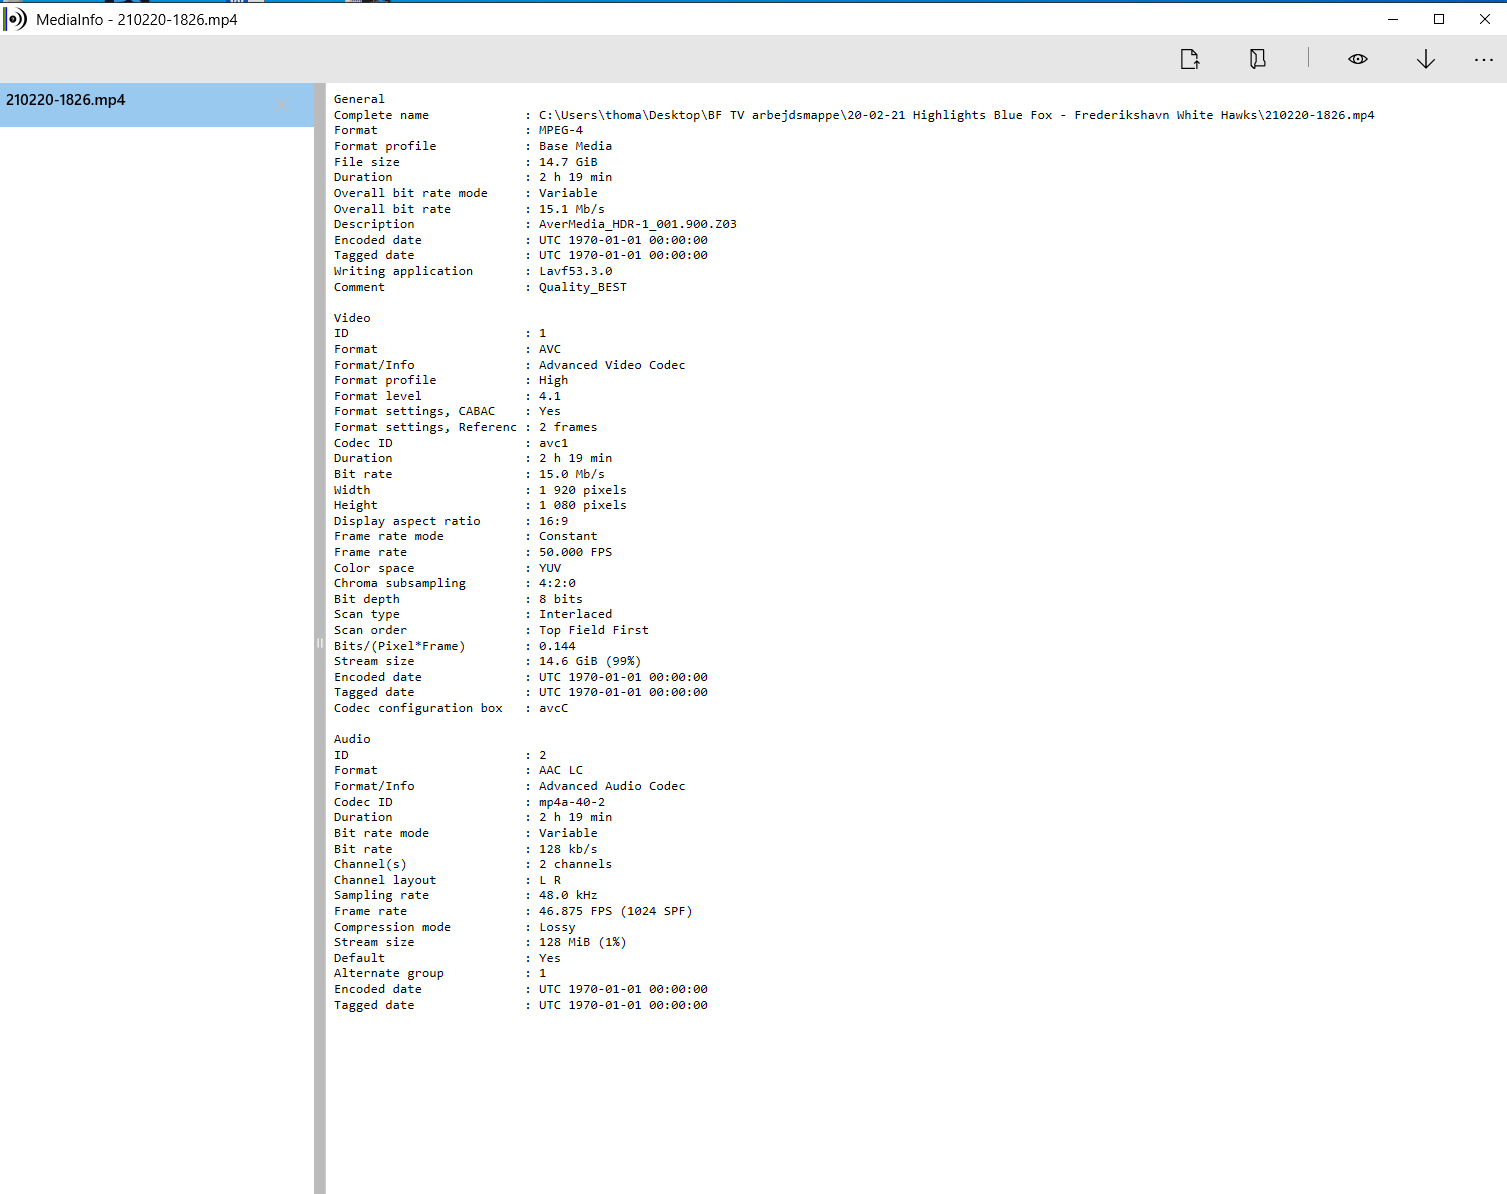
Hi Warren. Thank you for the adequate answer. You can see MediaInfo info on the attached file. You're right that it's a sport. It's the hometown hockey team I make highlights for. Our setup is four cameras that come up on the cube above the ice. We use Roland VR-50HD to edit it and between that and the cube we record the file I use for highlights on a Datavideo hdr-1. Will it help if we change all our settings from 1080i to 1080P?
Best regards
Thomas

Copy link to clipboard
Copied
Please next time:

Copy link to clipboard
Copied

Copy link to clipboard
Copied
MediaInfo to the rescue!
Yes, your source footage is 1080i50 which can also be denoted as 1080i25.
I know, it's a small headache. Add to that that the abbreviations for "frames per second" and "fields per second" are each "fps" and it gets to be too much.
It doesn't help that the MediaInfo category reads "Frame Rate" when it really should read "Field Rate". But, the Scan Type category is the important part.
Copy link to clipboard
Copied
If you equipment allows recording in 1080P, sure, do it. In case it does not, I suggest to check if your 1080i can be deinterlaced into real 50fps. Some files allow it. Download this tool VirtualDub2
Open your 1080i file > Video > Filters.. > Add.. > Bob doubler. If there is no repeated frames, then it works. If thou each 2nd frame is repeated, than you are out of luck.
Copy link to clipboard
Copied
It's probably worth noting that 1080i50 de-interlaces to 1080p25.
Forcing 1080i50 to 1080p50 should be tested all the way through to delivery in that it results in field doubling which may result in a QC failure later.
Copy link to clipboard
Copied
Regarding "Will it help if we change all our settings from 1080i to 1080P?":
A good rule of thumb is to base your edit settings and your source footage settings on your edited master settings - assuming your starting from scratch.
Do you have to deliver interlaced or progressive?
I'd just stick with 1080i50. If you learn that you need 1080p25 later, then you can de-interlace (also called "separating fields") on export from your Premiere Pro Sequence or on transcoding your edited master.
The AVC CODEC is supported for Smart Rendering in Premiere Pro, so I'd make sure that your Sequence Video Previews are also set to AVC and then export to AVC to take advantage of that speed increase. Then drop the AVC edited master into the Queue tab of Adobe Media Encoder if something like an MP4 is needed.
I noticed the mention of 1080p50 elsewhere in the responses. 1080p50 (commonly referred to as frames as fields) is used in sports so it was worth mentioning; however, your source is 1080i50 so 1080p50 does not apply here.
Copy link to clipboard
Copied
Hi again Warren
Thanks for your reply. Our output just needs to be for SoMe (YouTube, Facebook ect.)
The reason I want the 50 fps is that there are ghosts on my camera above the goals when I use them for slow motion at 50% speed.
You can see it in this image.

I found a video on YouTube that showed that it could solve the problem. Is it wrong?
Copy link to clipboard
Copied
@Jesper5C5F Have you seen my suggestion here?
https://community.adobe.com/t5/premiere-pro/frame-rate-import-issue/m-p/11854675#M331379
Copy link to clipboard
Copied
Are you enabling "Optical Flow" in Premiere Pro's Clip Speed/ Duration dialog box? And are you making sure it's still enabled when exporting?


Optical Flow is our best interpolation option on the Premiere Pro side; however, it works better with progressive scan source footage than with interlaced scan source footage.
Timewarp effect in After Effects
After Effects includes an effect called Timewarp that gives us precise control over a wide range of parameters when changing the playback speed (working independently from AE's Frame Blending switch). Important note: With interlaced source footage, you have to double the frame rate of the After Effects Composition. So you would want to manually set it from 25 to 50 and then render 1080 upper field first 25 for return to Premiere Pro. You could try to use Dynamic Link from your PR Sequence to your AE Comp, but I've found when changing the Comp settings so they no longer match the Sequence settings that rendering your Comps is the way to go.
Here's more on the Timewarp effect: https://helpx.adobe.com/after-effects/using/time-effects.html#timewarp_effect
Timewarp is based on Kronos for After Effects (we used to have to buy it separately). You'll definitely want to read up on how to use it for optimal results (Foundry website).
RE:Vision Twixtor
A popular 3rd party plug-in for this is Twixtor and Twixtor Pro. RE:Vision offers a trial version so you can try it before buying it. Even if you don't use it, everything in their "How do I get the most out of Twixtor?" article applies to improving any speed-change option: https://revisionfx.com/faq/how_do_i_get_the_most_out_of_twixtor/.
If you're able to record 50p in the future or higher - give it a try and test it in your workflow. A higher temporal resolution (that is, higher progressive frame rates) almost always makes for improved picture quality when changing playback speed.

 AdChoices