 Adobe Community
Copy link to clipboard
Copied
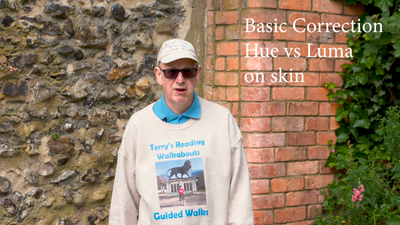
The latest Premiere looks very good! However I watched a vid on how to use "Hue vs Luma" (on Resolve) and tried to use that technique on Premiere. It did much the same thing but upon Render the result was unuseable 😞
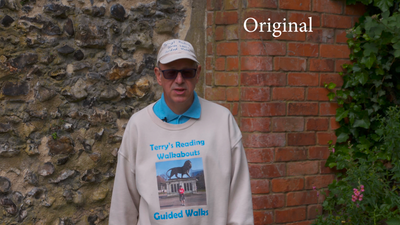
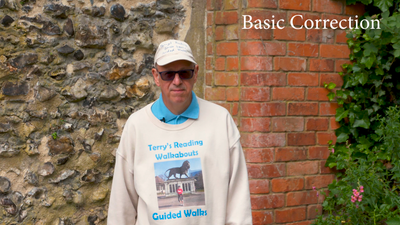
Attached 3 frames, still 1 is from the original. Still 2 has basic correction (up exposure) and still 3 has an additional hue vs Luma. There is only one Lumetri control. On Still 3 you can see some blocking effects - not on the area I wanted to add Luma to. Of course these are "live" when you play the H.264 rendered clip.
Think the original clip was Sony Hypergamma. Was on windows 10 with RTX 2080. Pretty sure I tried hw and sw Render - made no difference.
AVC Intra, 10 bit 422, Rec 709
[Moderator note: I replaced the images for you. Please in the future add images directly into your reply as Ann requested, rather than using the box at the bottom of the reply to attach files.]
 1 Correct answer
That looks like you've got just a bit of video noise and making that Luma adjustment made it more notable. This is a regular part of color work, and why colorists know their noise reduction software (typically Neat 5 at th moment) so well.
Lifting almost anything does have the probability of making any noise there more visible. And getting banding. Inducing blocking artifacts.
There are several strategies to reduce this problem ... first option for this situation, use masking. You can go int
...Copy link to clipboard
Copied
Copy link to clipboard
Copied
I can't see what you're talking about. I do have some experience with Lumetri, so I'll offer some advice.
In general, use the various HSL curves gently, smoothly, and without "sudden" changes in the line going across the curves panel. Understand they change values way too fast, so I always work with the Lumetri panel out wide so the panels are as tall as possible which enables a finer control of the curve.
Plus, I also typically use my Tangent Elements panel with the left (shadow) and right (highlights) color wheels set to "mouse emulation" while working the HSL curves as I have the left ball set to very fine control (much ball movement for small cursor change) and the right ball set to coarse cursor control (small ball movement gets major cursor movement).
I would recommend if you can, setting your mouse or pen to allow you to choose coarse or fine adjustments. Use fine adjustments when working those curves!
And the bottom two ... Luma/Sat and Sat/Sat ... never, ever take a value above the middle starting point! Always lower values, never raise them. I use those two on near every clip, they are wondrous, but ... never ever go above starting levels! You induce issues on doing so.
Now a few words on working color in general ... you will get smoother, less noticeable results if you use multiple tools in small amounts each to get a change rather than trying for the entire change with one tool. Why? Each tool has slightly different math backgrounds to it, and by using 2/3 different tools to affect a change, you are blending that change out in various ways. It does a smoother job with fewer artifacts and damage to the image. And yes, this is a good idea no matter the app, whether Premiere, Resolve, whatever.
Neil
Copy link to clipboard
Copied
Hi,
thanks for the tps. It is possible to see squares and bands on Terry'd sleeve but it looks worse on a movie.
What I was trying to do is raise the brightness just on his face - the cap lid acts as a sunshade.
I'm going to try to upload another clip. On this one you can still see some artefacts on his shirt but if you look at the gravel path on bottom right it looks "alive".
Copy link to clipboard
Copied
That looks like you've got just a bit of video noise and making that Luma adjustment made it more notable. This is a regular part of color work, and why colorists know their noise reduction software (typically Neat 5 at th moment) so well.
Lifting almost anything does have the probability of making any noise there more visible. And getting banding. Inducing blocking artifacts.
There are several strategies to reduce this problem ... first option for this situation, use masking. You can go into the ECP, and there's a mask option as part of the Lumetri effect. Set a mask around the guy's face but excluding the walkway and his shirt. That way you're only lifting his face.
And the strategy about using multiple tools is still applicable.
And ... Neat is your friend. Um ... hope you've got a decent CPU/GPU there ... sigh.
Neil
Copy link to clipboard
Copied
That's a good answer. I will try Neat again but I think I didn't have exposure set high enough.
Copy link to clipboard
Copied
There's a massive debate among colorists ... noise first or last in the processing chain?
More seem to be moving to ... first. But that can take some processing power in reality. And many of them have computers running above $15,000, well above mine ... ha!
So ... the common way those doing this first work is to do the job, then apply Neat to the ECP moved before (above) all other effects. Or you can accomplish the same by applying the Neat effect first but disabling it, by clicking the fx to the left of the effect so there's a line through it. (In Resolve, this can be applied to the first node, but then turned off while working. Turned on for export.)
Then when ready to export from Premiere, Neat will be processed to the media, then the rest of the effects. Thus not affecting say any "grain" you may have added in.
Also ... the temporal noise reduction setting is crucial. 2 frames +/- is good, but 3 frames is better. Three frames takes a heck of a lot more processing. So ... which do you use?
It can take some practice and testing ... before/after, 2-3 frames of temporal, and for X media at Y ISO, what settings do you use within Neat?
I've known people who have started to do noise and a transcode off the bat, then use the results of that to work a project. I've known people who export without Neat, but of course re-import, and immediately run an export of that with Neat applied.
Choices ... so many choices ...
Neil
Copy link to clipboard
Copied
and it's always a trade off between noise and sharpeness when it comes to color correction and noise reduction. I recently supervised the restoration of a film from the 70's and it's truly amazing what you can do now compared with what you could do when the film was originally made (yes I'm that old) and if you're working at a high end post facility as we were, attempting to tweak Neat for each shot was just not realistic from a budgetary standpoint.


