 Adobe Community
- Home
- Premiere Pro
- Discussions
- Identifying the "Extra Frame" of Black at End of V...
- Identifying the "Extra Frame" of Black at End of V...
Identifying the "Extra Frame" of Black at End of Video
Copy link to clipboard
Copied
Bit of a technical question. Want to identify the correct terminolgy to describe what I'm seeing so I can explain it to others, and figure out what exactly is happening here.
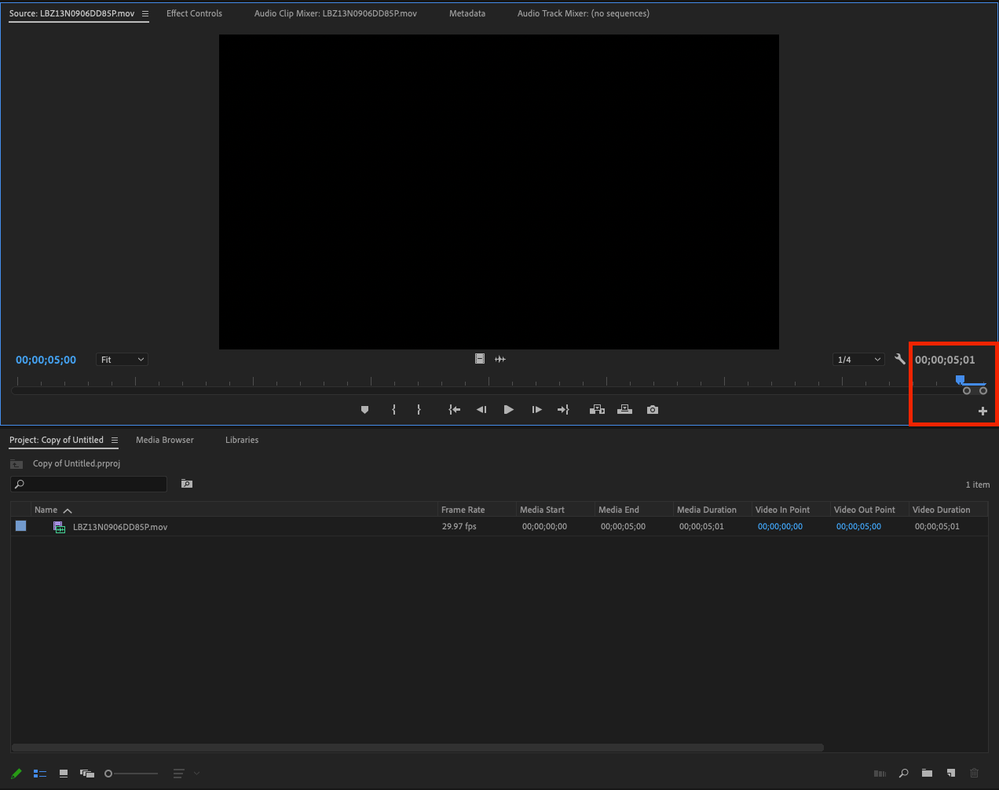
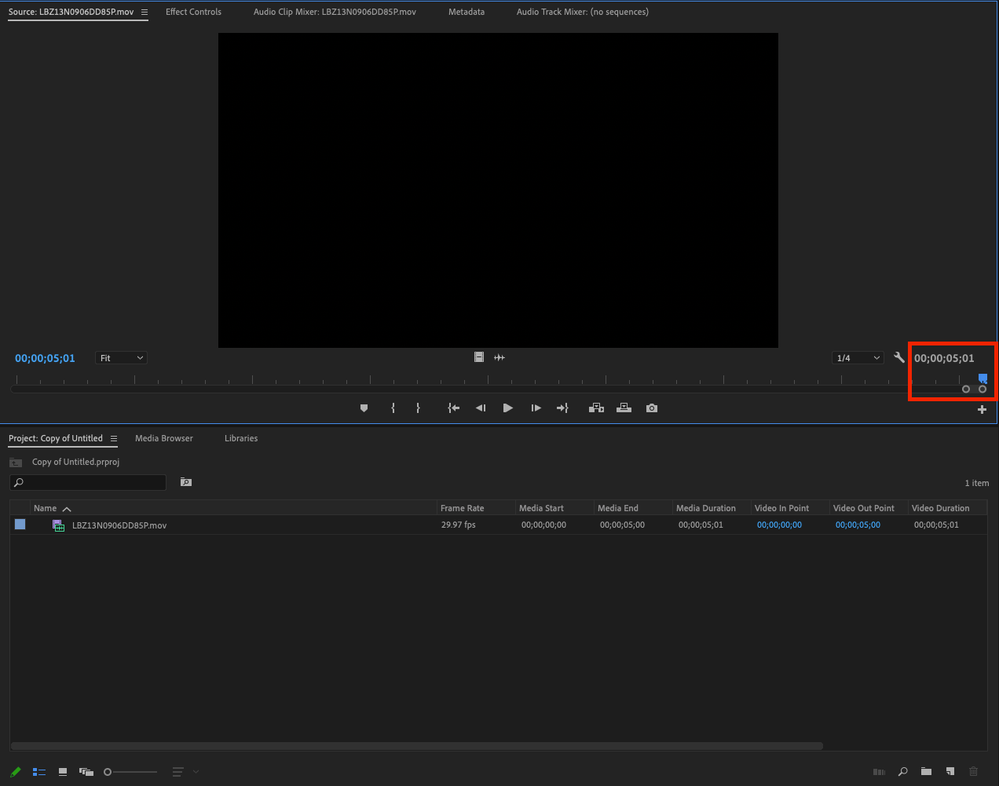
In the Preview monitor I use the up and down arrow keys to navigate to the start(?) and end(?) of a video. However, when I am at the end(?) I can move the playhead over 1 more frame(?). Why does the playhead move over past the end(?) of the video if that extra frame(?) isn't present in the final export? Also, is my terminology correct here?
Copy link to clipboard
Copied
Hello Samuel,
Sorry for the frustration. First of all, you should choose Window > Reset to Saved Layout so we can actually see your timeline.
The blue UI is called the "Playhead." There are no official names to the 3 main parts making up the Playhead. I use my own terminolgy to explain better, and I hope it helps rather than confuses.
- A playhead in any NLE is the indicator in which a frame of video or audio is played at that given time.
- If you zoom into the timeline, you can view the physical nature of the playhead itself.
- On the left side of the playhead is a "needle" like line that drops down which displays the beginning of that specific frame.
- To the right of that needle is a tail that extends from the upper part of the playead, This tail represents the end of that specific frame.
- If you are parked with the playhead using the Down Arrow, you are actually viewing the following clip, not the current clip. So, when you are at the end of the Timeline, you are either previewing the next clip, or if nothing is there, you're seeing "nothing" or Black.
I hope this makes sense, because it's a revelation that throws some people off.
This whole situation can introduce problems when using the Playhead to mark an Out point. You will be marking Out with an extra frame unintentially if you do not move left one frame before marking Out. If you then Delete, Ripple Delete, or Extract, you are then removing an added frame you probably didn't mean to. I like to use Mark Clip as that sets an Out point in the proper place (left one frame).
Let me know if you have any questions.
Thanks,
Kevin
Copy link to clipboard
Copied
Thanks for the info Kevin and Ann. I am familiar with the timeline playhead behavior and setting in/out points. This question is specifically about viewing an exported video clip in the preview monitor. I was trying to determine why I can move the playhead over one more "increment".
When setting the out point in the preview monitor, I cannot place the out point the in furthest right position (when the playhead's tail is off screen). This suggests to me that the far right position is not an "extra frame", it's more of a playhead postion purely for frame value monitoring. @Kevin-Monahan, what does adobe have to say about this?
Copy link to clipboard
Copied
In short: first screenshot shows playhead on the last frame of the clip.
Second screenshot shows playhead past the last frame of the clip. Its not an extra frame.
If this were the timeline, the playhead would be on the first frame of the next clip.
Copy link to clipboard
Copied
In the Preview monitor I use the up and down arrow keys to navigate to the start(?) and end(?) of a video. However, when I am at the end(?) I can move the playhead over 1 more frame(?). Why does the playhead move over past the end(?) of the video if that extra frame(?) isn't present in the final export? Also, is my terminology correct here?
By @samuelm25671648
That extra frame will be in the export if you have two adjacent clips and set an In Point at the start of the first clip and then use Down Arrow to go to the cut and set an Out Point. The very last frame of that export will be the first frame of clip two. Unless you do the same and remember to step one (1) frame back before you set the Out Point.
One way of getting around this is to select the first clip and use the Mark Selection command. Mark Selection is smart enough to understand that the end user do not want the first frame of clip two. On the other hand is Mark Selection, imho, limited and not always usable.
I have seen this discussed before but never got a clear explanation behind it, iow why the frame showed is the frame to the right of the Current Time Indicator/playhead (CTI). I guess that some frame must be shown (of course...) and the frame to the right makes sense because the CTI itself moves to the right when playing back forward.
The downside of this behaviour are several and one of the being when trimming cuts on the timeline using In and Out Points combined with Lift or Extract. One must always step one frame back before setting the Out Point to avoid trimming away one frame too much, iow the frame to the right of the CTI. There have been requests of redesigning this so if the end user sets an Out Point a Lift or Extract edit will not take that one frame to the right of the CTI.
The same way goes for the Source panel. If you set an In Point and advance let´s say 100 frames and set an Out Point you have selected 101 frames instead of the desired 100 frames. So if your drag that clip to the timeline 101 frames will be placed there instead of the expected 100 frames. Very annoying. Going one frame back is a must if you are doing tight edits. And as we know, one frame do make a difference many times in many edits and that´s why it´s annoying. But knowing this helps to workaround the limitation.
I don´t remember, but some video editing apps behave diffrently and do not require this "one step back" all the time when using In and Out Points when doing fine cutting on the timeline.
This has been like this since Premiere Pro 1.0 so i don´t except a change. Sometimes this is a non-issue and sometimes it really makes a difference and add extra steps to the workflow.
Not the best answer, i know... 🙂


